高级控件与屏幕适配
本篇文章主要是记录一下高级控件ListView和CardView的使用方式和注意事项,虽然目前都已经用RecyclerView替代了ListView但是了解其中的原理和优化还是有必要的,关于ListView的原理和真正意义上的优化在后面会专门写一片文章来讲述,本篇只谈其具体使用与必须优化的方式。至于CardView其实用的还是比较多的,可以看到我的小Demo实现的效果还是很不错!最后涉及到了一些Android屏幕适配问题的解决方案。
ListView
Displays a vertically-scrollable collection of views, where each view is positioned immediatelybelow the previous view in the list. For a more modern, flexible, and performant approach to displaying lists, use android.support.v7.widget.RecyclerView.
ListView的基本使用
ListView使用步骤如下:
1、在Layout中创建ListView 2、创建每一行的layout 3、创建每一行的数据 4、用adapter将数据填充到每一行的视图中
条目布局文件 item_app_list.xml
<?xml version="1.0" encoding="utf-8"?>
<LinearLayout
    xmlns:android="http://schemas.android.com/apk/res/android"
    xmlns:tools="http://schemas.android.com/tools"
    android:layout_width="match_parent"
    android:layout_height="match_parent"
    android:padding="10dp"
    android:orientation="horizontal">

    <ImageView
        android:id="@+id/app_icon_iv"
        android:src="@mipmap/ic_launcher"
        android:layout_width="40dp"
        android:layout_height="40dp"/>

    <TextView
        android:id="@+id/app_name_tv"
        android:textSize="20sp"
        android:paddingLeft="10dp"
        android:gravity="center_vertical"
        android:text="@string/app_name"
        android:layout_width="match_parent"
        android:layout_height="40dp"/>
</LinearLayout>
AppListActivity.java
public class AppListActivity extends AppCompatActivity {

    private List<String> appNameList;

    @Override
    protected void onCreate(Bundle savedInstanceState) {
        super.onCreate(savedInstanceState);
        setContentView(R.layout.activity_app_list);

        ListView listView = findViewById(R.id.app_lv);
        appNameList = Arrays.asList("QQ", "微信", "牛客", "招商银行", "支付宝");

        //listView.setAdapter(new AppListAdapterBase());
        listView.setAdapter(new AppListAdapter(getAppInfo()));
    }

    // 获取所有的应用信息
    private List<ResolveInfo> getAppInfo(){
        Intent intent = new Intent(Intent.ACTION_MAIN, null);
        intent.addCategory(Intent.CATEGORY_LAUNCHER);
        return getPackageManager().queryIntentActivities(intent, 0);
    }

    public class AppListAdapter extends  BaseAdapter {
        private List<ResolveInfo> resolveInfoList;

        public AppListAdapter(List<ResolveInfo> appInfo) {
            this.resolveInfoList = appInfo;
        }

        @Override
        public int getCount() {
            return resolveInfoList.size();
        }

        @Override
        public Object getItem(int position) {
            return resolveInfoList.get(position);
        }

        @Override
        public long getItemId(int position) {
            return position;
        }

        @Override
        public View getView(int position, View convertView, ViewGroup parent) {
            LayoutInflater layoutInflater = getLayoutInflater();
            convertView = layoutInflater.inflate(R.layout.item_app_list, null);
            ImageView iv = convertView.findViewById(R.id.app_icon_iv);
            TextView tv = convertView.findViewById(R.id.app_name_tv);
            ResolveInfo resolveInfo = resolveInfoList.get(position);
            tv.setText(resolveInfo.activityInfo.loadLabel(getPackageManager()));
            iv.setImageDrawable(resolveInfo.activityInfo.loadIcon(getPackageManager()));

            // 在这里给每一个条目设置点击事件
            convertView.setOnClickListener((v) -> {
                String packageName = resolveInfo.activityInfo.packageName;
                String className = resolveInfo.activityInfo.name;
                ComponentName componentName = new ComponentName(packageName, className);
                Intent intent = new Intent();
                intent.setComponent(componentName);
                startActivity(intent);
            });
            return convertView;
        }
    }


    // 最基础的数据展示,ImageView是固定的
    public class AppListAdapterBase extends BaseAdapter {

        @Override
        public int getCount() {
            return appNameList.size();
        }

        @Override
        public Object getItem(int position) {
            return appNameList.get(position);
        }

        @Override
        public long getItemId(int position) {
            return position;
        }

        @Override
        public View getView(int position, View convertView, ViewGroup parent) {
            LayoutInflater layoutInflater = getLayoutInflater();
            convertView = layoutInflater.inflate(R.layout.item_app_list, null);
            ImageView iv = convertView.findViewById(R.id.app_icon_iv);
            TextView tv = convertView.findViewById(R.id.app_name_tv);
            tv.setText(appNameList.get(position));
            return convertView;
        }
    }
}
点击事件与长按事件
public class AppListActivity extends AppCompatActivity {

    @Override
    protected void onCreate(Bundle savedInstanceState) {
        super.onCreate(savedInstanceState);
        setContentView(R.layout.activity_app_list);

        ListView listView = findViewById(R.id.app_lv);
        appNameList = Arrays.asList("QQ", "微信", "慕课网", "牛客");

        List<ResolveInfo> resolveInfoList = getAppInfo();
        listView.setAdapter(new AppListAdapter(resolveInfoList));

        // 点击事件写法二
        listView.setOnItemClickListener((parent, view, position, id) -> {
            ResolveInfo resolveInfo = resolveInfoList.get(position);
            String packageName = resolveInfo.activityInfo.packageName;
            String className = resolveInfo.activityInfo.name;
            ComponentName componentName = new ComponentName(packageName, className);
            Intent intent = new Intent();
            intent.setComponent(componentName);
            startActivity(intent);
        });

        // 长按的事件
        listView.setOnItemLongClickListener((parent, view, position, id) -> {
            AlertDialog.Builder builder = new AlertDialog.Builder(this);
            builder.setTitle("提示");
            builder.setMessage("确定删除吗?");
            builder.setPositiveButton("确定", (dialog, which) -> {
                // 移除此条目
                resolveInfoList.remove(position);
                listView.setAdapter(new AppListAdapter(resolveInfoList));
            });
            builder.setNegativeButton("取消", null);
            builder.show();
            return false;
        });
    }

    // 获取所有的应用信息
    private List<ResolveInfo> getAppInfo(){
        Intent intent = new Intent(Intent.ACTION_MAIN, null);
        intent.addCategory(Intent.CATEGORY_LAUNCHER);
        return getPackageManager().queryIntentActivities(intent, 0);
    }

    public class AppListAdapter extends  BaseAdapter {
        private List<ResolveInfo> resolveInfoList;

        public AppListAdapter(List<ResolveInfo> appInfo) {
            this.resolveInfoList = appInfo;
        }

        @Override
        public int getCount() {
            return resolveInfoList.size();
        }

        @Override
        public Object getItem(int position) {
            return resolveInfoList.get(position);
        }

        @Override
        public long getItemId(int position) {
            return position;
        }

        @Override
        public View getView(int position, View convertView, ViewGroup parent) {
            LayoutInflater layoutInflater = getLayoutInflater();
            convertView = layoutInflater.inflate(R.layout.item_app_list, null);
            ImageView iv = convertView.findViewById(R.id.app_icon_iv);
            TextView tv = convertView.findViewById(R.id.app_name_tv);
            ResolveInfo resolveInfo = resolveInfoList.get(position);
            tv.setText(resolveInfo.activityInfo.loadLabel(getPackageManager()));
            iv.setImageDrawable(resolveInfo.activityInfo.loadIcon(getPackageManager()));
            // 点击事件写法一
            convertView.setOnClickListener((v) -> {
                String packageName = resolveInfo.activityInfo.packageName;
                String className = resolveInfo.activityInfo.name;
                ComponentName componentName = new ComponentName(packageName, className);
                Intent intent = new Intent();
                intent.setComponent(componentName);
                startActivity(intent);
            });
            return convertView;
        }
    }
}
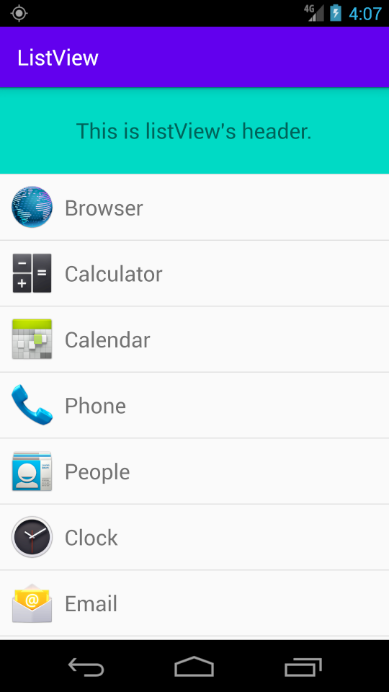
设置HeaderView与FooterView
header_app_list.xml
<?xml version="1.0" encoding="utf-8"?>
<LinearLayout
    xmlns:android="http://schemas.android.com/apk/res/android"
    android:layout_width="match_parent"
    android:layout_height="match_parent"
    android:orientation="vertical">

    <TextView
        android:gravity="center"
        android:textSize="20sp"
        android:text="This is listView's header."
        android:id="@+id/header_app_list_iv"
        android:background="@color/colorAccent"
        android:layout_width="match_parent"
        android:layout_height="80dp"/>

</LinearLayout>
AppListActivity.java(其实只需要在setAdapter之前做一个addHeaderView的操作即可)
public class AppListActivity extends AppCompatActivity {

    private List<String> appNameList;

    @Override
    protected void onCreate(Bundle savedInstanceState) {
        super.onCreate(savedInstanceState);
        setContentView(R.layout.activity_app_list);

        ListView listView = findViewById(R.id.app_lv);
        appNameList = Arrays.asList("QQ", "微信", "慕课网", "牛客", "招商银行");

        // 增加头Header
        listView.addHeaderView(getLayoutInflater().inflate(R.layout.header_app_list, null));

        List<ResolveInfo> resolveInfoList = getAppInfo();
        listView.setAdapter(new AppListAdapter(resolveInfoList));

        // 点击事件写法二
        listView.setOnItemClickListener((parent, view, position, id) -> {
            ResolveInfo resolveInfo = resolveInfoList.get(position);
            String packageName = resolveInfo.activityInfo.packageName;
            String className = resolveInfo.activityInfo.name;
            ComponentName componentName = new ComponentName(packageName, className);
            Intent intent = new Intent();
            intent.setComponent(componentName);
            startActivity(intent);
        });

        // 长按的事件
        listView.setOnItemLongClickListener((parent, view, position, id) -> {
            AlertDialog.Builder builder = new AlertDialog.Builder(this);
            builder.setTitle("提示");
            builder.setMessage("确定删除吗?");
            builder.setPositiveButton("确定", (dialog, which) -> {
                resolveInfoList.remove(position);
                listView.setAdapter(new AppListAdapter(resolveInfoList));
            });
            builder.setNegativeButton("取消", null);
            builder.show();
            return false;
        });
    }

    // 获取所有的应用信息
    private List<ResolveInfo> getAppInfo(){
        Intent intent = new Intent(Intent.ACTION_MAIN, null);
        intent.addCategory(Intent.CATEGORY_LAUNCHER);
        return getPackageManager().queryIntentActivities(intent, PackageManager.MATCH_ALL);
    }

    public class AppListAdapter extends  BaseAdapter {
        private List<ResolveInfo> resolveInfoList;

        public AppListAdapter(List<ResolveInfo> appInfo) {
            this.resolveInfoList = appInfo;
        }

        @Override
        public int getCount() {
            return resolveInfoList.size();
        }

        @Override
        public Object getItem(int position) {
            return resolveInfoList.get(position);
        }

        @Override
        public long getItemId(int position) {
            return position;
        }

        @Override
        public View getView(int position, View convertView, ViewGroup parent) {
            LayoutInflater layoutInflater = getLayoutInflater();
            convertView = layoutInflater.inflate(R.layout.item_app_list, null);
            ImageView iv = convertView.findViewById(R.id.app_icon_iv);
            TextView tv = convertView.findViewById(R.id.app_name_tv);
            ResolveInfo resolveInfo = resolveInfoList.get(position);
            tv.setText(resolveInfo.activityInfo.loadLabel(getPackageManager()));
            iv.setImageDrawable(resolveInfo.activityInfo.loadIcon(getPackageManager()));
            return convertView;
        }
    }
}
ListView的优化
真正意义上的优化: http://www.xuanyusong.com/archives/1252
public class AppListActivity extends AppCompatActivity {

    private List<String> appNameList;

    @Override
    protected void onCreate(Bundle savedInstanceState) {
        super.onCreate(savedInstanceState);
        setContentView(R.layout.activity_app_list);

        ListView listView = findViewById(R.id.app_lv);
        appNameList = Arrays.asList("QQ", "微信", "慕课网", "牛客", "招商银行", "支付宝");

        // 增加头Header
        listView.addHeaderView(getLayoutInflater().inflate(R.layout.header_app_list, null));

        List<ResolveInfo> resolveInfoList = getAppInfo();
        listView.setAdapter(new AppListAdapter(resolveInfoList));
    }

    // 获取所有的应用信息
    private List<ResolveInfo> getAppInfo(){
        Intent intent = new Intent(Intent.ACTION_MAIN, null);
        intent.addCategory(Intent.CATEGORY_LAUNCHER);
        return getPackageManager().queryIntentActivities(intent, 0);
    }

    public class AppListAdapter extends  BaseAdapter {
        private List<ResolveInfo> resolveInfoList;

        public AppListAdapter(List<ResolveInfo> appInfo) {
            this.resolveInfoList = appInfo;
        }

        @Override
        public int getCount() {
            return resolveInfoList.size();
        }

        @Override
        public Object getItem(int position) {
            return resolveInfoList.get(position);
        }

        @Override
        public long getItemId(int position) {
            return position;
        }

        @Override
        public View getView(int position, View convertView, ViewGroup parent) {
            ViewHolder viewHolder;
            if(convertView == null){
                LayoutInflater layoutInflater = getLayoutInflater();
                convertView = layoutInflater.inflate(R.layout.item_app_list, null);
                viewHolder = new ViewHolder();
                viewHolder.imageView = convertView.findViewById(R.id.app_icon_iv);
                viewHolder.textView = convertView.findViewById(R.id.app_name_tv);
                convertView.setTag(viewHolder);
            }else{
                viewHolder = (ViewHolder) convertView.getTag();
            }
            ResolveInfo resolveInfo = resolveInfoList.get(position);
            viewHolder.textView.setText(resolveInfo.activityInfo.loadLabel(getPackageManager()));
            viewHolder.imageView.setImageDrawable(resolveInfo.activityInfo.loadIcon(getPackageManager()));
            return convertView;
        }
    }

    // ViewHolder
    private static class ViewHolder {
        public ImageView imageView;
        public TextView textView;
    }
}
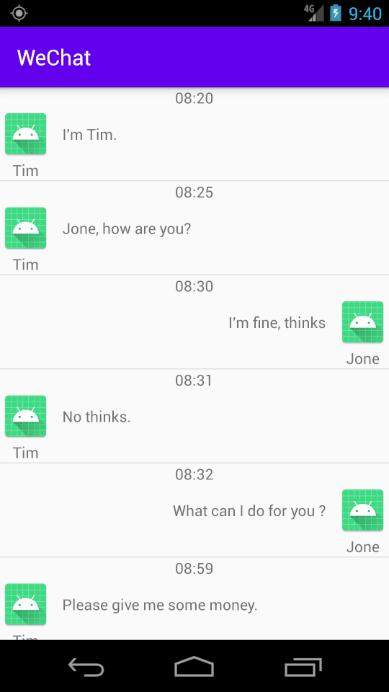
条目布局分类加载
item_left_chat.xml
<?xml version="1.0" encoding="utf-8"?>
<androidx.constraintlayout.widget.ConstraintLayout
    xmlns:android="http://schemas.android.com/apk/res/android"
    xmlns:app="http://schemas.android.com/apk/res-auto"
    xmlns:tools="http://schemas.android.com/tools"
    android:layout_width="match_parent"
    android:layout_height="match_parent">

    <TextView
        android:id="@+id/time_tv"
        android:layout_width="wrap_content"
        android:layout_height="wrap_content"
        android:text="21:52"
        app:layout_constraintEnd_toEndOf="parent"
        app:layout_constraintStart_toStartOf="parent"
        tools:ignore="MissingConstraints" />

    <ImageView
        android:id="@+id/icon_iv"
        android:src="@mipmap/ic_launcher"
        android:layout_width="wrap_content"
        android:layout_height="wrap_content"
        app:layout_constraintTop_toBottomOf="@+id/time_tv"
        tools:ignore="MissingConstraints"
        />

    <TextView
        android:id="@+id/name_tv"
        android:layout_width="wrap_content"
        android:layout_height="wrap_content"
        android:text="Tim"
        app:layout_constraintEnd_toEndOf="@+id/icon_iv"
        app:layout_constraintStart_toStartOf="@+id/icon_iv"
        app:layout_constraintTop_toBottomOf="@+id/icon_iv" />

    <TextView
        android:id="@+id/content_tv"
        android:layout_width="wrap_content"
        android:layout_height="wrap_content"
        android:text="Hello, how are you?"
        android:paddingStart="10sp"
        app:layout_constraintBottom_toBottomOf="@+id/icon_iv"
        app:layout_constraintStart_toEndOf="@+id/icon_iv"
        app:layout_constraintTop_toTopOf="@+id/icon_iv"
        tools:ignore="MissingConstraints" />
</androidx.constraintlayout.widget.ConstraintLayout>
item_right_chat.xml
<?xml version="1.0" encoding="utf-8"?>
<androidx.constraintlayout.widget.ConstraintLayout xmlns:android="http://schemas.android.com/apk/res/android"
    xmlns:app="http://schemas.android.com/apk/res-auto"
    xmlns:tools="http://schemas.android.com/tools"
    android:layout_width="match_parent"
    android:layout_height="match_parent">

    <TextView
        android:id="@+id/time_tv"
        android:layout_width="wrap_content"
        android:layout_height="wrap_content"
        android:text="21:52"
        app:layout_constraintEnd_toEndOf="parent"
        app:layout_constraintStart_toStartOf="parent"
        tools:ignore="MissingConstraints" />

    <TextView
        android:id="@+id/name_tv"
        android:layout_width="wrap_content"
        android:layout_height="wrap_content"
        android:text="Tim"
        app:layout_constraintEnd_toEndOf="@+id/icon_iv"
        app:layout_constraintStart_toStartOf="@+id/icon_iv"
        app:layout_constraintTop_toBottomOf="@+id/icon_iv" />

    <TextView
        android:id="@+id/content_tv"
        android:layout_width="wrap_content"
        android:layout_height="wrap_content"
        android:text="Hello, how are you?"
        android:paddingEnd="10sp"
        app:layout_constraintBottom_toBottomOf="@+id/icon_iv"
        app:layout_constraintEnd_toStartOf="@+id/icon_iv"
        app:layout_constraintTop_toTopOf="@+id/icon_iv"
        tools:ignore="MissingConstraints" />

    <ImageView
        android:id="@+id/icon_iv"
        android:layout_width="wrap_content"
        android:layout_height="wrap_content"
        android:src="@mipmap/ic_launcher"
        app:layout_constraintEnd_toEndOf="parent"
        app:layout_constraintTop_toBottomOf="@+id/time_tv"
        tools:ignore="MissingConstraints" />
</androidx.constraintlayout.widget.ConstraintLayout>
现在拥有item_left_chat.xml和item_right_chat.xml两个布局,所以只需要做好分类布局加载就好了:
public class MainActivity extends AppCompatActivity {

    @Override
    protected void onCreate(Bundle savedInstanceState) {
        super.onCreate(savedInstanceState);
        setContentView(R.layout.activity_main);
        ListView listView = findViewById(R.id.main_lv);
        List<ChatMessage> chatMessages = Arrays.asList(
                new ChatMessage(1, 2, "Tim", "08:20", "I'm Tim.", true),
                new ChatMessage(1, 2, "Tim", "08:25", "Jone, how are you?", true),
                new ChatMessage(2, 1, "Jone", "08:30", "I'm fine, thinks", false),
                new ChatMessage(1, 2, "Tim", "08:31", "No thinks.", true),
                new ChatMessage(2, 1, "Jone", "08:32", "What can I do for you ?", false),
                new ChatMessage(1, 2, "Tim", "08:59", "Please give me some money.", true)
        );
        listView.setAdapter(new ChatMessageAdapter(chatMessages, MainActivity.this));

    }

    static class ChatMessage {
        public int mId;
        public int mFriendId;
        public String mName;
        public String mDate;
        public String mContent;
        public boolean mIsComeMessage;

        public ChatMessage(int mId, int mFriendId,
                           String mName, String mDate,
                           String mContent, boolean mIsComeMessage) {
            this.mId = mId;
            this.mFriendId = mFriendId;
            this.mName = mName;
            this.mDate = mDate;
            this.mContent = mContent;
            this.mIsComeMessage = mIsComeMessage;
        }
    }

    static class ChatMessageAdapter extends BaseAdapter {
        List<ChatMessage> chatMessages;
        Context context;

        interface IMessageViewType {
            int COM_MESSAGE = 1;
            int TO_MESSAGE = 2;
        }

        public ChatMessageAdapter(List<ChatMessage> chatMessages, Context context) {
            this.chatMessages = chatMessages;
            this.context = context;
        }

        @Override
        public int getCount() {
            return chatMessages.size();
        }

        @Override
        public Object getItem(int position) {
            return chatMessages.get(position);
        }

        @Override
        public long getItemId(int position) {
            return position;
        }

        @Override
        public View getView(int position, View convertView, ViewGroup parent) {
            LayoutInflater layoutInflater = (LayoutInflater) context.getSystemService(Context.LAYOUT_INFLATER_SERVICE);
            ChatMessage chatMessage = chatMessages.get(position);
            if(convertView == null){
                if(chatMessage.mIsComeMessage){
                    convertView = layoutInflater.inflate(R.layout.item_left_chat, null);
                }else{
                    convertView = layoutInflater.inflate(R.layout.item_right_chat, null);
                }
                TextView timeTv = convertView.findViewById(R.id.time_tv);
                ImageView iconIv = convertView.findViewById(R.id.icon_iv);
                TextView nameTv = convertView.findViewById(R.id.name_tv);
                TextView contentTv = convertView.findViewById(R.id.content_tv);
                timeTv.setText(chatMessage.mDate);
                nameTv.setText(chatMessage.mName);
                contentTv.setText(chatMessage.mContent);
            }
            return convertView;
        }

        @Override
        public int getItemViewType(int position) {
            ChatMessage chatMessage = chatMessages.get(position);
            return chatMessage.mIsComeMessage ?
                IMessageViewType.COM_MESSAGE : IMessageViewType.TO_MESSAGE;
        }

        @Override
        public int getViewTypeCount() {
            return 2; // IMessageViewType 两种类型
        }
    }
}
CardView
CardView是用于实现卡片式布局效果的重要控件,实际上也是一个FrameLayout,只是额外提供了圆角和阴影,看上去有立体效果。
CardView是什么?
- Android5.0之后新增
- com.android.support:cardview-v7:26.1.0独立引入
- 继承自FrameLayout,方便作为其他控件容器,添加3D阴影和圆角效果
CardView常用属性
- cardBackgroundColor设置背景色
- cardCornerRadius设置圆角半径
- contentPadding 设置内部padding
- cardElevation设置阴影大小
- cardUseCompatPadding 默认为false,用于5.0及以上,true则添加额外的padding绘制阴影
- cardPreventCornerOverlap 默认为true,用于5.0以下,添加额外的padding,防止内容和圆角重叠
CardView的常用属性
引入CardView的依赖
implementation 'androidx.cardview:cardview:1.0.0'
一个VardView的小Demo:
<?xml version="1.0" encoding="utf-8"?>
<FrameLayout xmlns:android="http://schemas.android.com/apk/res/android"
    xmlns:tools="http://schemas.android.com/tools"
    android:layout_width="match_parent"
    android:layout_height="match_parent"
    xmlns:app="http://schemas.android.com/apk/res-auto"
    tools:context=".MainActivity">

    <!--
    cardBackgroundColor:设置背景色
    cardCornerRadius:设置圆角
    cardElevation:设置阴影
    contentPadding:设置内部padding
    -->
    <androidx.cardview.widget.CardView
        android:layout_gravity="center"
        app:cardBackgroundColor="@color/colorAccent"
        app:cardCornerRadius="10dp"
        app:cardElevation="5dp"
        app:contentPadding="10dp"
        android:layout_width="wrap_content"
        android:layout_height="wrap_content">

        <TextView
            android:layout_width="200dp"
            android:layout_height="50dp"
            android:text="Hello World!"
            android:gravity="center"
            android:layout_gravity="center"
            />
    </androidx.cardview.widget.CardView>
</FrameLayout>
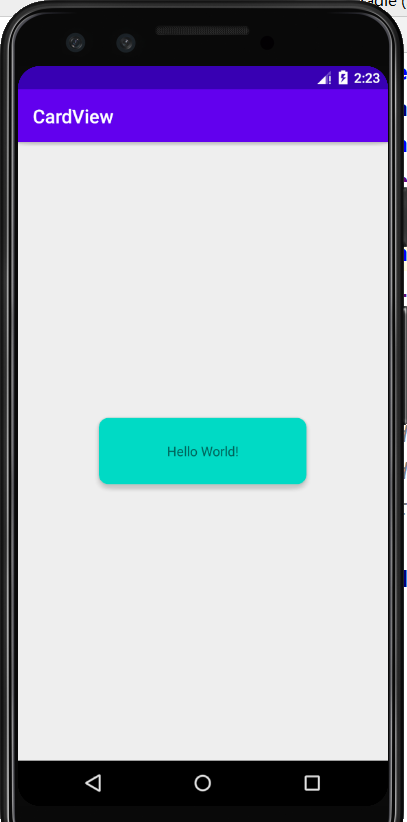
其实可以看到CardView还真的是有种卡片效果的。常用的属性如下:
| 属性 | 作用 |
|---|---|
| card_view:cardElevation | 阴影的大小 |
| card_view:cardMaxElevation | 阴影最大高度 |
| card_view:cardBackgroundColor | 卡片的背景色 |
| card_view:cardCornerRadius | 卡片的圆角大小 |
| card_view:contentPadding | 卡片内容于边距的间隔 |
| card_view:contentPaddingBottom | 卡片内容与底部的边距 |
| card_view:contentPaddingTop | 卡片内容与顶部的边距 |
| card_view:contentPaddingLeft | 卡片内容与左边的边距 |
| card_view:contentPaddingRight | 卡片内容与右边的边距 |
| card_view:contentPaddingStart | 卡片内容于边距的间隔起始 |
| card_view:contentPaddingEnd | 卡片内容于边距的间隔终止 |
| card_view:cardUseCompatPadding | 设置内边距,V21+的版本和之前的版本仍旧具有一样的计算方式 |
| card_view:cardPreventCornerOverlap | 在V20和之前的版本中添加内边距,这个属性为了防止内容和边角的重叠 |
CardView使用示例
先把展示的图片发放在drawable下的xxhdpi下:分别是img01-img05。
item_msg.xml ,这是ListView的条目布局:
<?xml version="1.0" encoding="utf-8"?>
<FrameLayout xmlns:android="http://schemas.android.com/apk/res/android"
    android:layout_width="match_parent"
    android:layout_height="wrap_content"
    xmlns:tools="http://schemas.android.com/tools"
    xmlns:app="http://schemas.android.com/apk/res-auto">

    <androidx.cardview.widget.CardView
        app:cardCornerRadius="8dp"
        app:cardElevation="5dp"
        app:cardUseCompatPadding="false"
        android:layout_marginLeft="16dp"
        android:layout_marginRight="16dp"
        android:layout_marginTop="8dp"
        android:layout_marginBottom="8dp"
        android:layout_width="match_parent"
        android:layout_height="wrap_content">
        <LinearLayout
            android:orientation="vertical"
            android:layout_width="match_parent"
            android:layout_height="wrap_content">
            <ImageView
                android:id="@+id/item_icon_iv"
                android:scaleType="centerCrop"
                tools:src="@drawable/img01"
                android:layout_width="match_parent"
                android:layout_height="wrap_content"/>

            <TextView
                android:id="@+id/item_title_tv"
                android:layout_margin="8dp"
                android:textColor="#000000"
                android:textSize="16sp"
                android:textStyle="bold"
                tools:text="一起来学习Android技术"
                android:layout_width="match_parent"
                android:layout_height="wrap_content"/>

            <TextView
                android:id="@+id/item_content_tv"
                android:layout_margin="8dp"
                android:textColor="#000000"
                android:layout_marginLeft="8dp"
                android:layout_marginRight="8dp"
                android:layout_marginBottom="8dp"
                tools:text="一起来学习Android技术, 一起来学习Android技术。"
                android:layout_width="match_parent"
                android:layout_height="wrap_content"/>
        </LinearLayout>
    </androidx.cardview.widget.CardView>
</FrameLayout>
main_activity.xml
<?xml version="1.0" encoding="utf-8"?>
<ListView
    xmlns:android="http://schemas.android.com/apk/res/android"
    xmlns:app="http://schemas.android.com/apk/res-auto"
    xmlns:tools="http://schemas.android.com/tools"
    android:layout_width="match_parent"
    android:layout_height="match_parent"
    android:id="@+id/id_listview_msg_list"
    android:divider="@null"
    android:background="#ffffff"
    android:paddingTop="8dp"
    tools:context=".MainActivity">


</ListView>
MainActivity.java
public class MainActivity extends AppCompatActivity {
@Override
protected void onCreate(Bundle savedInstanceState) {
super.onCreate(savedInstanceState);
this.setTitle("CardView测试");
setContentView(R.layout.activity_main);
ListView msgListView = findViewById(R.id.id_listview_msg_list);
List<Msg> messageList = Arrays.asList(
new Msg(1, R.drawable.img01, "如何才能不错过人工智能的时代?", "下一个时代就是机器学习的时代,与你一起预见未来!"),
new Msg(2, R.drawable.img02, "关于你的面试、实习心路历程", "奖品丰富,更设有参与奖,随机抽取5名幸运用户,获得付费面试课程中的任意一门!"),
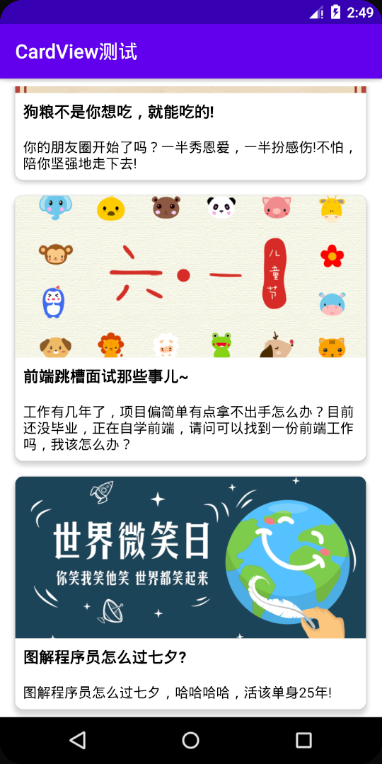
new Msg(3, R.drawable.img03, "狗粮不是你想吃,就能吃的!", "你的朋友圈开始了吗?一半秀恩爱,一半扮感伤!不怕,陪你坚强地走下去!"),
new Msg(4, R.drawable.img04, "前端跳槽面试那些事儿~", "工作有几年了,项目偏简单有点拿不出手怎么办?目前还没毕业,正在自学前端,请问可以找到一份前端工作吗,我该怎么办?"),
new Msg(5, R.drawable.img05, "图解程序员怎么过七夕?", "图解程序员怎么过七夕,哈哈哈哈,活该单身25年!")
);
msgListView.setAdapter(new MoocAdapter(messageList));
}
class MoocAdapter extends BaseAdapter {
private List<Msg> msgList;
public MoocAdapter(List<Msg> msgList) {
this.msgList = msgList;
}
@Override
public int getCount() {
return msgList.size();
}
@Override
public Object getItem(int position) {
return msgList.get(position);
}
@Override
public long getItemId(int position) {
return position;
}
@Override
public View getView(int position, View convertView, ViewGroup parent) {
ViewHolder viewHolder;
if(convertView == null){
convertView = View.inflate(MainActivity.this, R.layout.item_msg, null);
//convertView = getLayoutInflater().inflate(R.layout.item_msg, null);
viewHolder = new ViewHolder();
viewHolder.iconImageView = convertView.findViewById(R.id.item_icon_iv);
viewHolder.titleTextView = convertView.findViewById(R.id.item_title_tv);
viewHolder.contentTextView = convertView.findViewById(R.id.item_content_tv);
convertView.setTag(viewHolder);
}else{
viewHolder = (ViewHolder) convertView.getTag();
}
Msg msg = msgList.get(position);
viewHolder.contentTextView.setText(msg.getContent());
viewHolder.titleTextView.setText(msg.getTitle());
viewHolder.iconImageView.setImageResource(msg.getImgResId());
return convertView;
}
}
static class ViewHolder {
ImageView iconImageView;
TextView titleTextView;
TextView contentTextView;
}
}
@Data
@AllArgsConstructor
@NoArgsConstructor
class Msg {
private int id;
private int imgResId;
private String title;
private String content;
}
看看最终的展示效果:
这里用到了lombok这款插件,那就顺便说一下lombok在Android开发中如何使用吧。
使用tools工具预览
<!-- 引入tools命令空间 -->
xmlns:tools="http://schemas.android.com/tools"

<TextView
      android:id="@+id/item_title_tv"
      android:layout_margin="8dp"
      android:textColor="#000000"
      android:textSize="16sp"
      android:textStyle="bold"
      tools:text="一起来学习Android技术"
      android:layout_width="match_parent"
      android:layout_height="wrap_content"/>
使用tools工具可以进行控件效果预览,如果直接写了android:text=XXX,那么很可能在数据无法正确加载的情况下显示出我们定义的android:text属性,所以无论是ImageView还是TextView等需要添加数据才可以预览的情况都可以使用tools这个命名空间。
Lombok在Android中的使用
引入lombok的依赖:
// 这是CardView的依赖
implementation 'androidx.cardview:cardview:1.0.0'
// 配置Lombok注解处理器
annotationProcessor group: 'org.projectlombok', name: 'lombok', version: '1.18.12'
// 声明lombok的依赖作用域
compileOnly(group: 'org.projectlombok', name: 'lombok', version: '1.18.12')
安装Lombok的插件:
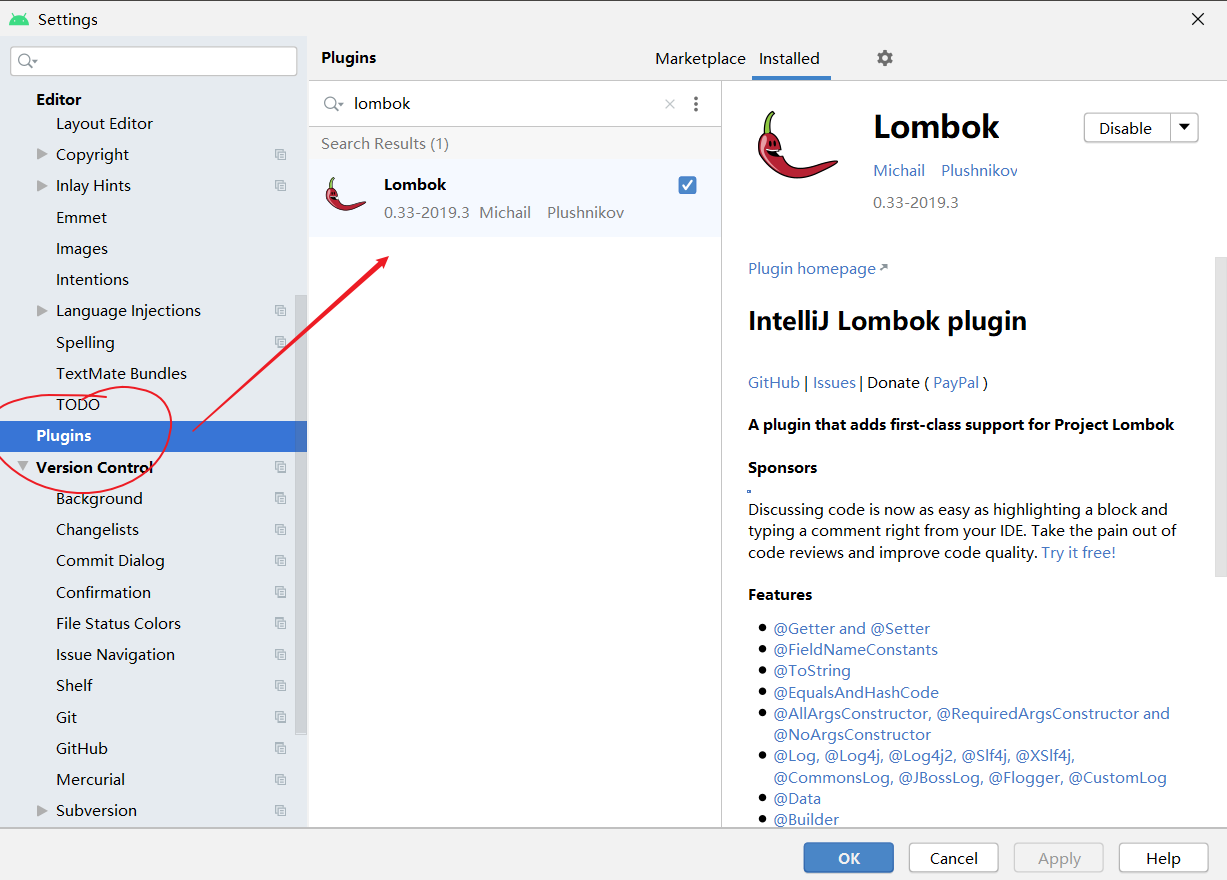
安装好插件后重启AndroidStudio即可使用Lombok插件。
最后别忘了在moudle或者project底下新建一个lombok.config:
lombok.anyConstructor.suppressConstructorProperties=true
然后开始愉快的写代码吧 ~
编译时编码错误解决方案
android {
    compileSdkVersion ...
    buildToolsVersion "..."

    // 指定编码为UTF-8
    compileOptions {
        encoding "UTF-8"
    }
    ...
}
Android屏幕适配
这个专门放置一篇博客!