Assistant与ReACT探究
最近OpenAI发布了Assistants API,允许在自己的应用程序中构建 AI 助手。Assistants API 目前支持三种类型的工具:Code Interpreter、Knowledge Retrieval、Function calling,还有对File的支持,其实网上已经有很多探讨Assistants API的使用方式的文章,主要参考API: https://platform.openai.com/docs/assistants/overview ,个人觉得这套工具其实本质实现了一个简单的ReAct模型,并且通过Assistants提供的 File、Function Call等能力,更好的与自己的应用程序进行交互,只不过目前还是相当不完备的,很多时候使用Assistants并不能一劳永逸。
关于Assistants的线程的概念,还有Messages等不再重复,因为这些官网都有比较详细的介绍。如果你使用的编程语言不是Python,也不是其他非常主流和常见的编程语言,那么直接用OpenAI提供的HTTP的接口效果是一样的,然后封装一下,开源共建一个API库。
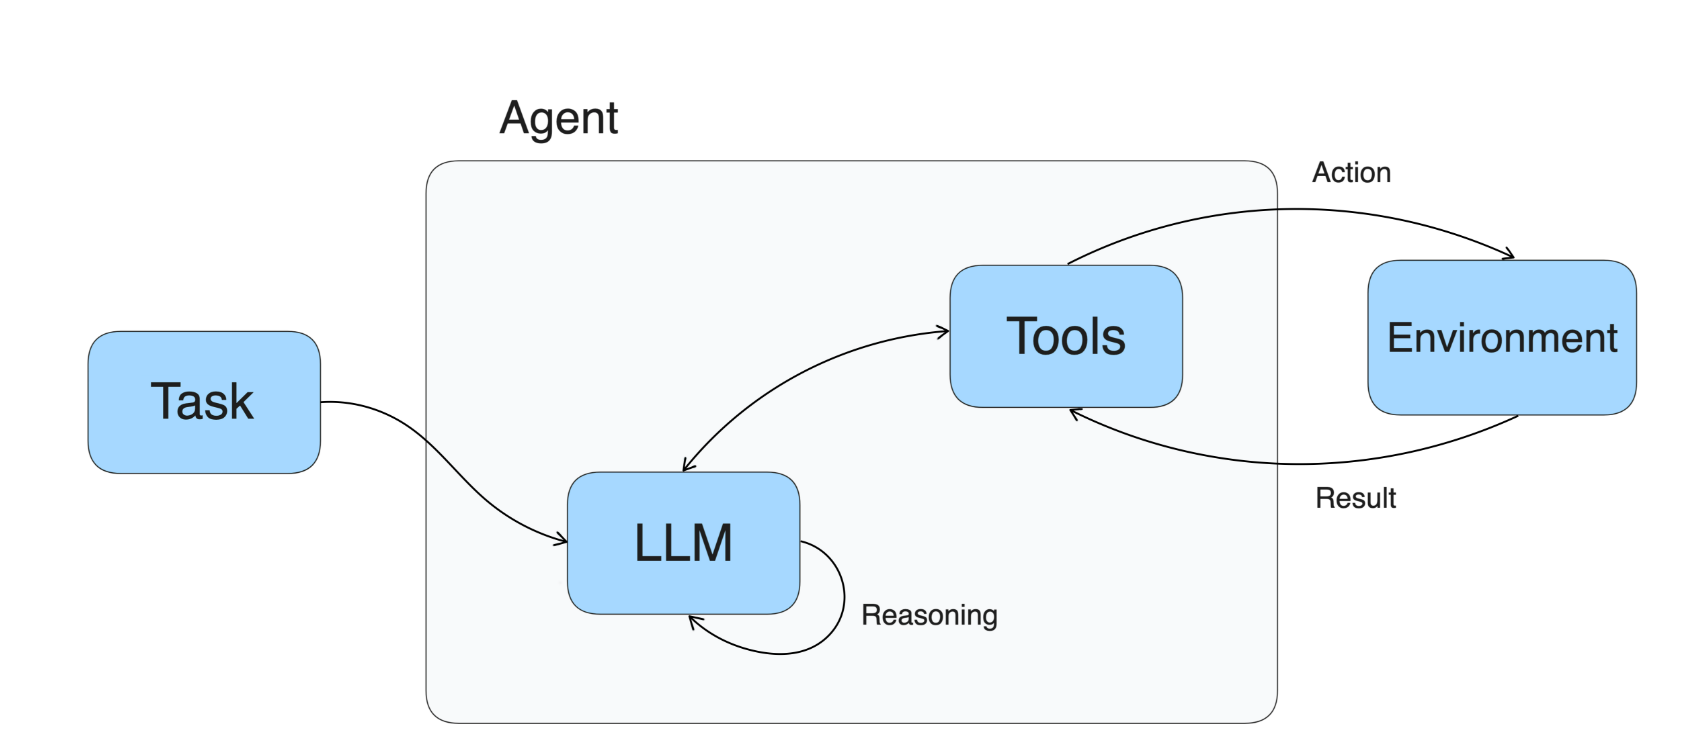
看到官网有这张图,其实还是很容易理解的吧,Assistant其实就是一个带ReAct(行为反思链)的机器人,通过创建Thread的方式,开启与Assistant的交互之旅,在一个线程中,Assistant会处理你的消息,并且根据上下文分析出此时需要调用哪些Function Call,并且何时需要生成代码并且运行Code Interpreter生成的代码:

我们通过轮询一个线程的状态来判断此时应该做什么,且看下面的生命周期:
 当首次创建并且运行的时候,转至排队状态,几乎立马会转到处理中的状态,我们需要关注的其实也就是处理中需要调用函数的时候(也就是Function Call),以及处理结果即可(这里结果就包含了完成、超时、失败、取消等状态)。如何轮询呢?提供了接口(官网有说明),其实大部分情况下1/2s一次就完全足够了,短期内多次轮询没有意义:
https://api.openai.com/v1/threads/runs
创建线程,创建消息,Run起来都可以参考官方文档。
创建助手
https://platform.openai.com/docs/assistants/how-it-works/creating-assistants
assistant = client.beta.assistants.create(
  name="Data visualizer",
  description="You are great at creating beautiful data visualizations. You analyze data present in .csv files, understand trends, and come up with data visualizations relevant to those trends. You also share a brief text summary of the trends observed.",
  model="gpt-4-1106-preview",
  tools=[{"type": "code_interpreter"}],
  file_ids=[file.id]
)
指定名称、描述、使用的LLM、工具(包括code_interpreter和你的自定义Function)
其实在playground页面创建也一样,都可以通过API来管理Assistant,以及更新Assistant。对于其他API也是一样的,Python的Assistant API库也是调用HTTP接口。
这里主要说一下如何定义工具,其实参考官方给的天气工具的例子就能写一个类似的,我常用的一个工具就是获得当前的时间,因为作为语言大模型,他不能已知当前的时间,需要我们告诉LLM,这个时候我们可以定义一个工具来做这个事情,让LLM在需要的时候自己去调用就知道当前时间:
{
    "type": "function",
    "function": {
        "name": "GetNowTime",
        "description": "获取当前时间",
        "parameters": {
            "type": "object",
            "properties": {},
            "required": []
        },
    }
}
这样的话,在创建Assistant的时候就把这个工具描述传递进去,由大模型自行决定何时调用:
my_assistant = client.beta.assistants.create(
    name=assistants_name,
    instructions="我的数据分析助手",
    model="gpt-4-1106-preview",
    tools=[
        {"type": "code_interpreter"},
        {
            "type": "function",
            "function": {
                "name": "GetNowTime",
                "description": "获取当前时间",
                "parameters": {
                    "type": "object",
                    "properties": {},
                    "required": []
                }
            }
        }
    ],
    file_ids = []
)
同时我们需要创建一个真实的Function,在大模型需要的时候去调用:
def get_now_time():
    now = datetime.now()
    return now.strftime('%Y-%m-%d %H:%M:%S')
同时里面还有一个file_ids的参数,其实就是把一个file挂在一个Assistant下,大多数情况下当作知识库,或者数据文件与Assistant建立关系。
创建线程和消息
https://platform.openai.com/docs/assistants/how-it-works/managing-threads-and-messages
thread = client.beta.threads.create(
  messages=[
    {
      "role": "user",
      "content": "Create 3 data visualizations based on the trends in this file.",
      "file_ids": [file.id]
    }
  ]
)
这个没啥好说的,可以在消息里携带图片或者数据文件。 有时候返回的消息有注释,目前有两种类型的注释:
- file_citation:文件引用是由检索工具创建的,它定义了对上传并由助手用于生成响应的特定文件中特定引用位置的引用。
- file_path:文件路径注释是由代码解释器工具创建,并包含对该工具生成的文件的引用。当消息对象中存在注释时,您将看到在文本中出现无法理解模型生成子字符串,您应该使用这些注释替换这些字符串。
# Retrieve the message object
message = client.beta.threads.messages.retrieve(
  thread_id="...",
  message_id="..."
)

# Extract the message content
message_content = message.content[0].text
annotations = message_content.annotations
citations = []

# Iterate over the annotations and add footnotes
for index, annotation in enumerate(annotations):
    # Replace the text with a footnote
    message_content.value = message_content.value.replace(annotation.text, f' [{index}]')

    # Gather citations based on annotation attributes
    if (file_citation := getattr(annotation, 'file_citation', None)):
        cited_file = client.files.retrieve(file_citation.file_id)
        citations.append(f'[{index}] {file_citation.quote} from {cited_file.filename}')
    elif (file_path := getattr(annotation, 'file_path', None)):
        cited_file = client.files.retrieve(file_path.file_id)
        citations.append(f'[{index}] Click <here> to download {cited_file.filename}')
        # Note: File download functionality not implemented above for brevity

# Add footnotes to the end of the message before displaying to user
message_content.value += '\n' + '\n'.join(citations)
RUN起来
https://platform.openai.com/docs/assistants/how-it-works/runs-and-run-steps
run = client.beta.threads.runs.create(
  thread_id=thread.id,
  assistant_id=assistant.id
)
轮训执行步骤,这块也是最关键的是监测到Function Call,并且执行后回复给Assistant结果:
while True:
  # 查询消息的状态
  re_run = client.beta.threads.runs.retrieve(
      thread_id=thread_id,
      run_id=run.id
  )
  # "queued", "in_progress", "requires_action", "cancelling", "cancelled", "failed", "completed",
  # "expired" 排队中, 进行中, 需要采取行动, 取消中, 已取消, 失败, 完成, 过期 如果状态完成,则获取结果,break
  if re_run.status == "completed":
      # 跑完了,获取全部消息,或者只获取最后的结果
      messages = client.beta.threads.messages.list(thread_id=thread_id)
      break
  else:
      run_step_dict = {}
      if re_run.status == "requires_action":
          # 请求工具
          tool_calls = re_run.required_action.submit_tool_outputs.tool_calls
          call_ids = []
          outputs = []
          for tool_call in tool_calls:
              if tool_call.type == 'function':
                  # 开始调用函数
                  function_name = tool_call.function.name
                  tool_calls_id = tool_call.id
                  call_ids.append(tool_calls_id)
                  function_params = json.loads(tool_call.function.arguments)
                  if function_name == 'GetNowTime':
                      current_app.logger.info('Function Call --> GetNowTime()')
                      # 调用函数(核心就是这里啦!)
                      # 调用函数(核心就是这里啦!)
                      # 调用函数(核心就是这里啦!)
                      result = get_now_time()
                      current_app.logger.info('Function Call Result --> GetNowTime() :%s', str(result))
                      outputs.append(str(result))
          tool_outputs = []
          for i in range(len(call_ids)):
              tool_outputs.append({
                  "tool_call_id": call_ids[i],
                  "output": outputs[i],
              })
          # 提交工具的输出
          client.beta.threads.runs.submit_tool_outputs(
              thread_id=thread_id,
              run_id=run.id,
              tool_outputs=tool_outputs
          )
  time.sleep(1)
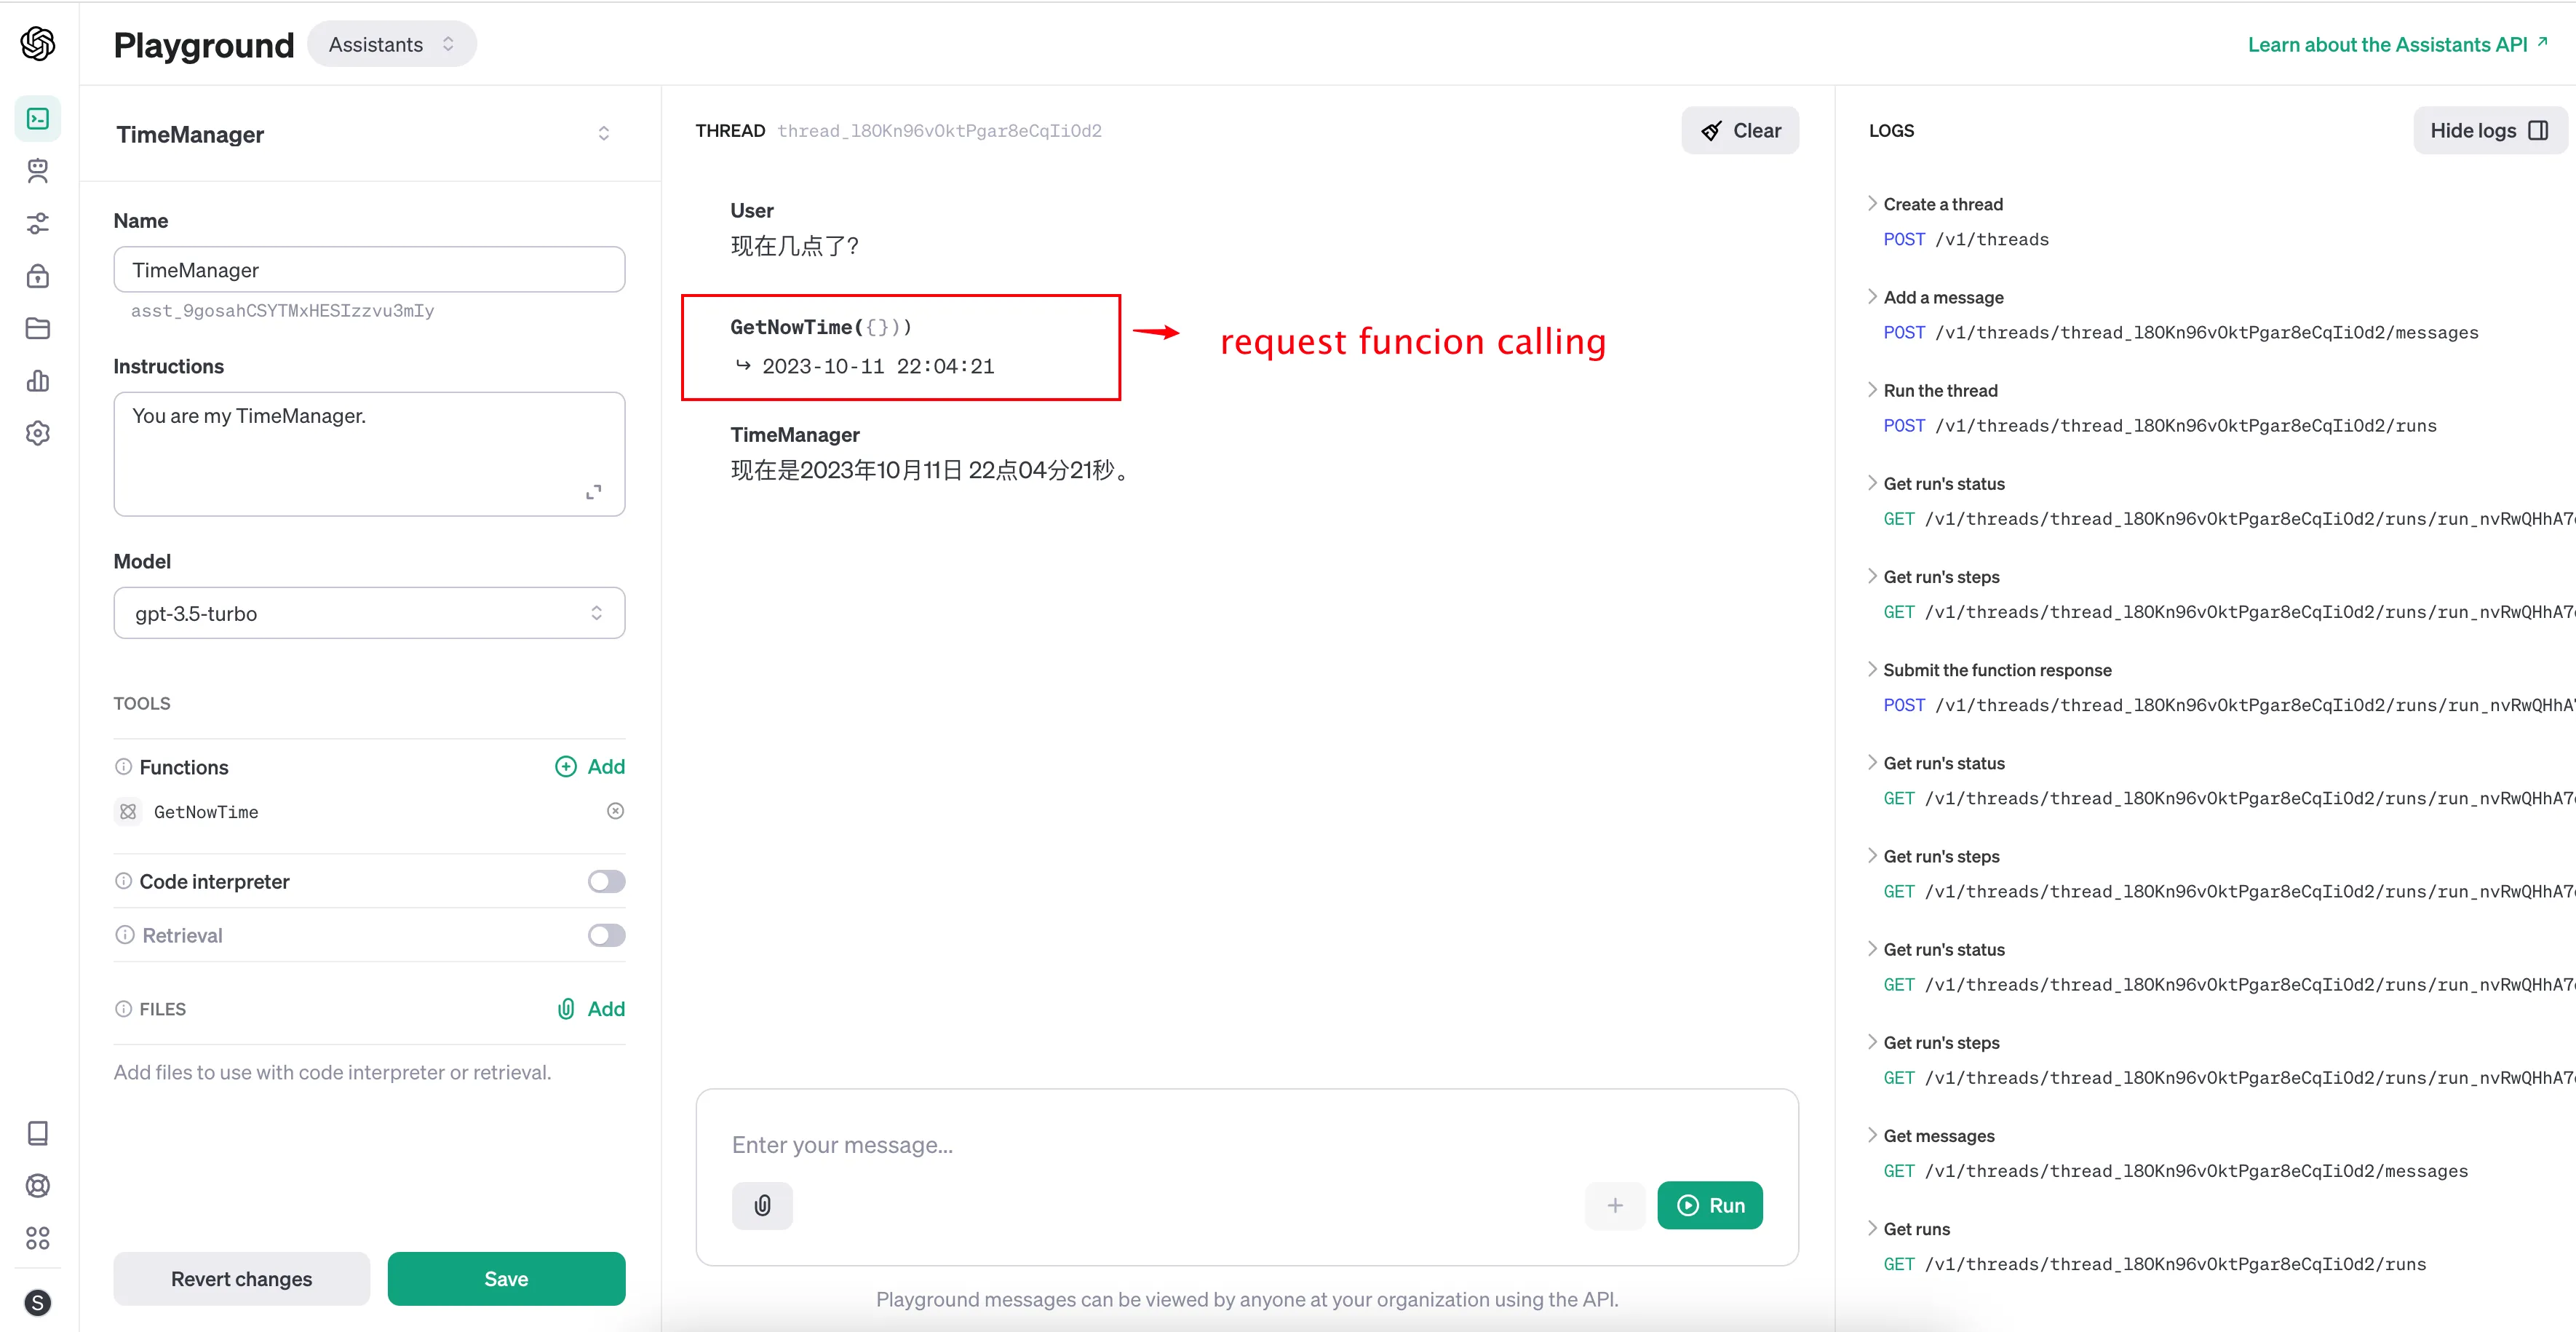
如果你想快速验证你的 Function 能否被准确的调用到,直接在Playground面板进行调试是最好的选择:

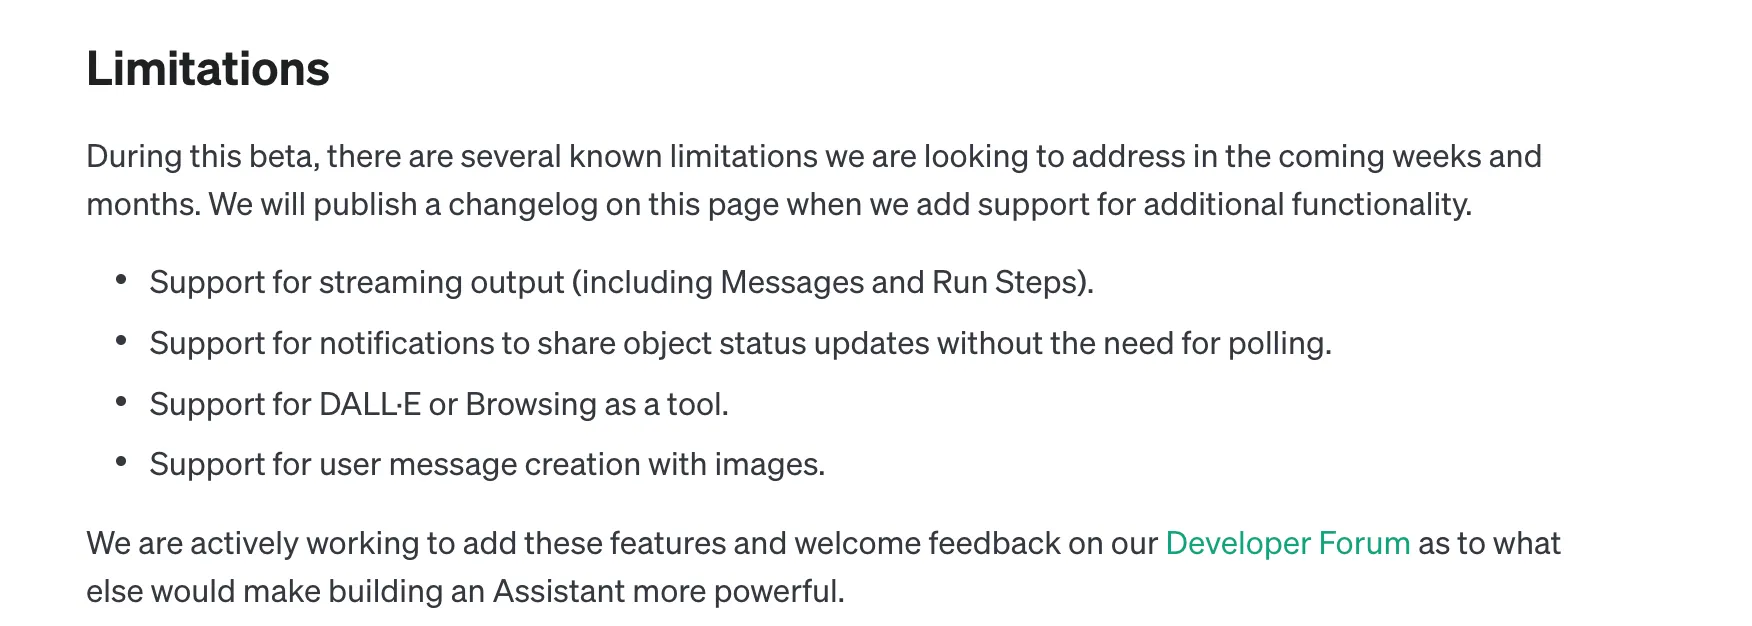
从官网可以看到,后面OpenAI会逐步让这个工具变的更好用,包括以下的优化:
- 支持流式输出
- 以通知的方式更新,避免轮询,可能是SSE或者Websocket
- 支持以图片作为用户消息

搭建OpenAI的API代理
可以使用Nginx来搭建一个OpenAI API的代理服务,首先确保Nginx的环境可以访问到OpenAI API,然后采用如下配置:
server {
    listen 80;  # 监听80端口,用于HTTP请求
    location / {
        proxy_pass  https://api.openai.com/;  # 反向代理到https://api.openai.com/这个地址
        proxy_ssl_server_name on;  # 开启代理SSL服务器名称验证,确保SSL连接的安全性
        proxy_set_header Host api.openai.com;  # 设置代理请求头中的Host字段为api.openai.com
        chunked_transfer_encoding off;  # 禁用分块编码传输,避免可能的代理问题
        proxy_buffering off;  # 禁用代理缓存,避免数据传输延迟
        proxy_cache off;  # 禁用代理缓存,确保实时获取最新的数据
        proxy_set_header X-Forwarded-For $remote_addr;  # 将客户端真实IP添加到代理请求头中的X-Forwarded-For字段中,用于记录客户端真实IP
    }
}
使用的时候需要设置OpenAI的BaseURL(0.27.x)
import openai
openai.api_key = os.environ.get("OPENAI_API_KEY")
openai.api_base = "your_proxy_url" # 代理地址,如“http://www.test.com/v1”
新版本(>1.2.x)OpenAI API设置BaseURL
from openai import OpenAI

client = OpenAI(
    api_key=os.environ.get("OPENAI_API_KEY"),
    base_url="your_proxy_url" # 代理地址,如“http://www.test.com/v1”
)
附上完整的nginx.conf与docker-compose.yml文件,以供参考: nginx.conf
user  nginx;
worker_processes  auto;

error_log  /var/log/nginx/error.log notice;
pid        /var/run/nginx.pid;


events {
    worker_connections  1024;
}


http {
    include       /etc/nginx/mime.types;
    default_type  application/octet-stream;

    log_format  main  '$remote_addr - $remote_user [$time_local] "$request" '
                      '$status $body_bytes_sent "$http_referer" '
                      '"$http_user_agent" "$http_x_forwarded_for"';

    access_log  /var/log/nginx/access.log  main;

    sendfile        on;
    #tcp_nopush     on;

    keepalive_timeout  65;

    #gzip  on;

    # include /etc/nginx/conf.d/*.conf;

    server {
        listen 80;
        location / {
            proxy_pass  https://api.openai.com/;
            proxy_ssl_server_name on;
            proxy_set_header Host api.openai.com;
            chunked_transfer_encoding off;
            proxy_buffering off;
            proxy_cache off;
            proxy_set_header X-Forwarded-For $remote_addr;
        }
    }
}
docker-compose.yaml
services:
  clash:
    image: dreamacro/clash-premium:latest
    volumes:
      - "$PWD/TAG.yaml:/root/.config/clash/config.yml"
    ports:
      - "7890:7890"
      - "7891:7891"
      - "7892:7892"
    restart: unless-stopped
  proxy:
    image: nginx
    volumes:
      - "$PWD/nginx.conf:/etc/nginx/nginx.conf"
    ports:
      - "80:80"
      - "443:443"
    restart: unless-stopped
附上我搭建的一个代理服务:
https://openai-proxy.zouchanglin.cn
Agent的原理——ReAct
ReAct其实就是Reasoning + Acting构成的一套反思、行动的思维链模型,不管是LangChain,还是AutoGen,其中比较核心的一个模块就是Agent。Agent的本质就是利用LLM去实现Reasoning + Acting的思维模式,从而完成复杂的任务。

下面直接动手实现一个这样的思维链Demo:
首先定义一些工具或者叫做函数:
[
    {
        "name":"GetTimeTools",
        "description":"获取当前时间",
        "parameters":[],
        "return":{
            "type":"datetime",
            "description":"时间"
        }
    },
    {
        "name":"AskHumanHelpTool",
        "description":"如果需要人类帮助,请使用它",
        "parameters":[
            {
                "type":"string",
                "name":"answer",
                "description":"你需要请求人类帮助的问题"
            }
        ]
    },
    {
        "name":"TaskCompleteTool",
        "description":"如果你认为你已经有了最终答案,请使用它",
        "parameters":[
            {
                "name":"output",
                "type":"string",
                "description":"输出你的最终答案"
            }
        ]
    },
    {
        "name":"CodeInterpreterTool",
        "description":"如要执行与环境无关的Python代码,则执行的结果用print打出来,请使用它",
        "parameters":[
            {
                "name":"code",
                "type":"string",
                "description":"你要执行的代码"
            }
        ]
    }
]
我这里准备了4个Tools以供LLM选择和调用,description用来定义这个工具的功能。
核心Prompt:
core_prompt = '''You are an assistant, please fully understand the user's question, choose the appropriate tool, and \
help the user solve the problem step by step.

### CONSTRAINTS ####
1. The tool selected must be one of the tools in the tool list.
2. When unable to find the input for the tool, please adjust immediately and use the AskHumanHelpTool to ask the user \
for additional parameters.
3. When you believe that you have the final answer and can respond to the user, please use the TaskCompleteTool.
5. You must response in Chinese.

### Tool List ###
%s


### Tool respond format ###
{
  "tool_name": "tool name",
  "response": "tool response content"
}


You should only respond in JSON format as described below

### RESPONSE FORMAT ###
{"thought": "Reasons and thought process for choosing these tools","tool_name": "tool_name","args_list": {"args_name_1\
": "args_value_1","args_name_2": "args_value_2"}}
Make sure that the response content you return is all in JSON format and does not contain any extra content.'''
这段Prompt其实就是Agent的核心了:其中包括了LLM的角色与任务,可调用的工具,每次返回的JSON格式等。接下来就是考验LLM分析问题的能力了:
import json
from datetime import datetime

from openai_client import client
from react import CORE_PROMPT
from react.react_enum import FunctionCallEnum
from tools.time_tools import get_now


def load_tools():
    with open('core_function.json', 'r', encoding='utf-8') as f:
        try:
            content = f.read()
            tools = json.loads(content)
            return core_prompt % content
        except json.JSONDecodeError as e:
            raise Exception('core_function.json文件格式错误,请检查!')


def function_call(tool_name: str, messages: list[dict]):
    if tool_name == FunctionCallEnum.GetTimeTools.name:
        func_call_message = {
            "name": FunctionCallEnum.GetTimeTools.name,
            "response": get_now().strftime('%Y-%m-%d %H:%M:%S')
        }
        messages.append({
            "role": "user",
            "content": json.dumps(func_call_message)
        })
    else:
        print('不支持的工具:' + tool_name)


def exec_python_code_in_sandbox(llm_response, messages: list[dict]):
    print('执行Python代码', llm_response)
    code = llm_response['args_list']['code']
    # 保存在文件中
    with open('tmp.py', 'w', encoding='utf-8') as f:
        f.write(code)
    # shell方式执行获得返回值
    import subprocess
    result = subprocess.run(['python', 'tmp.py'], stdout=subprocess.PIPE)
    print(result.stdout.decode('utf-8'))
    # 返回结果
    func_call_message = {
        "tool_name": FunctionCallEnum.CodeInterpreterTool.name,
        "response": result.stdout.decode('utf-8')
    }
    messages.append({
        "role": "user",
        "content": json.dumps(func_call_message)
    })
    # 删除文件
    import os
    os.remove('tmp.py')


def start_react(user_input: str):
    messages = [
        {
            "role": "system",
            "content": CORE_PROMPT
        },
        {
            "role": "user",
            "content": user_input
        }
    ]
    handle_count = 0
    while True:
        completion = client.chat.completions.create(
            model="gpt-4-1106-preview",
            messages=messages,
            temperature=0.0,
            response_format={
                "type": "json_object",
            }
        )
        handle_count += 1
        print('OpenAI 交互处理次数:', handle_count)
        response_msg = completion.choices[0].message.content.strip()
        messages.append({
            "role": "assistant",
            "content": response_msg
        })
        try:
            llm_response = json.loads(response_msg)
            tool_name = llm_response['tool_name']
            if tool_name == FunctionCallEnum.TaskCompleteTool.name:
                print('任务完成', llm_response)
                break
            elif tool_name == FunctionCallEnum.AskHumanHelpTool.name:
                print('需要人工帮助', llm_response)
                input_content = input('请输入人工帮助的内容:')
                func_call_message = {
                    "tool_name": FunctionCallEnum.AskHumanHelpTool.name,
                    "response": input_content
                }
                messages.append({
                    "role": "user",
                    "content": json.dumps(func_call_message)
                })
            elif tool_name == FunctionCallEnum.CodeInterpreterTool.name:
                exec_python_code_in_sandbox(llm_response, messages)
            else:
                print('需要使用工具:', tool_name)
                function_call(tool_name, messages)
        except json.JSONDecodeError as ignored:
            print('Json解析错误', ignored.msg, response_msg)
            break


if __name__ == '__main__':
    load_tools()
    # start_react('现在是几点?')
    start_react('10分钟后是几点?')
    # start_react('我想知道1.01的365次方减去100加上300是多少?')
以10分钟后是几点这个问题举例:
{"thought":"首先需要获取当前的时间,然后在当前时间的基础上加上10分钟。","tool_name":"GetTimeTools","args_list":{}}
{"thought":"获取到了当前时间,现在需要编写一个Python代码来计算10分钟后的时间。","tool_name":"CodeInterpreterTool","args_list":{"code":"
from datetime import datetime, timedelta
current_time = datetime.strptime('2024-02-18 17:31:43', '%Y-%m-%d %H:%M:%S')
ten_minutes_later = current_time + timedelta(minutes=10)
print(ten_minutes_later.strftime('%Y-%m-%d %H:%M:%S'))"}}
2024-02-18 17:41:43

{"thought":"已经计算出10分钟后的时间,现在可以将结果告诉用户。","tool_name":"TaskCompleteTool","args_list":{"output":"10分钟后是2024年2月18日17点41分43秒。"}}

Process finished with exit code 0
看起来很容易明白吧,其实就是利用LLM的推理能力,把复杂问题拆解为一步步可以使用工具解决的小问题,这样就实现了最基本的Agent的功能。
本文内容与代理服务仅供学习目的使用,并不代表任何法律建议。在阅读、分享或实践本文时,坚决遵守中华人民共和国现行法律法规,并尊重所有相关的知识产权和其他权利。提醒读者,在应用本文内容时,应确保其行为符合当地法律及规定,并承担相应的责任。本声明旨在促进法律知识的传播与教育,同时维护法治精神和社会秩序。任何违反相关法律规定的使用或行为,均与作者无关。
