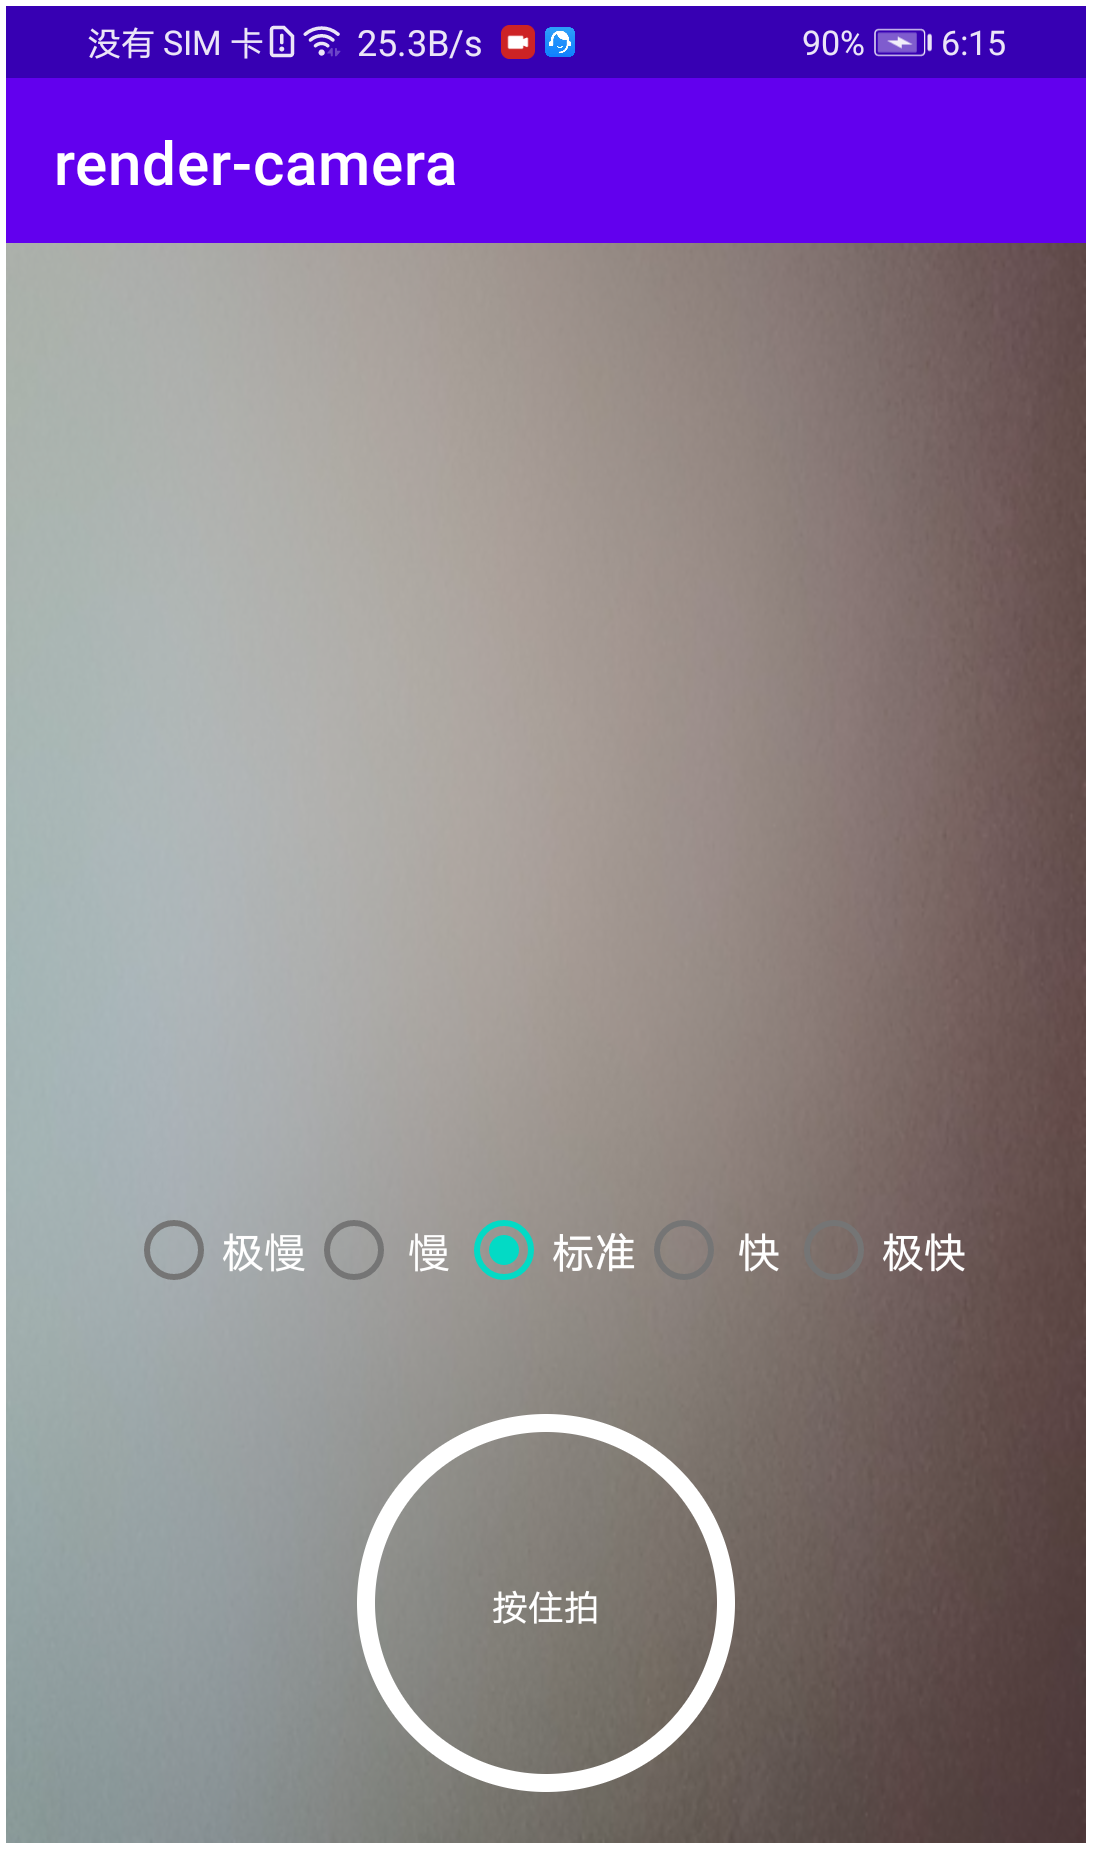
OpenGL+MediaCodec视频录制
通过OpenGL渲染摄像头数据到屏幕时,使用GLSurfaceView就可以完成,如果要做中间层处理,比如美颜等,通过着色器处理之后写入帧缓冲(FBO)来完成的。那么如何从着色器拿到数据然后编码生成视频呢?一般来说,使用软编码或者MediaCodec来进行编码,如果图像的byte[] 拿到了,编码就简单了,但是现在时在着色器中处理的,没有byte[],怎么将我们处理之后的图像变成一个Mp4文件呢?
MediaCodec
MediaCodec时AndroidSDK中为我们提供编解码的API:
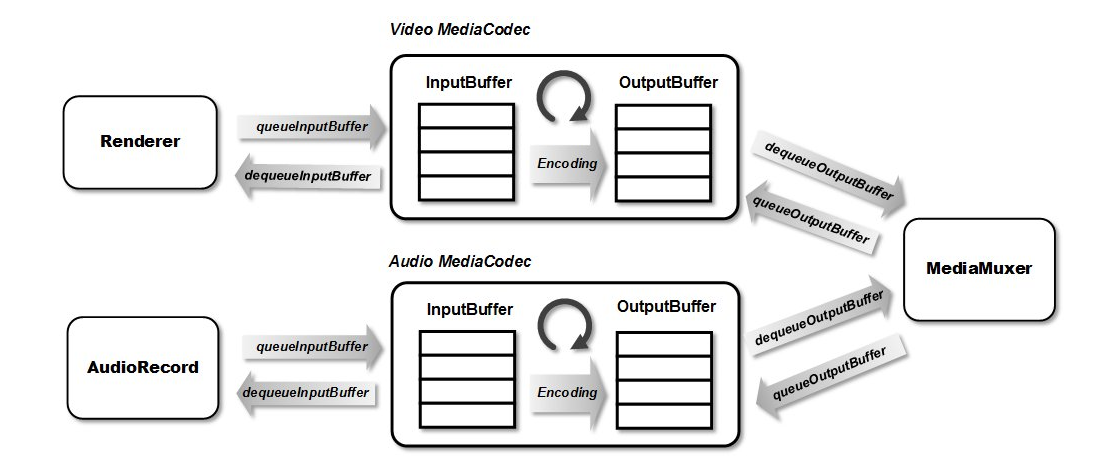
MediaCodec内部有两个缓存队列,分别是:输入缓冲队列与输出缓冲队列。我们只需要使用 queueInputBuffer 将需要的 byte 数据提交到输入队列,使用 equeueOutputBuffer 从输出队列去除编码完成后的数据即编码后的数据。
但是没法得到原始图像的 byte 数据,怎么办呢?
Surface surface = mMediaCodec.createInputSurface();
这与录屏直播的问题是一样的,当我们用上述方法得到一个Surface,这个Surface由编码器创建,如果向这个Surface画画,那么画在上面的图像就会自动进行编码。所以现在问题变成了,如何将OpenGL处理之后的图像再画到这个Surface中去?简单来说就是OpenGL怎么朝指定的Surface中画画!!
EGL环境
OpenGL ES只是图形API,不负责管理(显示)窗口,窗口的管理交由各个设备自己来完成。OpenGL ES调用用于渲染纹理多边形,而EGL调用用于将渲染放到屏幕上,所以EGL可以看作为OpenGL ES与设备的桥梁。
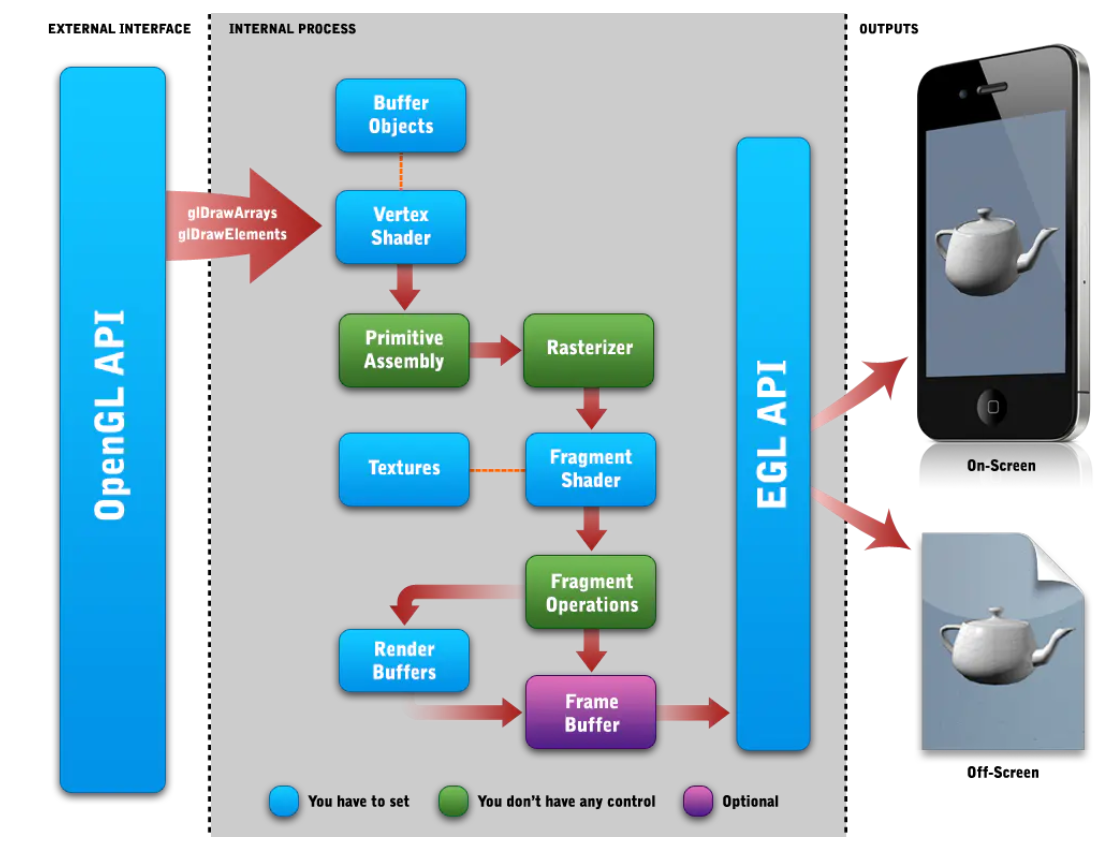
Android 使用 EGL 库创建OpenGL ES上下文并为 OpenGL ES 渲染提供窗口系统。调用任何 OpenGL函数前,必须已经创建了 OpenGL 上下文。OpenGL ES操作适用于当前上下文,渲染代码应该在当前 GLES 线程上执行。
上下文:在渲染过程中需要将顶点信息(形状)、纹理信息(图像)等渲染状态信息存储起来,而存储这些信息的数据结构就可以看作 OpenGL 的上下文。
使用GLSurfaceView时,我们无需关系搭建OpenGL上下文环境,也无需关心创建OpenGL ES的显示设备。但是使用GLSurfaceView不够灵活,比如共享OpenGL上下文来达到多线程共同操作一份纹理等操作都不能直接使用。
本次的OpenGL上下文环境依旧使用Java层EGL的API来完成,因为仅仅只是视频录制,不涉及复杂的场景,所以暂时先使用Java层的EGL API来完成。但是对于稍微复杂点的场景(比如人脸识别),则需要到C++层来实施,其实本质都是一样的。
解决方案
所以到目前思路很清晰了,直接利用EGL来建立OpenGL与设备的联系,让OpenGL将纹理一边用绘制到屏幕,一边用于编码,这样就完成了视频录制功能了:
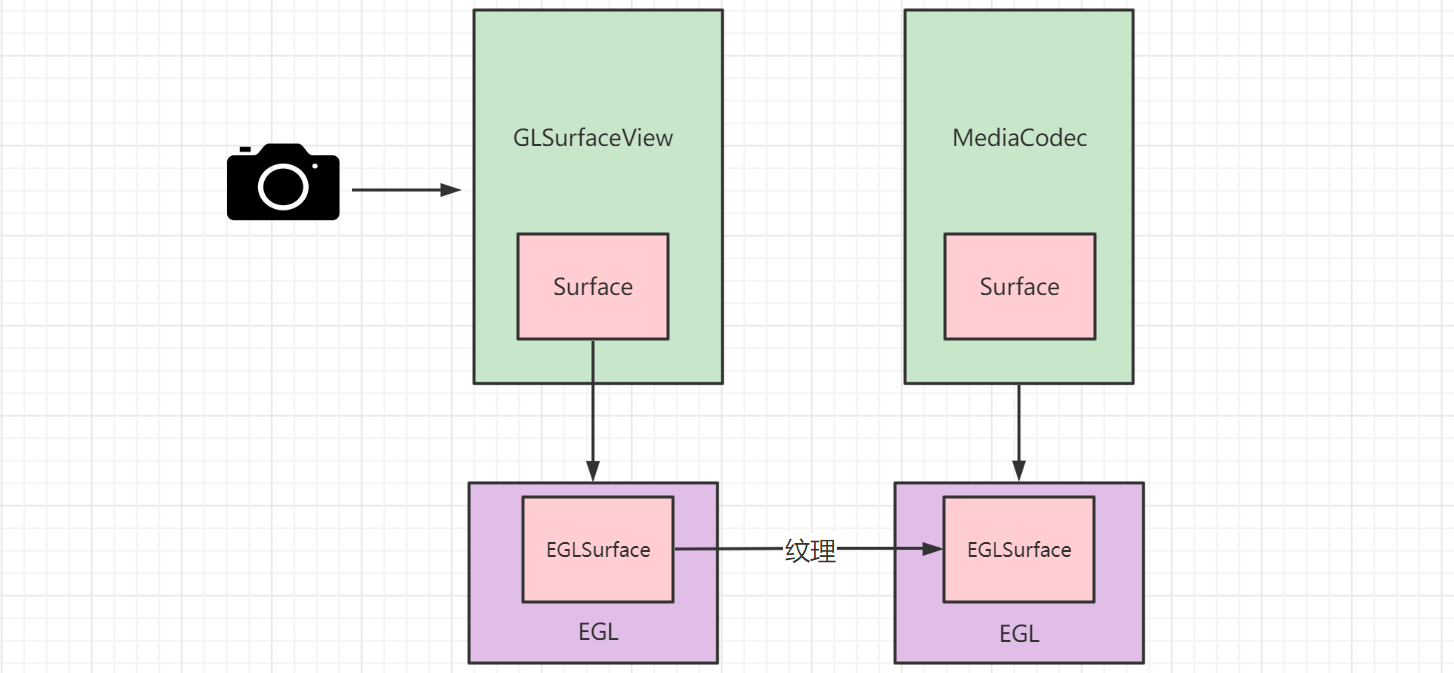
EGLSurface 可以是由 EGL 分配的离屏缓冲区,也可以是由操作系统分配的窗口。能够与Surface绑定,让OpenGL 在EGLSurface绘制,相当于在Surface绘制。
需要在一个单独的线程中搭建一个EGL环境,创建EGLSurface与MediaCodec的Surface绑定,来绘制图像到需要编码的Surface中去。
代码实现
EGLEnv.java,此类负责通过EGL创建OpenGL上下文环境。以及让编码的OpenGLContext与GLSurfaceView的OpenGLContext绑定,与GLSurfaceView中的EGLContext共享数据,只有这样才能拿到处理完之后显示的图像纹理,拿到这个纹理才能进行编码:
public class EGLEnv {
    private final EGLContext mEglContext;
    private final RecordFilter recordFilter;

    private final EGLSurface mEglSurface; // 画布
    private final EGLDisplay mEglDisplay; // 窗口

    /**
     * @param surface MediaRecorder的surface
     */
    public EGLEnv(Context context,EGLContext mGlContext, Surface surface,int width,int height) {
        // 1、创建Display,获得显示窗口,作为OpenGL的绘制目标
        mEglDisplay = EGL14.eglGetDisplay(EGL14.EGL_DEFAULT_DISPLAY);
        if (mEglDisplay == EGL14.EGL_NO_DISPLAY) {
            throw new RuntimeException("eglGetDisplay failed");
        }

        // 初始化显示窗口
        int[] version = new int[2];
        if(!EGL14.eglInitialize(mEglDisplay, version,0,version,1)) {
            throw new RuntimeException("eglInitialize failed");
        }

        // 2、配置Display,属性选项(RGBA)
        int[] configAttributes = {
                EGL14.EGL_RED_SIZE, 8,
                EGL14.EGL_GREEN_SIZE, 8,
                EGL14.EGL_BLUE_SIZE, 8,
                EGL14.EGL_ALPHA_SIZE, 8,
                EGL14.EGL_RENDERABLE_TYPE, EGL14.EGL_OPENGL_ES2_BIT, // OpenGL ES 2.0
                EGL14.EGL_NONE // 参数占位符
        };
        int[] numConfigs = new int[1];
        EGLConfig[] configs = new EGLConfig[1];
        // EGL根据属性选择一个配置
        if (!EGL14.eglChooseConfig(mEglDisplay, configAttributes, 0, configs, 0, configs.length,
                numConfigs, 0)) {
            throw new RuntimeException("EGL error " + EGL14.eglGetError());
        }

        EGLConfig mEglConfig = configs[0];

        // EGL上下文参数
        int[] context_attribute_list = {
                EGL14.EGL_CONTEXT_CLIENT_VERSION, 2,
                EGL14.EGL_NONE
        };

        // 让编码的OpenGLContext与GLSurfaceView的OpenGLContext绑定,与GLSurfaceView中的EGLContext共享数据
        // 只有这样才能拿到处理完之后显示的图像纹理,拿到这个纹理才能进行编码
        mEglContext = EGL14.eglCreateContext(mEglDisplay, mEglConfig,
                mGlContext, context_attribute_list, 0);

        if (mEglContext == EGL14.EGL_NO_CONTEXT){
            throw new RuntimeException("EGL error " + EGL14.eglGetError());
        }

        // 创建EGLSurface (画布)
        int[] surface_attribute_list = {
                EGL14.EGL_NONE
        };
        mEglSurface = EGL14.eglCreateWindowSurface(mEglDisplay, mEglConfig, surface, surface_attribute_list, 0);
        if (mEglSurface == null){
            throw new RuntimeException("EGL error " + EGL14.eglGetError());
        }

        // 绑定当前线程的显示器(display)
        if (!EGL14.eglMakeCurrent(mEglDisplay, mEglSurface, mEglSurface, mEglContext)){
            throw new RuntimeException("EGL error " + EGL14.eglGetError());
        }

        recordFilter = new RecordFilter(context);
        recordFilter.setSize(width,height);
    }

    public void draw(int textureId, long timestamp) {
        recordFilter.onDraw(textureId);
        EGLExt.eglPresentationTimeANDROID(mEglDisplay, mEglSurface, timestamp);
        // EGLSurface是双缓冲模式
        EGL14.eglSwapBuffers(mEglDisplay, mEglSurface);
    }

    public void release(){
        EGL14.eglDestroySurface(mEglDisplay,mEglSurface);
        EGL14.eglMakeCurrent(mEglDisplay, EGL14.EGL_NO_SURFACE, EGL14.EGL_NO_SURFACE,
                EGL14.EGL_NO_CONTEXT);
        EGL14.eglDestroyContext(mEglDisplay, mEglContext);
        EGL14.eglReleaseThread();
        EGL14.eglTerminate(mEglDisplay);
        recordFilter.release();
    }
}
MediaRecorder.java负责视频的编码:
public class MediaRecorder {
    private final int mWidth;
    private final int mHeight;
    private final String mPath;
    private final Context mContext;

    private MediaCodec mMediaCodec;
    private Surface mSurface;
    private EGLContext mGlContext;
    private MediaMuxer mMuxer;
    private Handler mHandler;
    private boolean isStart;
    private int track;
    private float mSpeed;
    private long mLastTimeStamp;
    private EGLEnv eglEnv;

    public MediaRecorder(Context context, String path, EGLContext glContext, int width, int
            height) {
        mContext = context.getApplicationContext();
        mPath = path;
        mWidth = width;
        mHeight = height;
        mGlContext = glContext;
    }

    public void start(float speed) throws IOException {
        mSpeed = speed;
        // 设置编码格式
        MediaFormat format = MediaFormat.createVideoFormat(MediaFormat.MIMETYPE_VIDEO_AVC,
                mWidth, mHeight);
        // 颜色空间 从 surface当中获得
        format.setInteger(MediaFormat.KEY_COLOR_FORMAT, MediaCodecInfo.CodecCapabilities
                .COLOR_FormatSurface);
        // 码率
        format.setInteger(MediaFormat.KEY_BIT_RATE, 1500_000);
        // 帧率
        format.setInteger(MediaFormat.KEY_FRAME_RATE, 25);
        // 关键帧间隔
        format.setInteger(MediaFormat.KEY_I_FRAME_INTERVAL, 10);
        // 创建编码器
        mMediaCodec = MediaCodec.createEncoderByType(MediaFormat.MIMETYPE_VIDEO_AVC);
        // 配置编码器
        mMediaCodec.configure(format, null, null, MediaCodec.CONFIGURE_FLAG_ENCODE);
        // 这个surface显示的内容就是要编码的画面
        mSurface = mMediaCodec.createInputSurface();

        // 混合器 (复用器) 将编码的h.264封装为mp4
        mMuxer = new MediaMuxer(mPath,
                MediaMuxer.OutputFormat.MUXER_OUTPUT_MPEG_4);

        // 开启编码
        mMediaCodec.start();

        // 创建OpenGL环境
        HandlerThread handlerThread = new HandlerThread("codec-gl");
        handlerThread.start();
        mHandler = new Handler(handlerThread.getLooper());

        mHandler.post(() -> {
            // 创建EGL环境
            eglEnv = new EGLEnv(mContext, mGlContext, mSurface, mWidth, mHeight);
            isStart = true;
        });
    }


    public void fireFrame(final int textureId, final long timestamp) {
        if (!isStart) {
            return;
        }
        //录制用的OpenGL已经和Handler的线程绑定了 ,所以需要在这个线程中使用录制的OpenGL
        mHandler.post(() -> {
            //画画
            eglEnv.draw(textureId, timestamp);
            codec(false);
        });
    }


    private void codec(boolean endOfStream) {
        //给个结束信号
        if (endOfStream) {
            mMediaCodec.signalEndOfInputStream();
        }
        while (true) {
            //获得输出缓冲区 (编码后的数据从输出缓冲区获得)
            MediaCodec.BufferInfo bufferInfo = new MediaCodec.BufferInfo();
            int encoderStatus = mMediaCodec.dequeueOutputBuffer(bufferInfo, 10_000);
            //需要更多数据
            if (encoderStatus == MediaCodec.INFO_TRY_AGAIN_LATER) {
                //如果是结束那直接退出,否则继续循环
                if (!endOfStream) {
                    break;
                }
            } else if (encoderStatus == MediaCodec.INFO_OUTPUT_FORMAT_CHANGED) {
                //输出格式发生改变  第一次总会调用所以在这里开启混合器
                MediaFormat newFormat = mMediaCodec.getOutputFormat();
                track = mMuxer.addTrack(newFormat);
                mMuxer.start();
            } else {
                //调整时间戳
                bufferInfo.presentationTimeUs = (long) (bufferInfo.presentationTimeUs / mSpeed);
                //有时候会出现异常 : timestampUs xxx < lastTimestampUs yyy for Video track
                if (bufferInfo.presentationTimeUs <= mLastTimeStamp) {
                    bufferInfo.presentationTimeUs = (long) (mLastTimeStamp + 1_000_000 / 25 / mSpeed);
                }
                mLastTimeStamp = bufferInfo.presentationTimeUs;

                //正常则 encoderStatus 获得缓冲区下标
                ByteBuffer encodedData = mMediaCodec.getOutputBuffer(encoderStatus);
                //如果当前的buffer是配置信息,不管它 不用写出去
                if ((bufferInfo.flags & MediaCodec.BUFFER_FLAG_CODEC_CONFIG) != 0) {
                    bufferInfo.size = 0;
                }
                if (bufferInfo.size != 0) {
                    //设置从哪里开始读数据(读出来就是编码后的数据)
                    encodedData.position(bufferInfo.offset);
                    //设置能读数据的总长度
                    encodedData.limit(bufferInfo.offset + bufferInfo.size);
                    //写出为mp4
                    mMuxer.writeSampleData(track, encodedData, bufferInfo);
                }
                // 释放这个缓冲区,后续可以存放新的编码后的数据啦
                mMediaCodec.releaseOutputBuffer(encoderStatus, false);
                // 如果给了结束信号 signalEndOfInputStream
                if ((bufferInfo.flags & MediaCodec.BUFFER_FLAG_END_OF_STREAM) != 0) {
                    break;
                }
            }
        }
    }


    public void stop() {
        // 释放
        isStart = false;
        mHandler.post(() -> {
            codec(true);
            mMediaCodec.stop();
            mMediaCodec.release();
            mMediaCodec = null;
            mMuxer.stop();
            mMuxer.release();
            eglEnv.release();
            eglEnv = null;
            mMuxer = null;
            mSurface = null;
            mHandler.getLooper().quitSafely();
            mHandler = null;
        });
    }
}
代码其实不难理解,完整的工程请见: https://github.com/zouchanglin/render-camera