Netty编码实战与Channel生命周期
本次将搭建一个最简单的Hello Netty服务器,并且通过这个简单的示例了解了Channel的生命周期。最后将基于Netty搭建一个Websocket网页聊天小程序,可以使用户在Web浏览器或者移动端浏览器进行消息的收发,来深入体会一下使用Netty编码NIO服务器是多么便捷。
Hello Netty服务器
- 构建一对主从线程组
- 定义服务器启动类
- 为服务器设置Channel
- 设置处理从线程池的助手类初始化器
- 监听启动和关闭服务器
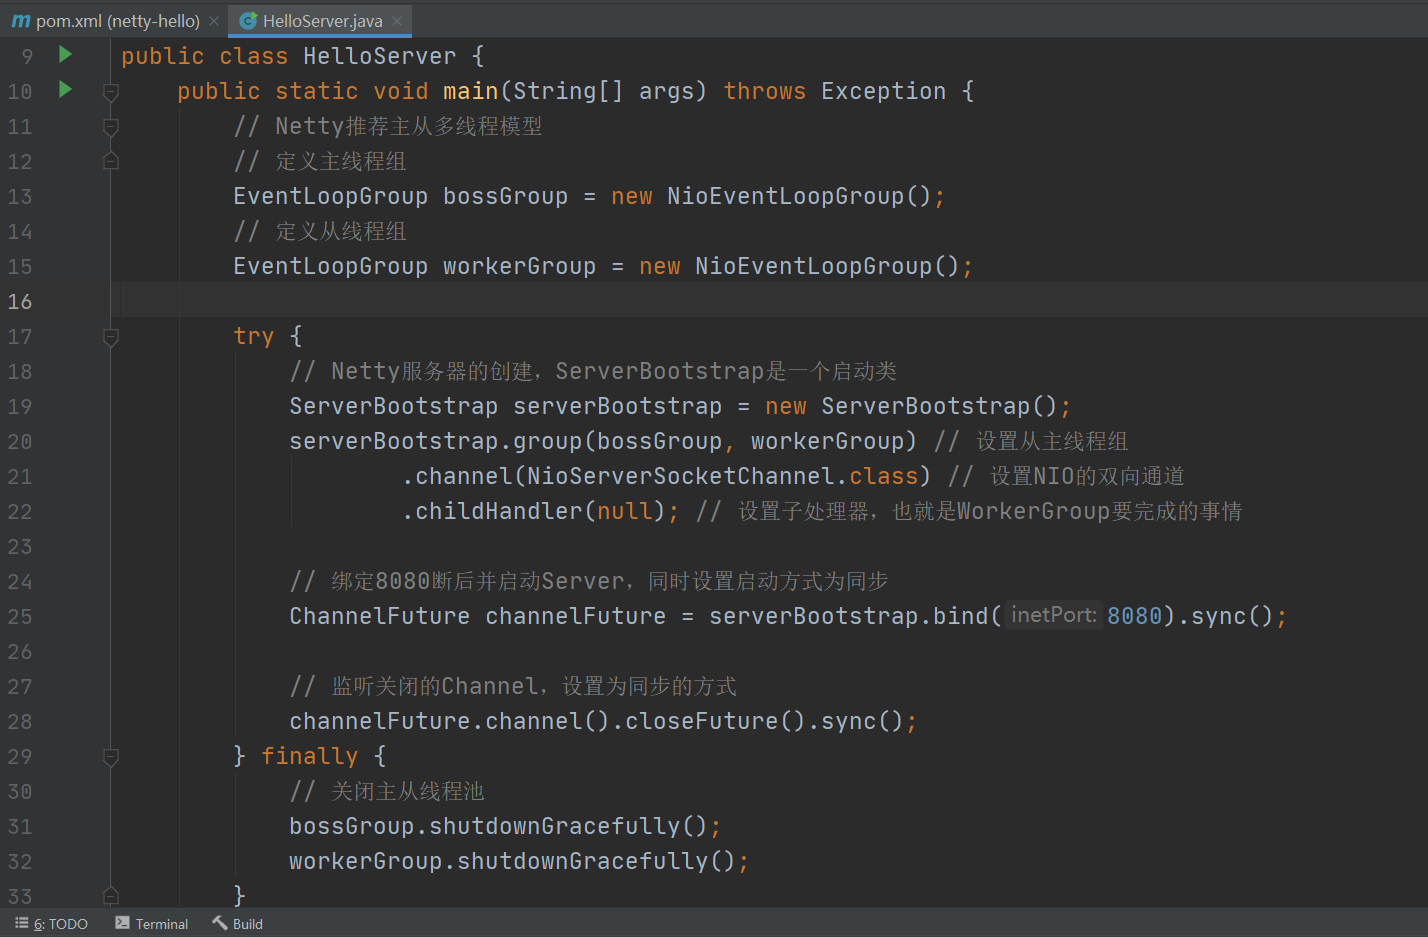
1、构建主从线程组与服务启动类
首先新建一个Maven工程,引入Netty的依赖,我引入的依赖如下:
<dependencies>
    <dependency>
        <groupId>io.netty</groupId>
        <artifactId>netty-all</artifactId>
        <version>4.1.50.Final</version>
    </dependency>
</dependencies>
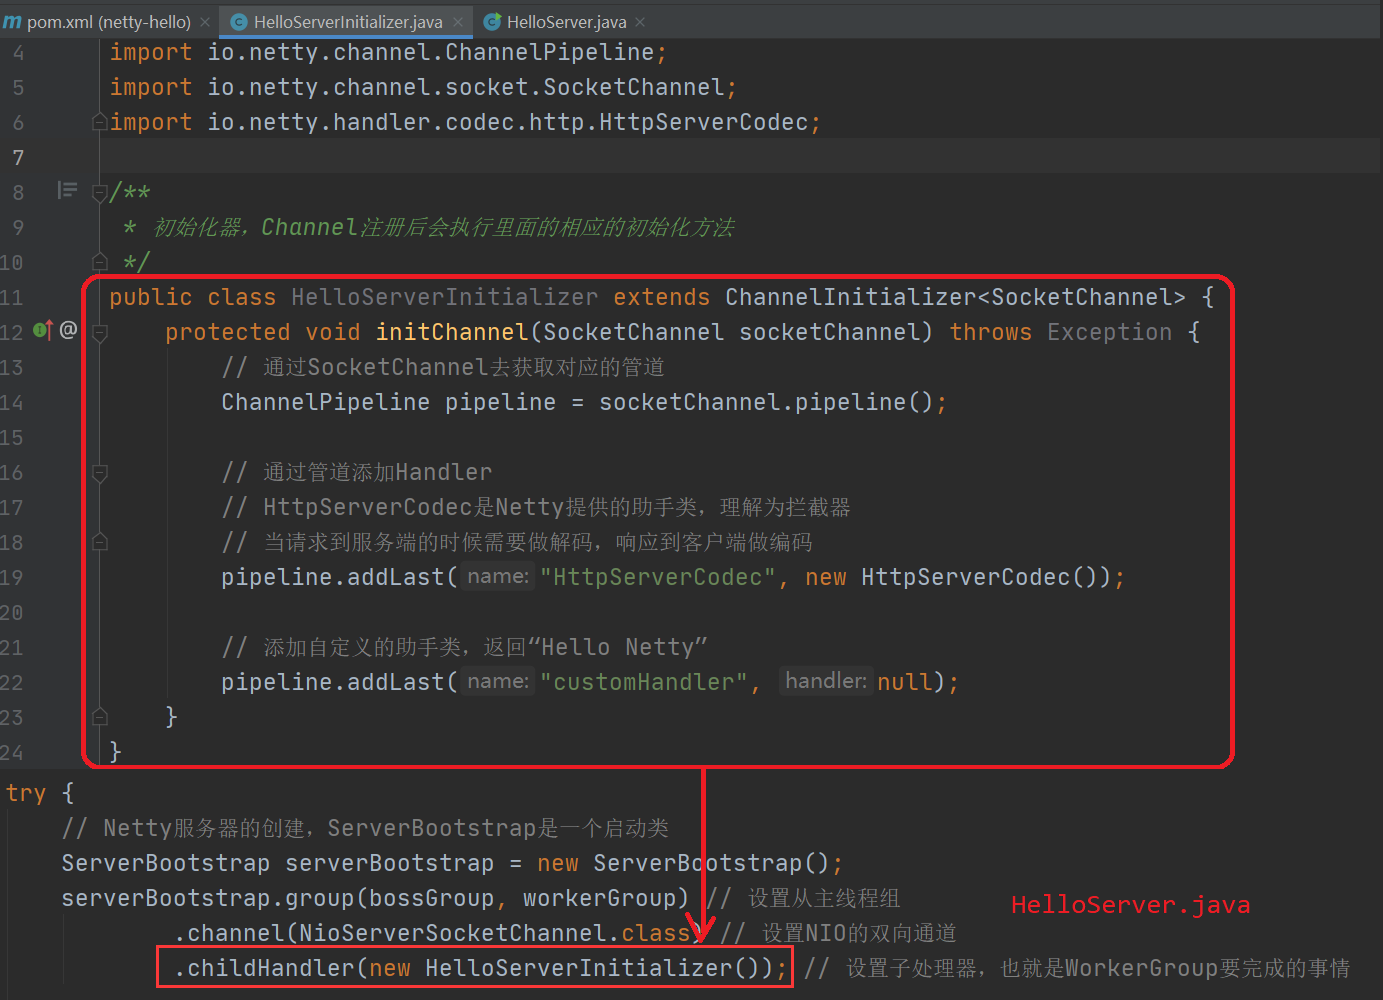
2、设置Channel初始化器
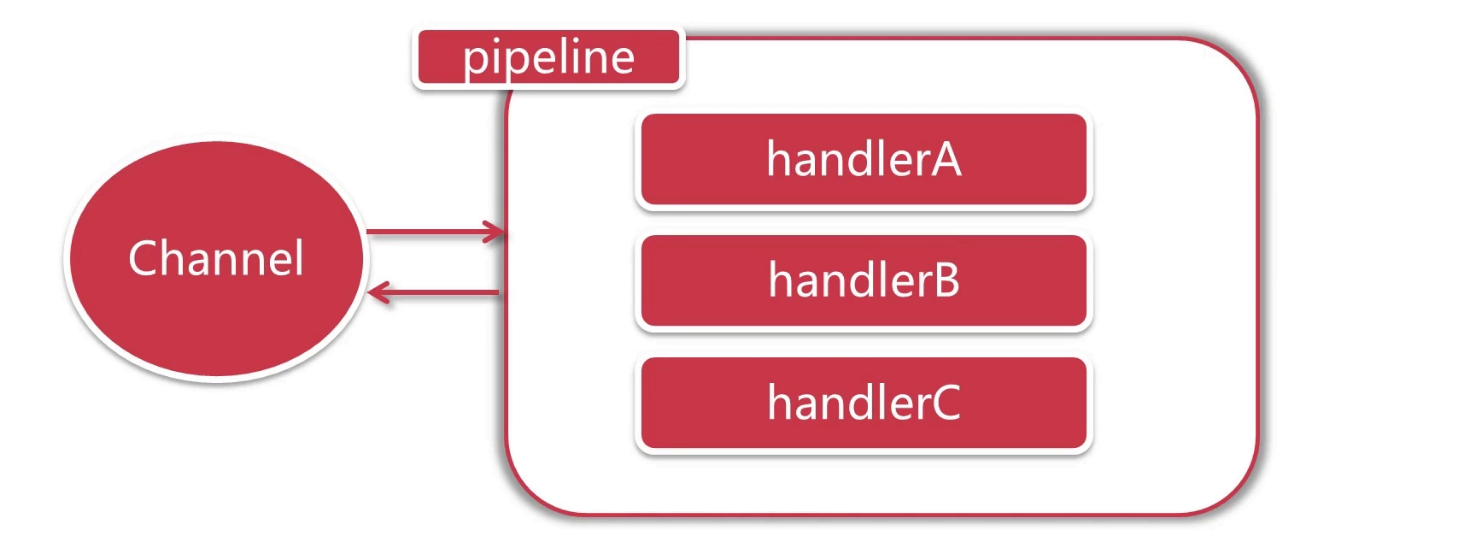
每一个channel由多个handler共同组成管道(pipeline)
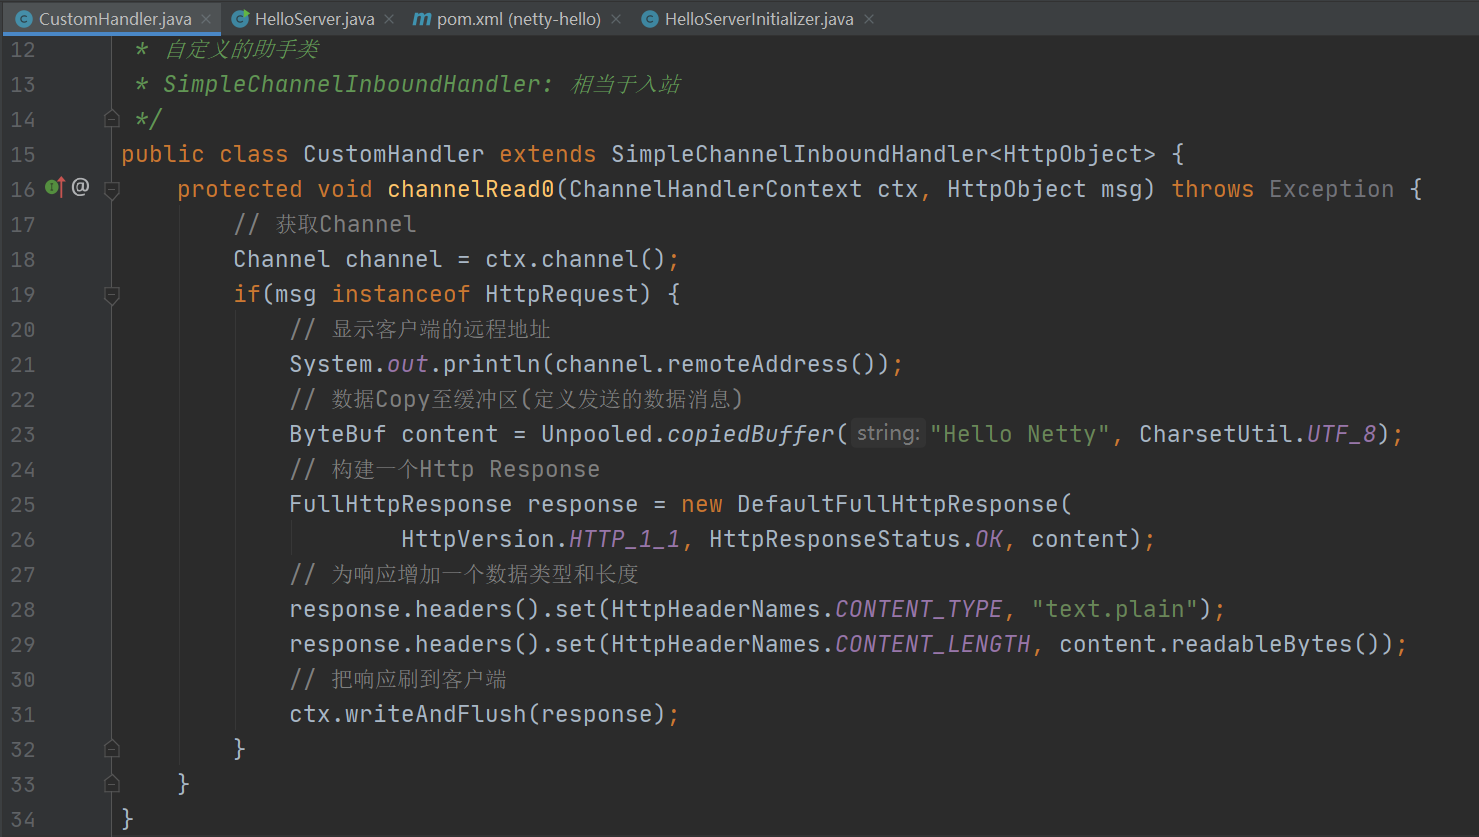
3、开始编写自定义的助手类
然后接下来启动服务器,通过Postman访问一下http://localhost:8080得到如下结果:
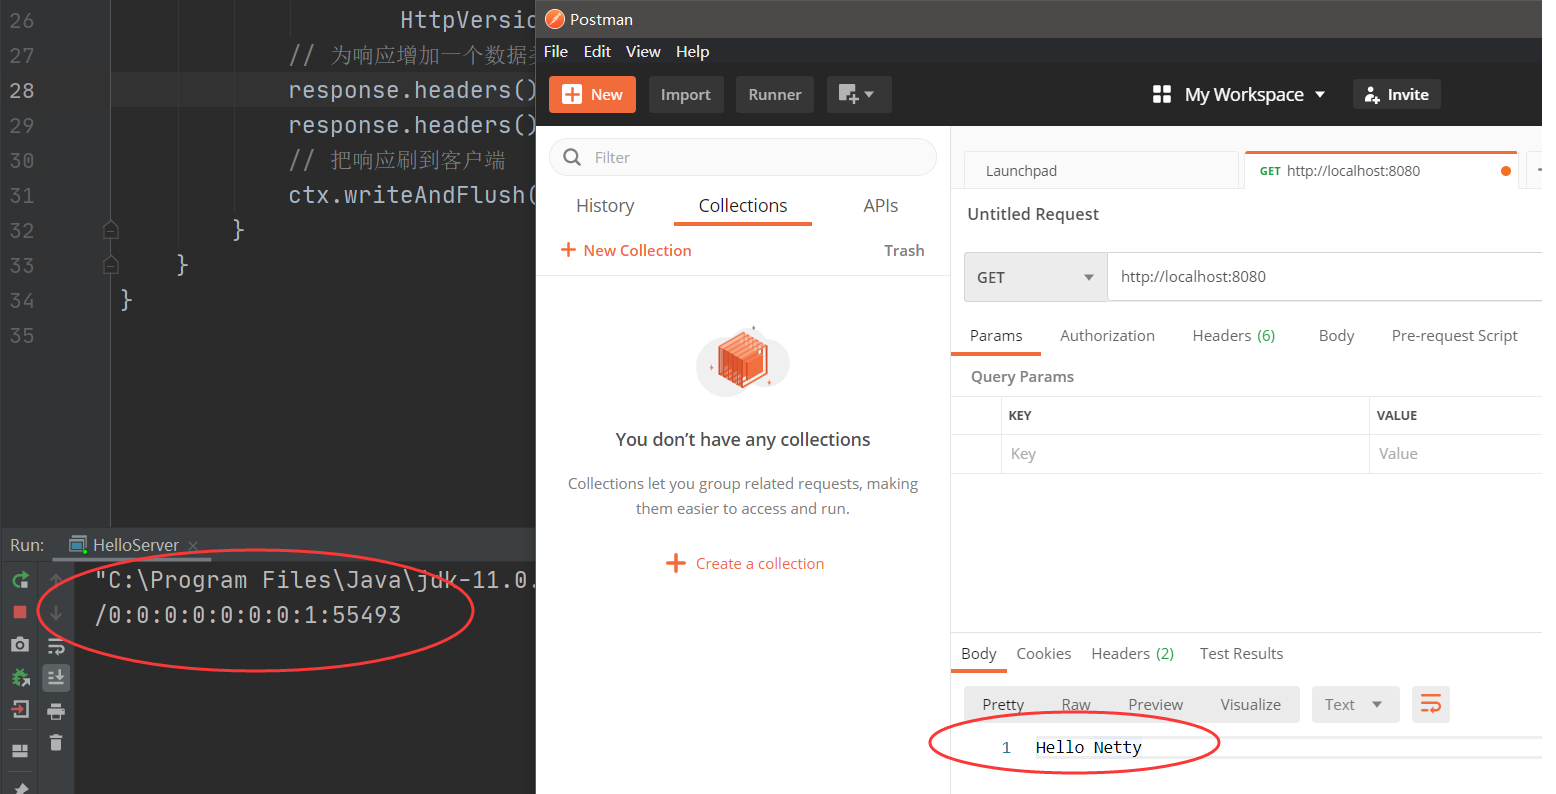
如果直接在浏览器端访问的话会打印两次客户端远程地址,因为浏览器默认还访问了http://localhost:8080/favicon.ico,或者使用在Linux环境下使用curl进行测试也是可以的。
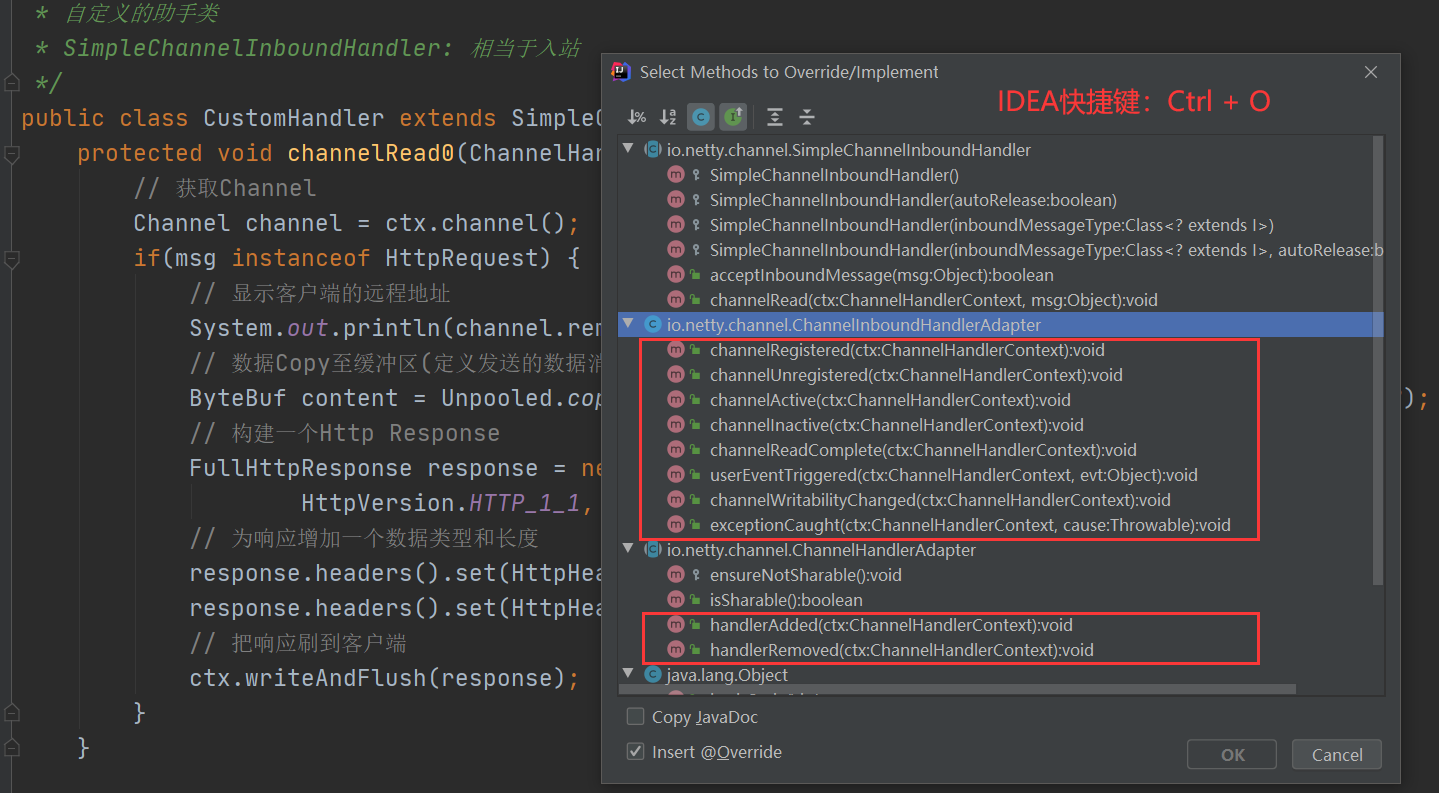
探究Channel生命周期
我们通过重写下图所示的方法来研究一下Channel的生命周期(IDEA快捷键 Ctrl + O):
重写完成之后的CustomHandler如下:
public class CustomHandler extends SimpleChannelInboundHandler<HttpObject> {
    protected void channelRead0(ChannelHandlerContext ctx, HttpObject msg) throws Exception {
        // 获取Channel
        Channel channel = ctx.channel();
        if(msg instanceof HttpRequest) {
            // 显示客户端的远程地址
            System.out.println(channel.remoteAddress());
            // 数据Copy至缓冲区(定义发送的数据消息)
            ByteBuf content = Unpooled.copiedBuffer("<h1>Hello Netty</h1>", CharsetUtil.UTF_8);
            // 构建一个Http Response
            FullHttpResponse response = new DefaultFullHttpResponse(
                    HttpVersion.HTTP_1_1, HttpResponseStatus.OK, content);
            // 为响应增加一个数据类型和长度
            response.headers().set(HttpHeaderNames.CONTENT_TYPE, "text.plain");
            response.headers().set(HttpHeaderNames.CONTENT_LENGTH, content.readableBytes());
            // 把响应刷到客户端
            ctx.writeAndFlush(response);
        }
    }

    @Override
    public void channelRegistered(ChannelHandlerContext ctx) throws Exception {
        System.out.println("Channel-注册");
        super.channelRegistered(ctx);
    }

    @Override
    public void channelUnregistered(ChannelHandlerContext ctx) throws Exception {
        System.out.println("Channel-移除");
        super.channelUnregistered(ctx);
    }

    @Override
    public void channelActive(ChannelHandlerContext ctx) throws Exception {
        System.out.println("Channel-活跃");
        super.channelActive(ctx);
    }

    @Override
    public void channelInactive(ChannelHandlerContext ctx) throws Exception {
        System.out.println("Channel-不活跃(断开了)");
        super.channelInactive(ctx);
    }

    @Override
    public void channelReadComplete(ChannelHandlerContext ctx) throws Exception {
        System.out.println("Channel-读取数据完毕");
        super.channelReadComplete(ctx);
    }

    @Override
    public void userEventTriggered(ChannelHandlerContext ctx, Object evt) throws Exception {
        System.out.println("用户事件触发");
        super.userEventTriggered(ctx, evt);
    }

    @Override
    public void channelWritabilityChanged(ChannelHandlerContext ctx) throws Exception {
        System.out.println("Channel-可写更改");
        super.channelWritabilityChanged(ctx);
    }

    @Override
    public void exceptionCaught(ChannelHandlerContext ctx, Throwable cause) throws Exception {
        System.out.println("捕获到异常");
        super.exceptionCaught(ctx, cause);
    }

    @Override
    public void handlerAdded(ChannelHandlerContext ctx) throws Exception {
        System.out.println("助手类添加");
        super.handlerAdded(ctx);
    }

    @Override
    public void handlerRemoved(ChannelHandlerContext ctx) throws Exception {
        System.out.println("助手类移除");
        super.handlerRemoved(ctx);
    }
}
通过Curl访问控制台打印如下:
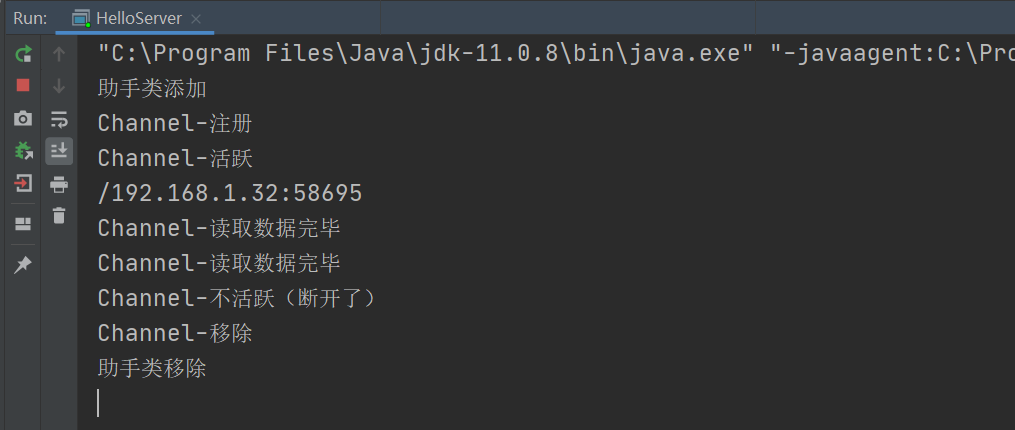
为什么要用CURL而不是浏览器或者PostMan呢?因为我们使用了HTTP1.1的版本,支持长连接,而且默认是开启状态,所以看不到Channel不活跃断开的状态,所以才使用CURL来访问。
网页版的WebSocket聊天室
1、Netty 服务器编码
Netty 服务器启动类WSServe.java如下:
import io.netty.bootstrap.ServerBootstrap;
import io.netty.channel.ChannelFuture;
import io.netty.channel.EventLoopGroup;
import io.netty.channel.nio.NioEventLoopGroup;
import io.netty.channel.socket.nio.NioServerSocketChannel;

public class WSServer {
    public static void main(String[] args) throws Exception {
        EventLoopGroup bossGroup = new NioEventLoopGroup();
        EventLoopGroup workerGroup = new NioEventLoopGroup();

        try{
            ServerBootstrap serverBootstrap = new ServerBootstrap();
            serverBootstrap.group(bossGroup, workerGroup)
                    .channel(NioServerSocketChannel.class)
                    .childHandler(new WSServerInitializer());

            ChannelFuture channelFuture = serverBootstrap.bind(8080).sync();
            channelFuture.channel().closeFuture().sync();
        } finally {
            bossGroup.shutdownGracefully();
            workerGroup.shutdownGracefully();
        }
    }
}
接下来是Channel初始化器WSServerInitializer.java
import io.netty.channel.ChannelInitializer;
import io.netty.channel.ChannelPipeline;
import io.netty.channel.socket.SocketChannel;
import io.netty.handler.codec.http.HttpObjectAggregator;
import io.netty.handler.codec.http.HttpServerCodec;
import io.netty.handler.codec.http.websocketx.WebSocketServerProtocolHandler;
import io.netty.handler.stream.ChunkedWriteHandler;

public class WSServerInitializer extends ChannelInitializer<SocketChannel> {
    @Override
    protected void initChannel(SocketChannel socketChannel) throws Exception {
        ChannelPipeline pipeline = socketChannel.pipeline();
        // WebSocket基于Http协议,添加Http编解码器
        pipeline.addLast(new HttpServerCodec());

        // 添加对写大数据流的支持
        pipeline.addLast(new ChunkedWriteHandler());

        // 对Http Message进行聚合,聚合成FullHttpRequest或FullHttpResponse
        // 几乎在Netty中的编程都会使用到此Handler
        pipeline.addLast(new HttpObjectAggregator(1024 * 64));

        //-------------------- 以上是用于支持HTTP协议 ----------------------

        // WebSocket服务器处理的协议,并且指定给客户端链接访问的路由
        // 使用此Handler会直接帮你处理握手动作(Close、Ping、Pong)
        // 对于WebSocket,都是以帧进行传输的,不同数据对应的帧也不同
        pipeline.addLast(new WebSocketServerProtocolHandler("/ws"));

        // 自定义的Handler
        pipeline.addLast(new ChatHandler());
    }
}
最后是自定义的Handler,ChatHandler.java
import io.netty.channel.Channel;
import io.netty.channel.ChannelHandlerContext;
import io.netty.channel.SimpleChannelInboundHandler;
import io.netty.channel.group.ChannelGroup;
import io.netty.channel.group.DefaultChannelGroup;
import io.netty.handler.codec.http.websocketx.TextWebSocketFrame;
import io.netty.util.concurrent.GlobalEventExecutor;

import java.time.LocalDateTime;

// 对于WebSocket,都是以帧进行传输的,不同数据对应的帧也不同 -> TextWebSocketFrame
// TextWebSocketFrame是WebSocket专门用于处理文本的对象,Frame是消息的载体
public class ChatHandler extends SimpleChannelInboundHandler<TextWebSocketFrame> {

    // 用于记录和管理所有客户端的Channel
    private static ChannelGroup clients = new DefaultChannelGroup(GlobalEventExecutor.INSTANCE);

    @Override
    protected void channelRead0(ChannelHandlerContext ctx, TextWebSocketFrame msg) throws Exception {
        // 从客户端获取到的消息内容
        String content = msg.text();
        System.out.println("接收到的数据:" + content);
        String message = "[服务器收到消息] " + LocalDateTime.now() + "消息为:" + content;
        for(Channel channel: clients){
            //channel.writeAndFlush(content); ERROR 不能直接传String,而是TextWebSocketFrame载体
            channel.writeAndFlush(new TextWebSocketFrame(message));
        }

        // 下面这种方式与For循环一致
        //clients.writeAndFlush(new TextWebSocketFrame(message));
    }


    @Override
    public void handlerAdded(ChannelHandlerContext ctx) throws Exception {
        Channel channel = ctx.channel();
        // 当客户端打开链接后,获取客户端的Channel并且添加Channel至ChannelGroup中进行管理
        clients.add(channel);
    }

    @Override
    public void handlerRemoved(ChannelHandlerContext ctx) throws Exception {
        // 当触发handlerRemoved,ChannelGroup会自动移除客户端的Channel
        System.out.println("客户端断开, Channel对应的长ID:" + ctx.channel().id().asLongText());
        System.out.println("客户端断开, Channel对应的短ID:" + ctx.channel().id().asShortText());
    }
}
2、前端JavaScript编码
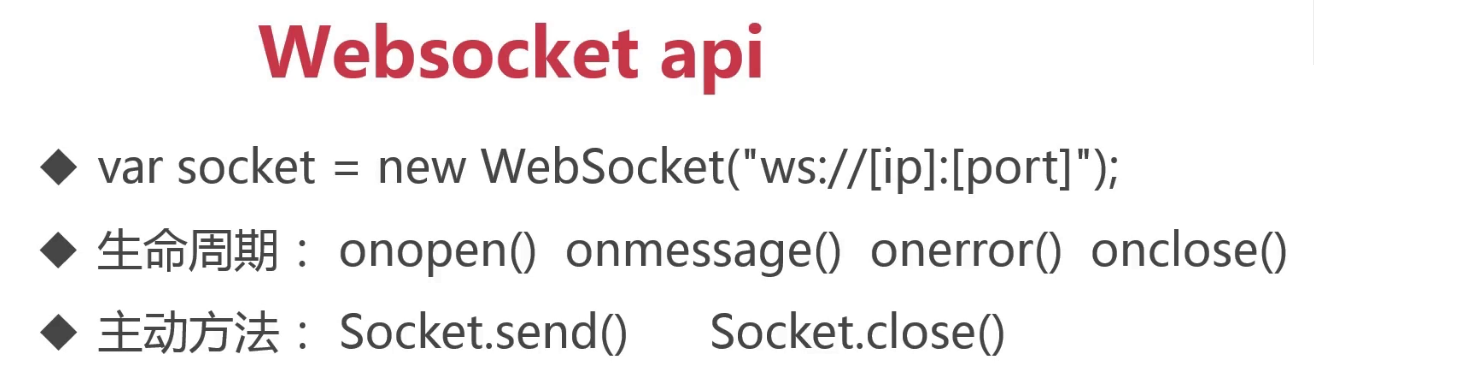
下面是前端需要用到的WebSocket API:
<html>
	<head>
		<meta charset="utf-8" />
		<title></title>
	</head>
	<body>
		<div>发送消息</div>
		<input type="text" id="msgContent"/>
		<input type="button" onclick="CHAT.chat()" value="发送"/>

		<div>接收消息</div>
		<div id="receiveMsg" style="background-color: darkturquoise;"></div>
		<script type="application/javascript">
			window.CHAT = {
				socket: null,
				init: function(){
					if(window.WebSocket){
						CHAT.socket = new WebSocket("ws://127.0.0.1:8080/ws");
						CHAT.socket.onopen = function(){
							console.log('连接建立成功...');
						},
						CHAT.socket.onclose = function(){
							console.log('连接建立关闭...');
						},
						CHAT.socket.onerror = function(){
							console.log('连接建立发生错误...');
						},
						CHAT.socket.onmessage = function(e){
							console.log('收到消息...' + e.data);
							var receiveMsg = document.getElementById('receiveMsg');
							var html = receiveMsg.innerHTML;
							receiveMsg.innerHTML = html + "<br/>" + e.data;
						}
					}else{
						alert('不支持WebSocket');
					}
				},
				chat: function(){
					var msg = document.getElementById("msgContent");
					CHAT.socket.send(msg.value);
				}
			}
			CHAT.init();
		</script>
	</body>
</html>
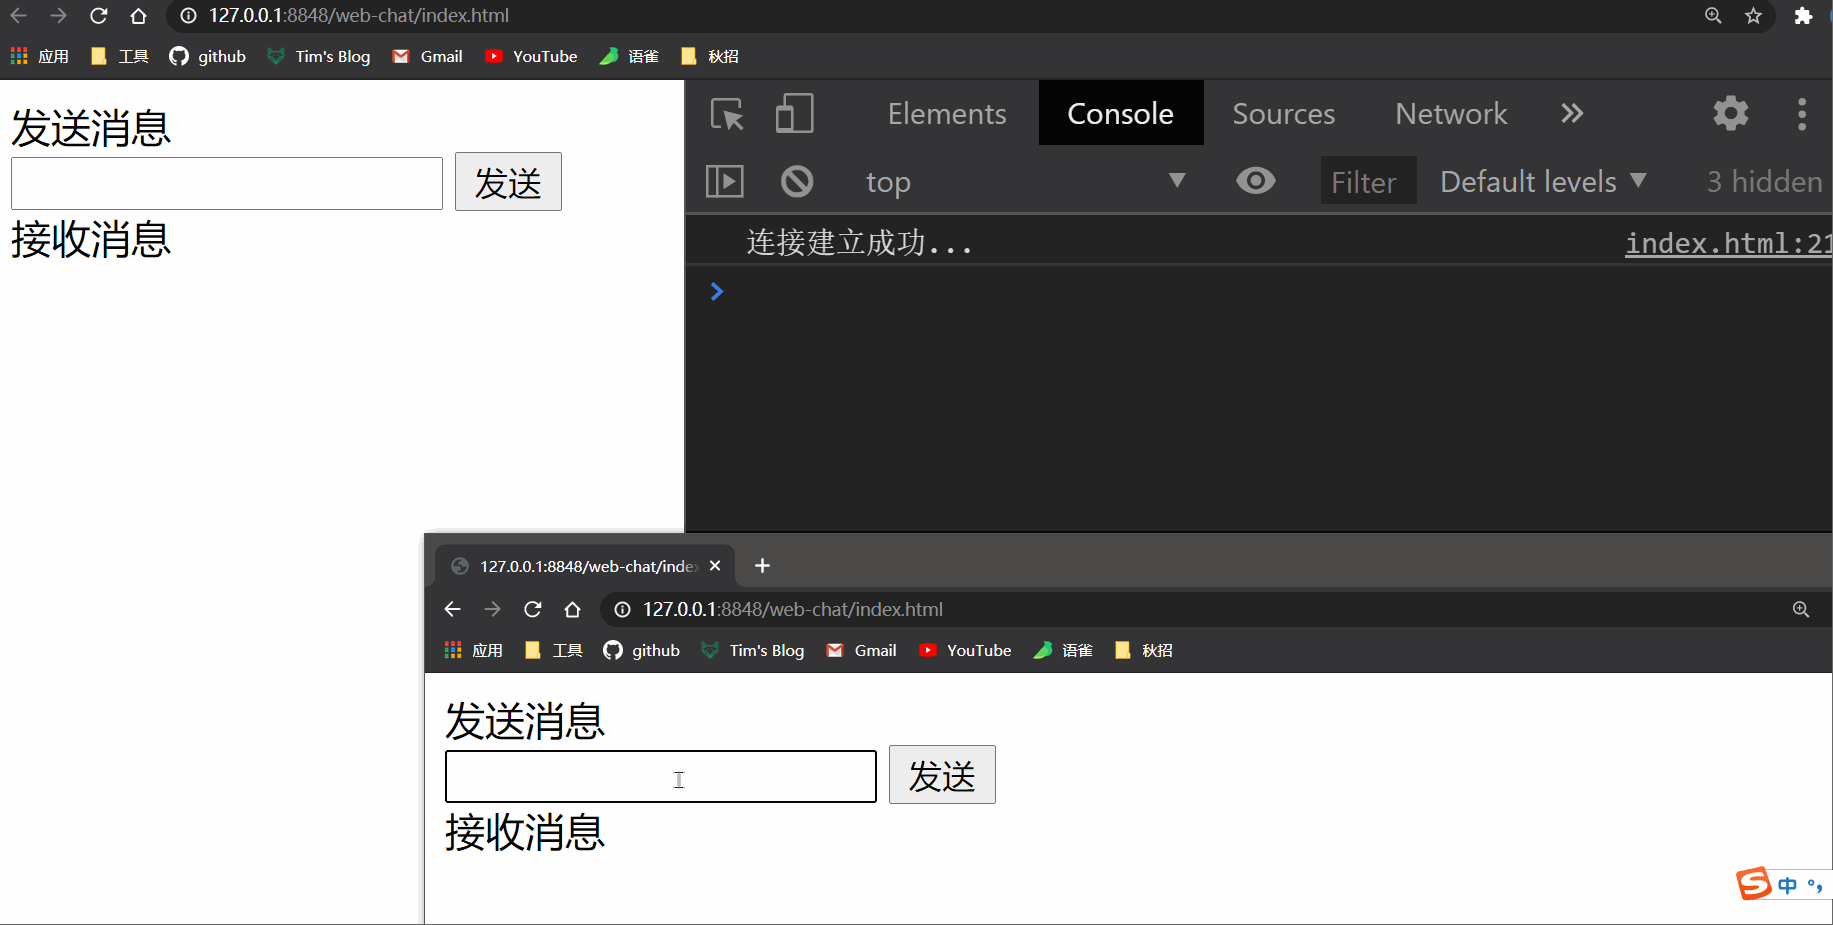
3、效果展示
Netty编码的小总结
首先是流程,先新建主从线程组,编写启动类,因为Netty官方推荐的模式也是主从线程模型。接下来是编写Channel初始化器,继承自ChannelInitializer,Channel注册后会执行里面的相应的初始化方法,通过Channel获取管道,然后添加需要的Handler,最后添加自己的自定义的Handler来处理请求。