Spring Cloud Bus自动刷新配置
在之前的文章中,我讲述了统一配置中心(服务端和客户端)的基本使用,并且演示了从配置Git仓库到拉取配置的整个流程,请见 《统一配置中心》 这篇博客。在该博客中我们说到了,统一配置中心还有个好处就是动态更新配置文件,而无需手动重启服务,但是并没有演示或者实现。本文将记述如何通过Spring Cloud Bus自动刷新配置,以及自动刷新的原理。
自动刷新配置原理
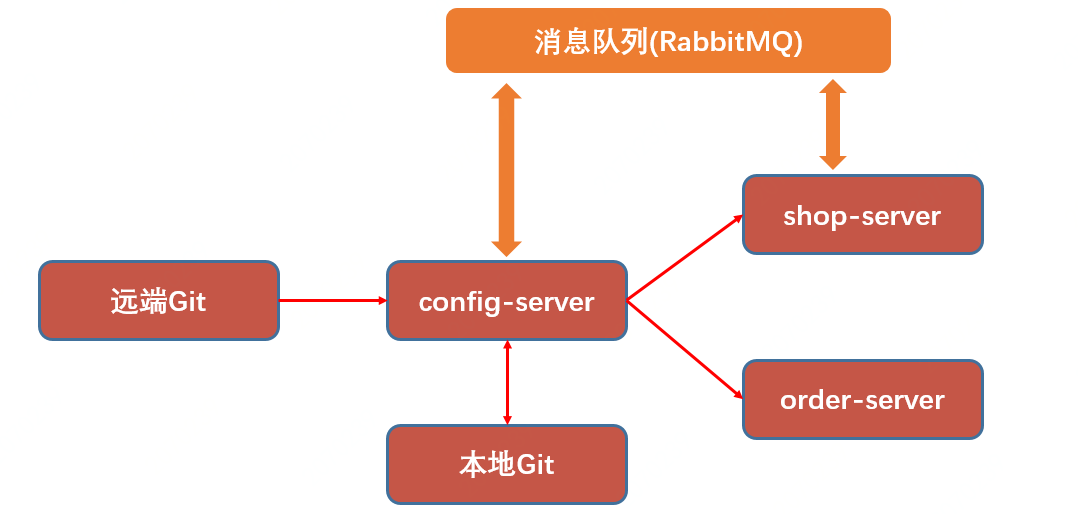
实现配置的自动刷新是很有必要的,先看看使用Spring Cloud Bus实现配置的自动刷新的原理,如下图:

Spring Cloud Bus提供了批量刷新配置的机制,它使用轻量级的消息代理(例如RabbitMQ、Kafka等)连接分布式系统的节点,这样就可以通过Spring Cloud Bus广播配置的变化或者其他的管理指令。shop服务的所有实例通过消息总线连接到了一起,每个实例都会订阅配置更新事件。当其中一个微服务节点的/bus/refresh端点被请求时,该实例就会向消息总线发送一个配置更新事件,其他实例获得该事件后也会更新配置。
实现配置自动刷新
1、引入相关依赖和配置
<dependency>
    <groupId>org.springframework.cloud</groupId>
    <artifactId>spring-cloud-starter-bus-amqp</artifactId>
</dependency>
因为Spring Cloud Bus是需要通过消息队列来完成自动刷新配置的功能的,所以需要开启一个消息队列,并且在配置文件中配置一下消息队列,我这里采用的是RabbitMQ:
spring:
  application:
    name: config
  cloud:
    config:
      server:
        git:
          uri: https://gitee.com/zouchanglin/config-repo
          username: zouchanglin
          password: 00001010101
          basedir: /root/config
  rabbitmq:
    host: 192.168.79.128
    port: 5672
    username: guest
    password: guest

eureka:
  instance:
    appname: config
  client:
    service-url:
      defaultZone: http://localhost:8762/eureka
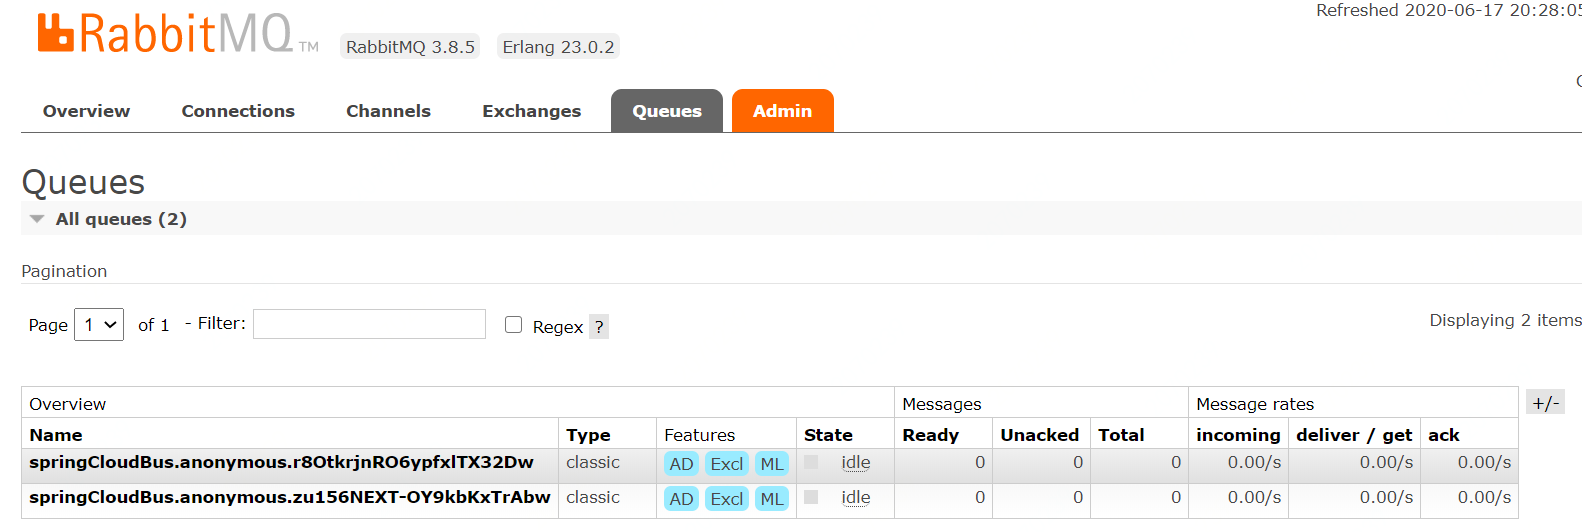
统一配置中心和Client启动后可以看到对应的消息队列:

2、暴露更新接口
POST http://localhost:8080/actuator/bus-refresh
使用POST方式请求该接口,统一配置中心才知道Git仓库中的配置发生了变化,才会主动去拉取最新的配置,然后把配置更新的消息发送到消息队列,Config Client消费消息从而主动去配置中心拉取最新的配置,才完成了配置自动更新。但是actuator/bus-refresh 这个接口需要暴露出去,Git的WebHook才能访问到这个接口,所以还需要在统一配置中心的配置文件中加入以下内容:
spring:
  application:
    name: config
  cloud:
    config:
      server:
        git:
          uri: https://gitee.com/zouchanglin/config-repo
          username: zouchanglin
          password: 00101010101
          basedir: /root/config
  rabbitmq:
    host: 192.168.79.128
    port: 5672
    username: guest
    password: guest

# 把actuator/bus-refresh接口暴露出去
management:
  endpoints:
    web:
      exposure:
        include: "*"

eureka:
  instance:
    appname: config
  client:
    service-url:
      defaultZone: http://localhost:8762/eureka
更新完配置文件后,重启一下统一配置中心。
3、声明配置自动更新范围
shop-dev.yml配置如下,它的env属性是dev
server:
  port: 8090

eureka:
  client:
    service-url:
      defaultZone: http://localhost:8762/eureka/

spring:
  application:
    name: shop
  rabbitmq:
    host: 192.168.79.128
    port: 5672
    username: guest
    password: guest
env: dev
我们在测试拿到的配置文件的内容的时候,写了这样的Controller,现在需要新加一个@RefreshScope注解,其实就是声明了配置自动更新的生效范围,所以需要加上@RefreshScope注解:
@RestController
@RequestMapping("/env")
@RefreshScope
public class EnvController {

    @Value("${env}")
    private String env;

    @GetMapping("print")
    public String printEnv(){
        return env;
    }
}
但是通常不这样使用,我们往往是把配置集中到一起,然后在配置类上面声明,假设现在Git仓库的shop-dev.yml配置如下:
server:
  port: 8090

eureka:
  client:
    service-url:
      defaultZone: http://localhost:8762/eureka/

spring:
  application:
    name: shop
  rabbitmq:
    host: 192.168.79.128
    port: 5672
    username: guest
    password: guest
env: dev

boy:
  name: Tim
  age: 18
于是在config目录下新建一个JavaBean,叫做Boy,这时对这个Boy加上@RefreshScope:
package xpu.edu.shop_service.config;

@Data
@Component
@ConfigurationProperties(prefix = "boy")
@RefreshScope
public class Boy {
    private String name;
    private int age;
}
此时Controller修改为如下:
@RestController
@RequestMapping("/env")
public class EnvController {

    @Autowired
    private Boy boy;

    @GetMapping("print")
    public String printEnv(){
        return "name:" + boy.getName() + " age:" + boy.getAge();
    }
}
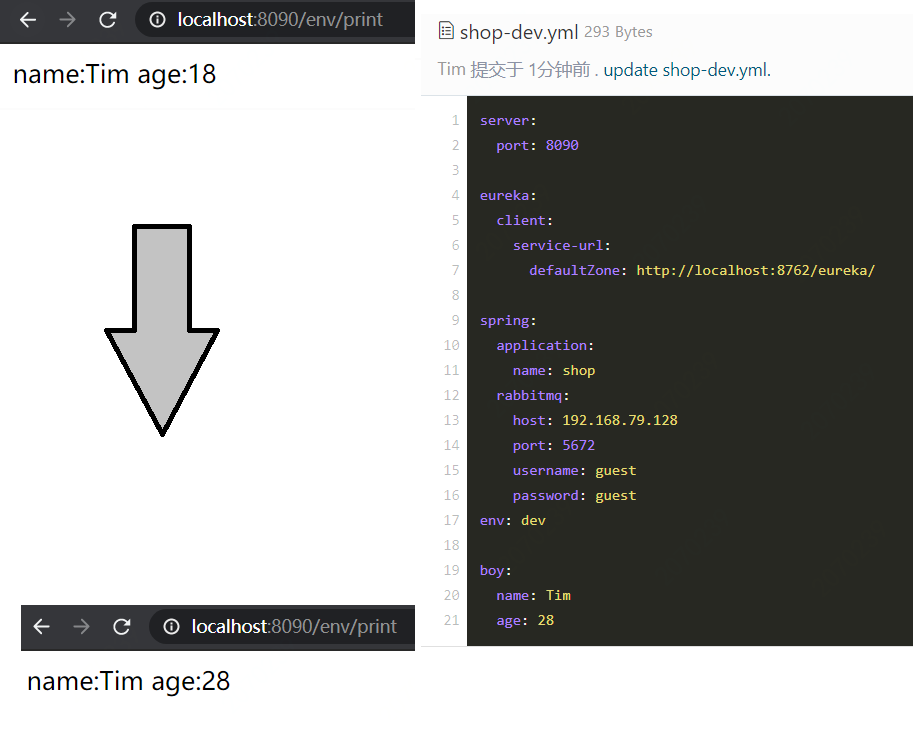
通过手动访问/actuator/bus-refresh 接口,已经实现了刷新,如下图所示:

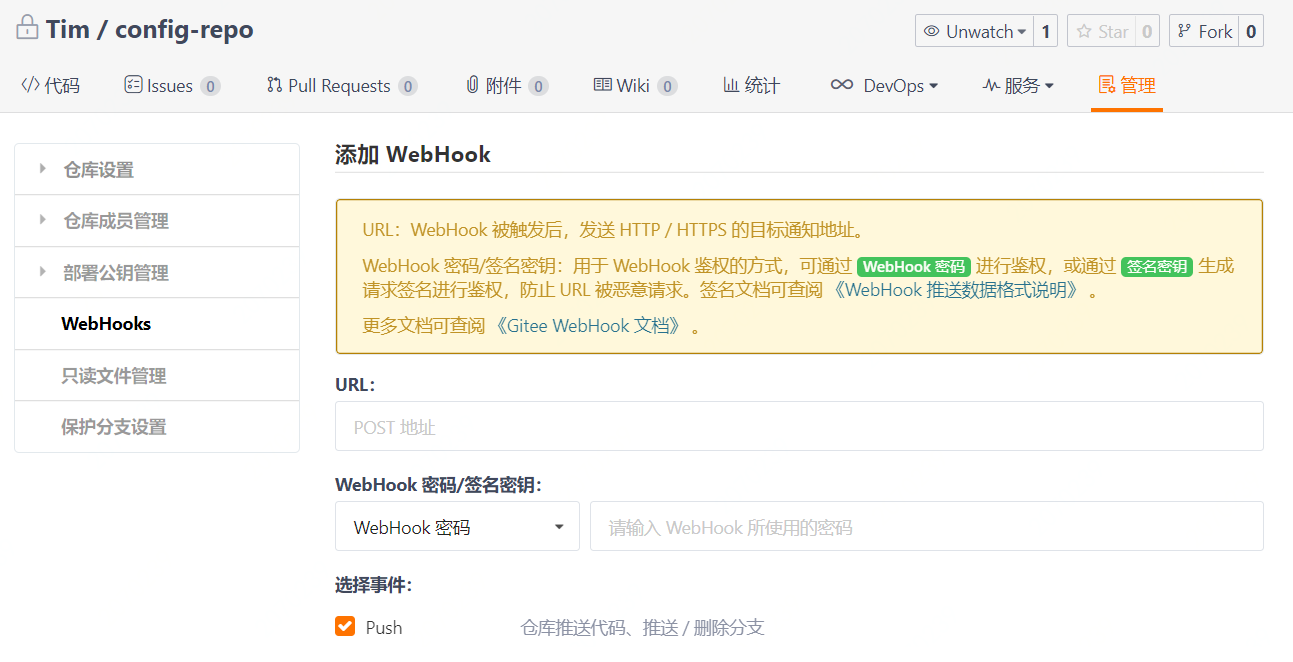
现在自动刷新就只差一步了,那就是配置Git的WebHook,只要发生更新或者是其他事件,Git托管平台便会自动访问我们的/actuator/bus-refresh 接口,从而自动刷新配置文件就完成了!
