Spring Security oAuth2(二)
在 《Spring Security oAuth2(一)》 中主要是oAuth的一些基本概念与四种认证方式,现在就正式开始完成几个主要示例,快速上手Spring提供的Spring Security oAuth2。网上很多示例教程都是使用 JWT(JSON Web Tokens)来管理Token,于是很多人认为oAuth2就应该用JWT来管理Token,其实这是非常错误的想法,后面我会专门就使用 JWT 这个问题进行讨论,看看 JWT 的最佳使用场景。
创建oAuth2 示例工程
新建名为spring-security-oauth2的Maven工程,pom.xml(spring-security-oauth2)如下:
<?xml version="1.0" encoding="UTF-8"?>
<project xmlns="http://maven.apache.org/POM/4.0.0"
         xmlns:xsi="http://www.w3.org/2001/XMLSchema-instance"
         xsi:schemaLocation="http://maven.apache.org/POM/4.0.0 http://maven.apache.org/xsd/maven-4.0.0.xsd">
    <modelVersion>4.0.0</modelVersion>

    <parent>
        <groupId>org.springframework.boot</groupId>
        <artifactId>spring-boot-starter-parent</artifactId>
        <version>2.3.10.RELEASE</version>
        <relativePath/> <!-- lookup parent from repository -->
    </parent>

    <groupId>cn.tim</groupId>
    <artifactId>spring-security-oauth2</artifactId>
    <packaging>pom</packaging>
    <version>1.0-SNAPSHOT</version>

    <modules>
        <module>spring-security-oauth2-server</module>
        <module>spring-security-oauth2-dependencies</module>
    </modules>

    <properties>
        <maven.compiler.source>8</maven.compiler.source>
        <maven.compiler.target>8</maven.compiler.target>
    </properties>

    <dependencyManagement>
        <dependencies>
            <dependency>
                <groupId>cn.tim</groupId>
                <artifactId>spring-security-oauth2-dependencies</artifactId>
                <version>1.0.0-SNAPSHOT</version>
                <type>pom</type>
                <scope>import</scope>
            </dependency>
        </dependencies>
    </dependencyManagement>

    <build>
        <plugins>
            <plugin>
                <groupId>org.springframework.boot</groupId>
                <artifactId>spring-boot-maven-plugin</artifactId>
            </plugin>
        </plugins>
    </build>
</project>
其中有两个模块,一个是 spring-security-oauth2-dependencies,另一个是 spring-security-oauth2-server。在spring-security-oauth2项目中创建名为 spring-security-oauth2-dependencies 的 Maven 子 Module,作为统一的依赖管理模块,其pom.xml文件如下:
<?xml version="1.0" encoding="UTF-8"?>
<project xmlns="http://maven.apache.org/POM/4.0.0"
         xmlns:xsi="http://www.w3.org/2001/XMLSchema-instance"
         xsi:schemaLocation="http://maven.apache.org/POM/4.0.0 http://maven.apache.org/xsd/maven-4.0.0.xsd">
    <modelVersion>4.0.0</modelVersion>

    <groupId>cn.tim</groupId>
    <artifactId>spring-security-oauth2-dependencies</artifactId>
    <version>1.0.0-SNAPSHOT</version>
    <packaging>pom</packaging>
    <url>https://zouchanglin.cn</url>

    <properties>
        <maven.compiler.source>8</maven.compiler.source>
        <maven.compiler.target>8</maven.compiler.target>
        <spring-cloud.version>Hoxton.RELEASE</spring-cloud.version>
    </properties>
    <dependencyManagement>
        <dependencies>
            <dependency>
                <groupId>org.springframework.cloud</groupId>
                <artifactId>spring-cloud-dependencies</artifactId>
                <version>${spring-cloud.version}</version>
                <type>pom</type>
                <scope>import</scope>
            </dependency>
        </dependencies>
    </dependencyManagement>

    <pluginRepositories>
        <pluginRepository>
            <id>spring-milestone</id>
            <name>Spring Milestone</name>
            <url>https://repo.spring.io/milestone</url>
            <snapshots>
                <enabled>false</enabled>
            </snapshots>
        </pluginRepository>
        <pluginRepository>
            <id>spring-snapshot</id>
            <name>Spring Snapshot</name>
            <url>https://repo.spring.io/snapshot</url>
            <snapshots>
                <enabled>true</enabled>
            </snapshots>
        </pluginRepository>
    </pluginRepositories>
</project>
接下来创建另一个子 Module,即 spring-security-oauth2-server,这个模块作为认证/授权服务器模块,对应的pom.xml 如下:
<?xml version="1.0" encoding="UTF-8"?>
<project xmlns="http://maven.apache.org/POM/4.0.0"
         xmlns:xsi="http://www.w3.org/2001/XMLSchema-instance"
         xsi:schemaLocation="http://maven.apache.org/POM/4.0.0 http://maven.apache.org/xsd/maven-4.0.0.xsd">
    <parent>
        <artifactId>spring-security-oauth2</artifactId>
        <groupId>cn.tim</groupId>
        <version>1.0-SNAPSHOT</version>
    </parent>

    <modelVersion>4.0.0</modelVersion>

    <artifactId>spring-security-oauth2-server</artifactId>

    <properties>
        <maven.compiler.source>8</maven.compiler.source>
        <maven.compiler.target>8</maven.compiler.target>
    </properties>

    <dependencies>
        <dependency>
            <groupId>org.springframework.boot</groupId>
            <artifactId>spring-boot-starter-web</artifactId>
        </dependency>

        <dependency>
            <groupId>org.springframework.cloud</groupId>
            <artifactId>spring-cloud-starter-oauth2</artifactId>
        </dependency>

        <dependency>
            <groupId>org.springframework.boot</groupId>
            <artifactId>spring-boot-starter-test</artifactId>
        </dependency>
    </dependencies>

    <build>
        <plugins>
            <plugin>
                <groupId>org.springframework.boot</groupId>
                <artifactId>spring-boot-maven-plugin</artifactId>
                <configuration>
                    <mainClass>cn.tim.security.server.OAuth2ServerApplication</mainClass>
                </configuration>
            </plugin>
        </plugins>
    </build>
</project>
工程到这里也就搭建完毕了,剩下的内容就是编写代码了。
基于内存存储令牌
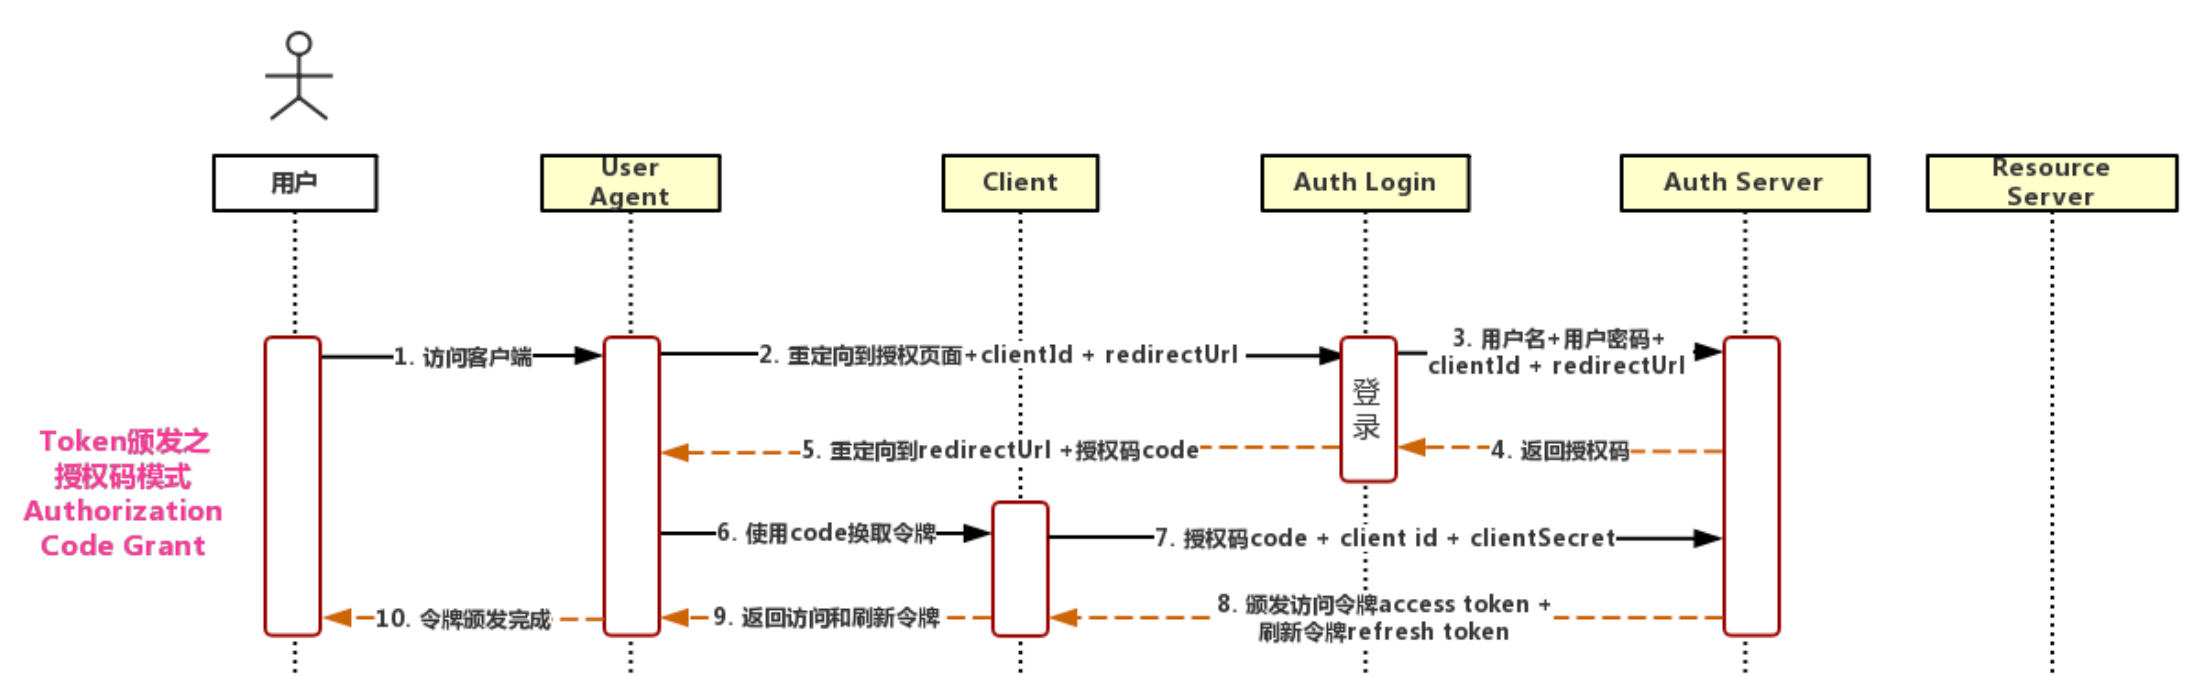
基于内存存储令牌的模式用于演示最基本的操作,这样可以快速地理解 oAuth2 认证服务器中 “认证”、“授权”、“访问令牌” 的基本概念,还是下面这张图:
 step1: 请求认证服务获取授权码,请求地址:
GET http://localhost:8080/oauth/authorize?client_id=client&response_type=code
携带了client_id以及认证类型response_type等参数。
step2: 认证通过,回调注册的URL,携带参数code
GET http://emaple.com/xxx?code=xxxxx
step3: 请求认证服务器获取令牌
POST http://yourClientId:yourSecret@localhost:8080/oauth/token
携带参数为grant_type:authorization_code,code:xxxxx(code就是step2中的code)
step4: 认证服务器返回令牌
{
    "access_token": "5cb673e1-d5c1-4887-b766-0975b29ab74b",
    "token_type": "bearer",
    "expires_in": 43199,
    "scope": "app"
}
步骤就是上面的步骤,现在开始编写认证服务器的配置代码。创建一个类继承 AuthorizationServerConfigurerAdapter 并添加相关注解
package cn.tim.security.server.config;

import org.springframework.beans.factory.annotation.Autowired;
import org.springframework.context.annotation.Configuration;
import org.springframework.security.crypto.bcrypt.BCryptPasswordEncoder;
import org.springframework.security.oauth2.config.annotation.configurers.ClientDetailsServiceConfigurer;
import org.springframework.security.oauth2.config.annotation.web.configuration.AuthorizationServerConfigurerAdapter;
import org.springframework.security.oauth2.config.annotation.web.configuration.EnableAuthorizationServer;

@Configuration
@EnableAuthorizationServer
public class AuthenticationServerConfiguration extends AuthorizationServerConfigurerAdapter {

    @Autowired
    private BCryptPasswordEncoder passwordEncoder;

    // 1、基于内存存储令牌
    @Override
    public void configure(ClientDetailsServiceConfigurer clients) throws Exception {
        // 配置客户端
        clients
                // 使用内存设置
                .inMemory()
                // client_id
                .withClient("client")
                // client_secret,注意这个secret是需要加密的,这里使用默认编码器
                .secret(passwordEncoder.encode("secret"))
                // 授权类型
                .authorizedGrantTypes("authorization_code")
                // 授权范围
                .scopes("app")
                // 注册回调地址
                .redirectUris("https://example.com");
    }
}
然后是服务器安全配置,创建一个类继承 WebSecurityConfigurerAdapter 并添加相关注解:
package cn.tim.security.server.config;

import org.springframework.context.annotation.Bean;
import org.springframework.context.annotation.Configuration;
import org.springframework.security.config.annotation.authentication.builders.AuthenticationManagerBuilder;
import org.springframework.security.config.annotation.method.configuration.EnableGlobalMethodSecurity;
import org.springframework.security.config.annotation.web.configuration.EnableWebSecurity;
import org.springframework.security.config.annotation.web.configuration.WebSecurityConfigurerAdapter;
import org.springframework.security.crypto.bcrypt.BCryptPasswordEncoder;


@Configuration
@EnableWebSecurity
@EnableGlobalMethodSecurity(prePostEnabled = true, securedEnabled = true, jsr250Enabled = true)
public class WebSecurityConfiguration extends WebSecurityConfigurerAdapter {

    @Bean
    public BCryptPasswordEncoder passwordEncoder(){
        return new BCryptPasswordEncoder();
    }

    @Override
    protected void configure(AuthenticationManagerBuilder auth) throws Exception {
        auth.inMemoryAuthentication()
                .withUser("admin").password(passwordEncoder().encode("123456")).roles("ADMIN")
                .and()
                .withUser("user").password(passwordEncoder().encode("123456")).roles("USER");
    }
}
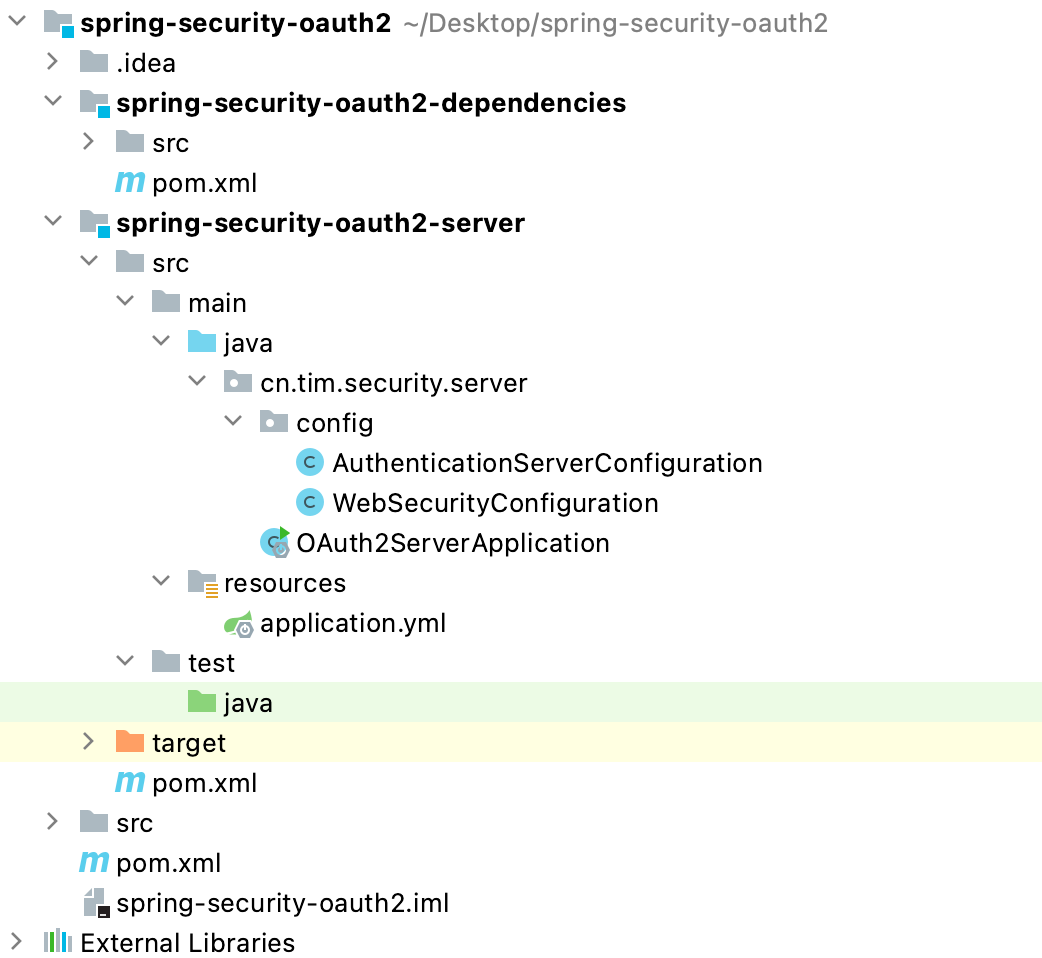
整个项目结构如下:
 现在开始访问获取授权码,打开浏览器,输入地址:
http://localhost:8080/oauth/authorize?client_id=client&response_type=code
会跳转到登录页面:
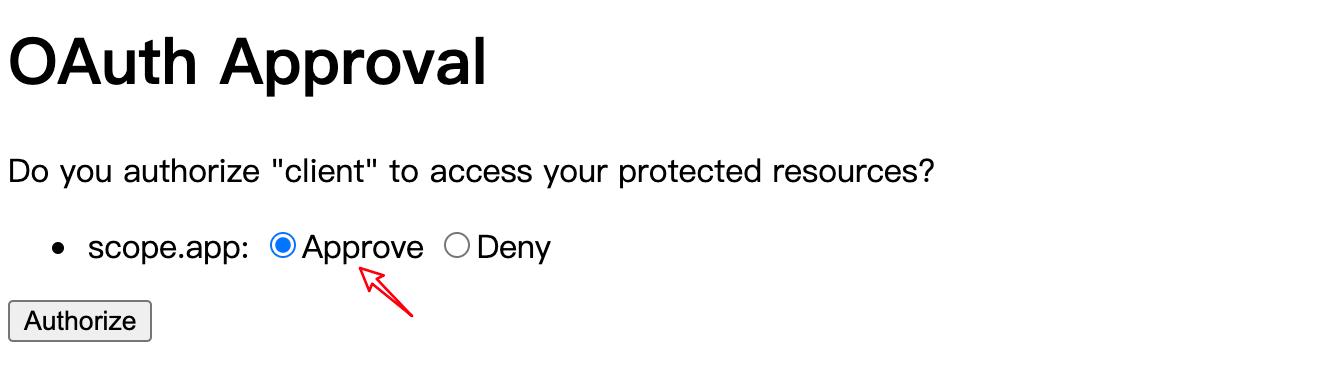
 验证成功后会询问用户是否授权客户端
 选择授权后会跳转到预先设定的地址,浏览器地址上还会包含一个授权码(code=j4jmTM),浏览器地址栏会显示如下地址:
https://example.com/?code=j4jmTM
有了这个授权码就可以获取访问令牌了,现在我们通过授权码向服务器申请令牌,通过curl的方式访问:
curl -X POST -H "Content-Type: application/x-www-form-urlencoded" -d 'grant_type=authorization_code&code=j4jmTM' "http://client:secret@localhost:8080/oauth/token"
得到的结果如下:
{
    "access_token":"b15c7d2d-b8ea-41e7-ac09-c7fd1517114b",
    "token_type":"bearer",
    "expires_in":43199,
    "scope":"app"
}
现在用PostMan请求试试:
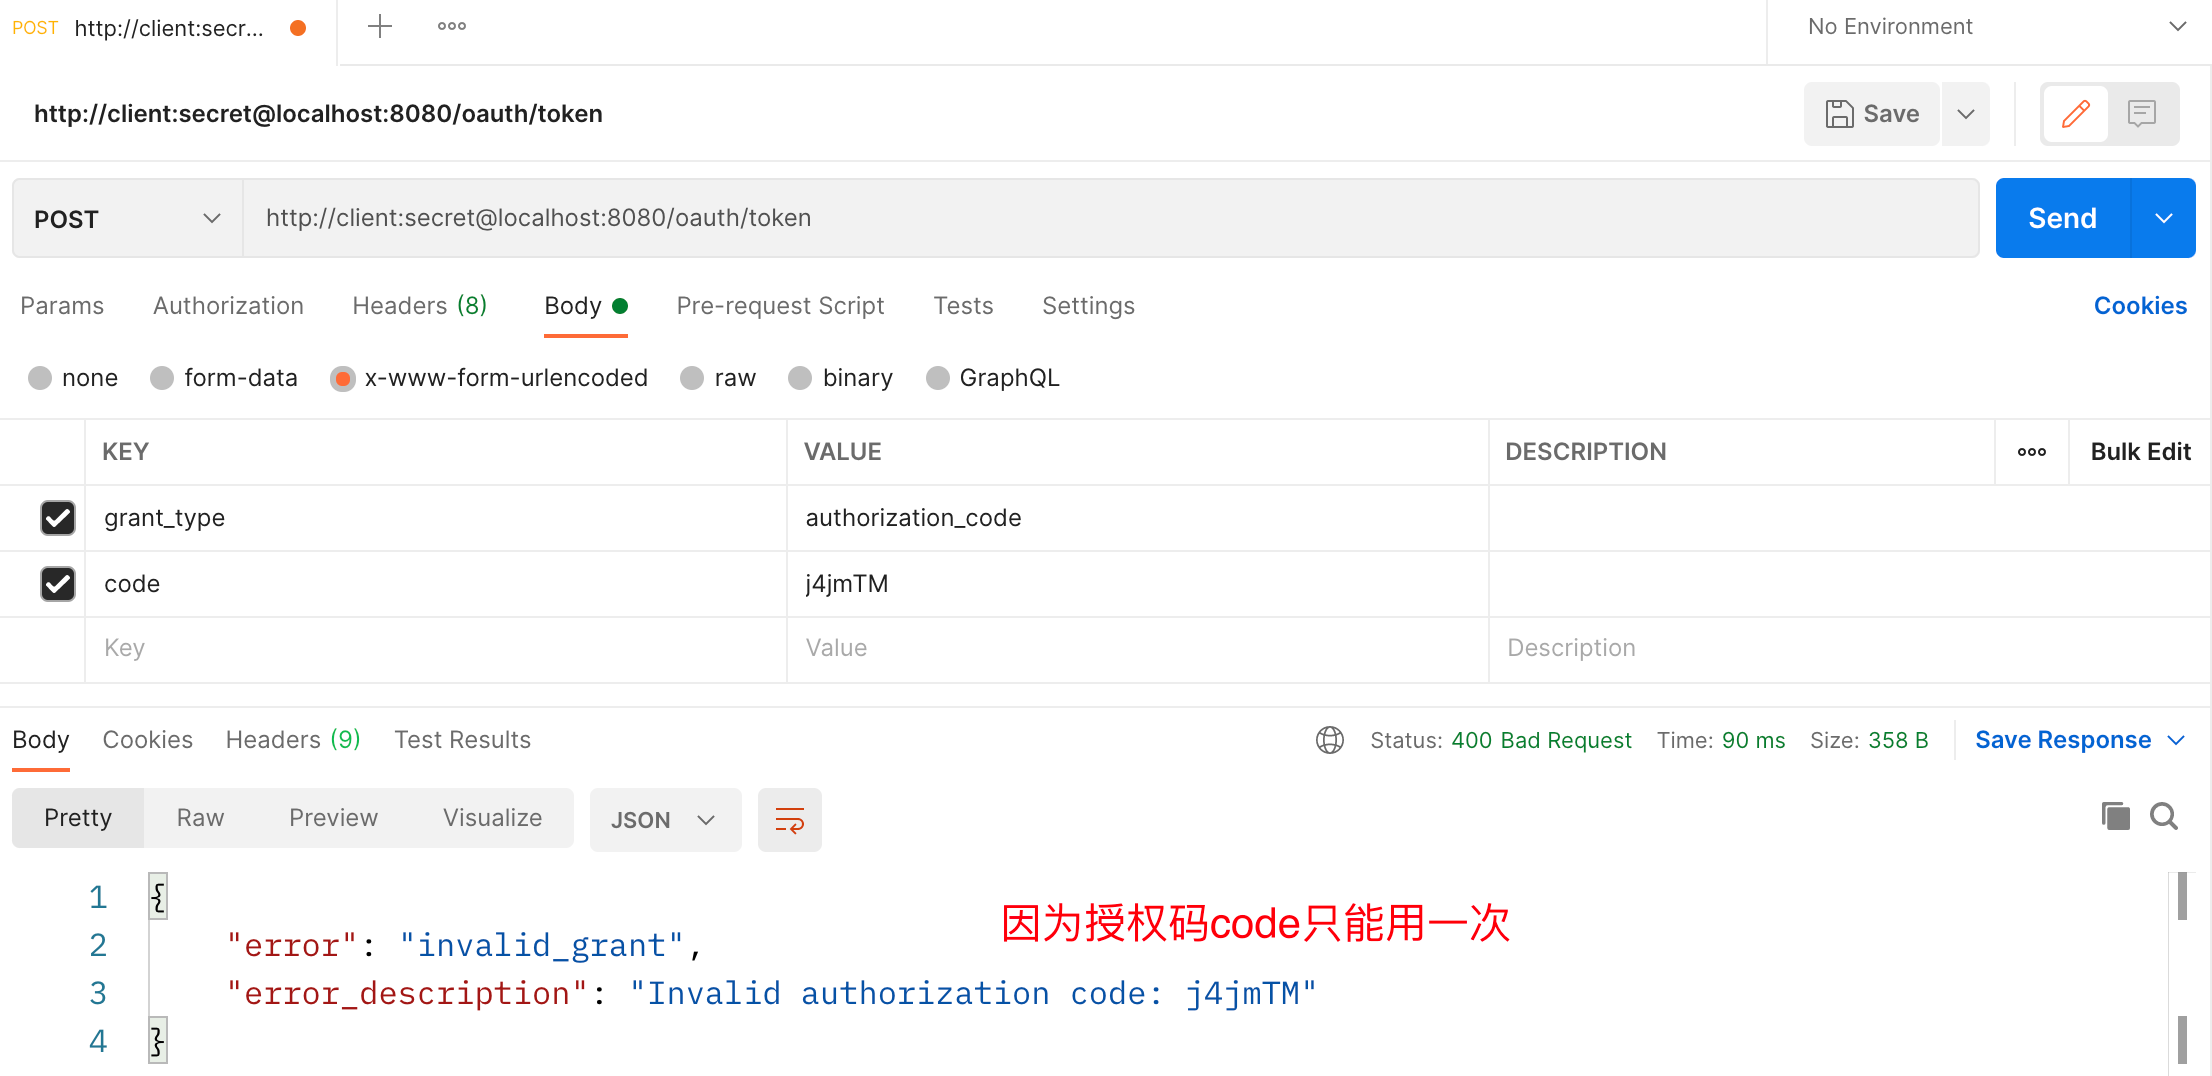 现在重新换个请求码,直接用PostMan请求access_token:
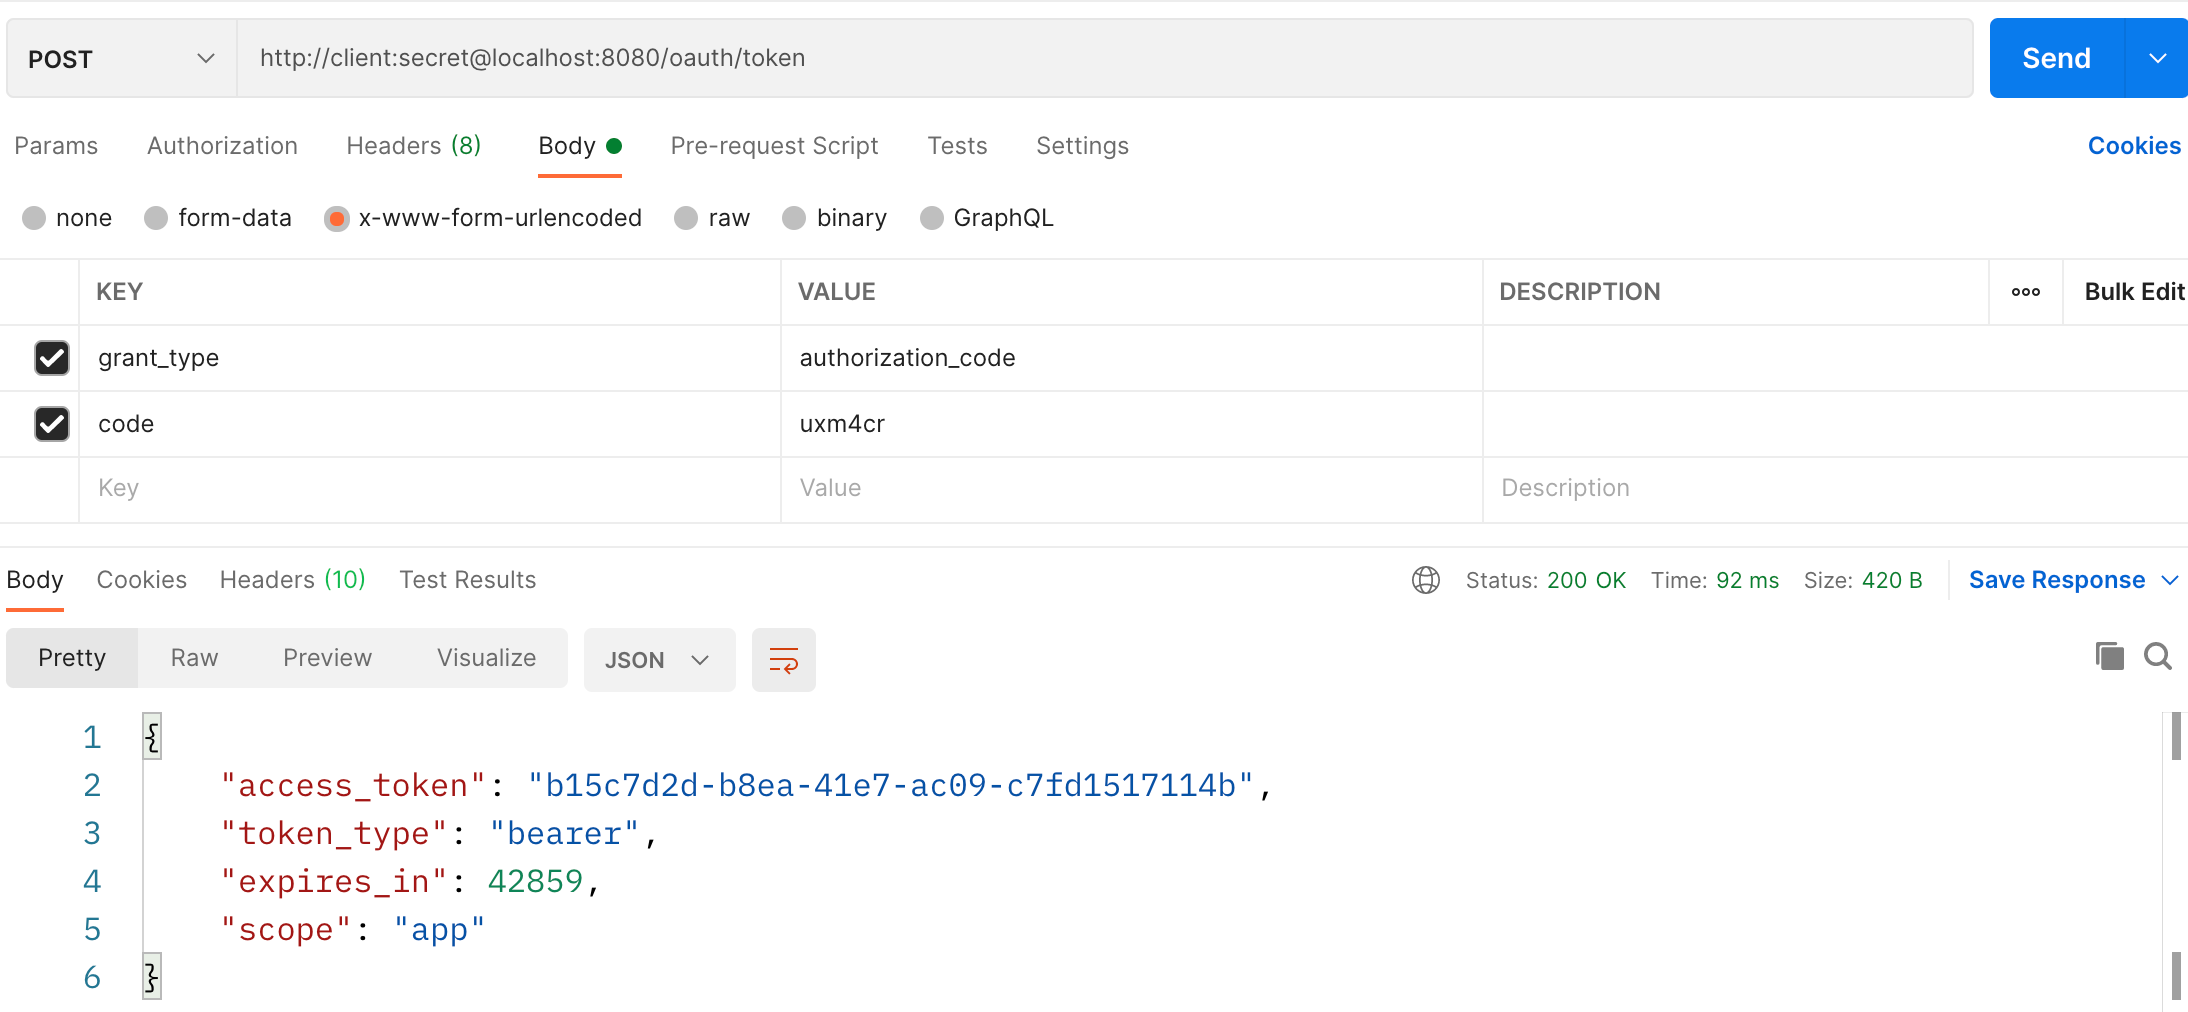
通过 GET 请求访问认证服务器获取授权码 -> 端点:/oauth/authorize
通过 POST 请求利用授权码访问认证服务器获取令牌 -> 端点:/oauth/token
附:默认的端点 URL如下:
/oauth/authorize:授权端点
/oauth/token:令牌端点
/oauth/confirm_access:用户确认授权提交端点
/oauth/error:授权服务错误信息端点
/oauth/check_token:用于资源服务访问的令牌解析端点
/oauth/token_key:提供公有密匙的端点,如果你使用 JWT 令牌的话
基于JDBC存储令牌
基于JDBC存储令牌其实与内存是类似的,只不过这次客户端信息就不是写在代码里了,而是存在于数据库中。主要步骤如下: 1、初始化 oAuth2 相关表 2、在数据库中配置客户端 3、配置认证服务器 - 配置数据源:DataSource - 配置令牌存储方式:TokenStore -> JdbcTokenStore - 配置客户端读取方式:ClientDetailsService -> JdbcClientDetailsService - 配置服务端点信息:AuthorizationServerEndpointsConfigurer - tokenStore:设置令牌存储方式 - 配置客户端信息:ClientDetailsServiceConfigurer - withClientDetails:设置客户端配置读取方式 4、配置 Web 安全 - 配置密码加密方式:BCryptPasswordEncoder - 配置认证信息:AuthenticationManagerBuilder 5、通过 GET 请求访问认证服务器获取授权码 - 端点:/oauth/authorize 6、通过 POST 请求利用授权码访问认证服务器获取令牌 - 端点:/oauth/token
使用官方提供的建表脚本初始化 oAuth2 相关表,地址如下:
https://github.com/spring-projects/spring-security-oauth/blob/master/spring-security-oauth2/src/test/resources/schema.sql
由于我们使用的是 MySQL 数据库,默认建表语句中主键为 VARCHAR(256),这超过了最大的主键长度,请手动修改为 128,并用 BLOB 替换语句中的 LONGVARBINARY 类型,修改后的建表脚本如下:
create database oauth2 charset utf8;

use oauth2;

-- used in tests that use HSQL
create table oauth_client_details
(
    client_id               VARCHAR(256) PRIMARY KEY,
    resource_ids            VARCHAR(256),
    client_secret           VARCHAR(256),
    scope                   VARCHAR(256),
    authorized_grant_types  VARCHAR(256),
    web_server_redirect_uri VARCHAR(256),
    authorities             VARCHAR(256),
    access_token_validity   INTEGER,
    refresh_token_validity  INTEGER,
    additional_information  VARCHAR(4096),
    autoapprove             VARCHAR(256)
);

create table oauth_client_token
(
    token_id          VARCHAR(256),
    token             BLOB,
    authentication_id VARCHAR(256) PRIMARY KEY,
    user_name         VARCHAR(256),
    client_id         VARCHAR(256)
);

create table oauth_access_token
(
    token_id          VARCHAR(256),
    token             BLOB,
    authentication_id VARCHAR(256) PRIMARY KEY,
    user_name         VARCHAR(256),
    client_id         VARCHAR(256),
    authentication    BLOB,
    refresh_token     VARCHAR(256)
);

create table oauth_refresh_token
(
    token_id       VARCHAR(256),
    token          BLOB,
    authentication BLOB
);

create table oauth_code
(
    code           VARCHAR(256),
    authentication BLOB
);

create table oauth_approvals
(
    userId         VARCHAR(256),
    clientId       VARCHAR(256),
    scope          VARCHAR(256),
    status         VARCHAR(10),
    expiresAt      TIMESTAMP,
    lastModifiedAt TIMESTAMP
);


-- customized oauth_client_details table
create table ClientDetails
(
    appId                  VARCHAR(256) PRIMARY KEY,
    resourceIds            VARCHAR(256),
    appSecret              VARCHAR(256),
    scope                  VARCHAR(256),
    grantTypes             VARCHAR(256),
    redirectUrl            VARCHAR(256),
    authorities            VARCHAR(256),
    access_token_validity  INTEGER,
    refresh_token_validity INTEGER,
    additionalInformation  VARCHAR(4096),
    autoApproveScopes      VARCHAR(256)
);
接下来在数据库中配置一条客户端信息,在表 oauth_client_details 中增加一条客户端配置记录,需要设置的字段如下: client_id:客户端标识 client_secret:客户端安全码,此处不能是明文,需要加密 scope:客户端授权范围 authorized_grant_types:客户端授权类型 web_server_redirect_uri:服务器回调地址 client_secret需要使用 BCryptPasswordEncoder 为客户端安全码加密,代码如下:
System.out.println(new BCryptPasswordEncoder().encode("secret"));

由于使用了 JDBC 存储,需要增加相关依赖,数据库连接池部分弃用 Druid 改为 HikariCP (号称全球最快连接池) 统一依赖管理里面添加依赖:
<dependency>
    <groupId>com.zaxxer</groupId>
    <artifactId>HikariCP</artifactId>
    <version>3.4.5</version>
</dependency>
<dependency>
    <groupId>org.springframework.boot</groupId>
    <artifactId>spring-boot-starter-jdbc</artifactId>
    <exclusions>
        <!-- 排除 tomcat-jdbc 以使用 HikariCP -->
        <exclusion>
            <groupId>org.apache.tomcat</groupId>
            <artifactId>tomcat-jdbc</artifactId>
        </exclusion>
    </exclusions>
</dependency>
<dependency>
    <groupId>mysql</groupId>
    <artifactId>mysql-connector-java</artifactId>
    <version>8.0.23</version>
</dependency>
然后配置认证服务器,创建一个类继承 AuthorizationServerConfigurerAdapter 并添加相关注解:
package cn.tim.security.server.config;

import org.springframework.boot.context.properties.ConfigurationProperties;
import org.springframework.boot.jdbc.DataSourceBuilder;
import org.springframework.context.annotation.Bean;
import org.springframework.context.annotation.Configuration;
import org.springframework.context.annotation.Primary;
import org.springframework.security.oauth2.config.annotation.configurers.ClientDetailsServiceConfigurer;
import org.springframework.security.oauth2.config.annotation.web.configuration.AuthorizationServerConfigurerAdapter;
import org.springframework.security.oauth2.config.annotation.web.configuration.EnableAuthorizationServer;
import org.springframework.security.oauth2.config.annotation.web.configurers.AuthorizationServerEndpointsConfigurer;
import org.springframework.security.oauth2.provider.ClientDetailsService;
import org.springframework.security.oauth2.provider.client.JdbcClientDetailsService;
import org.springframework.security.oauth2.provider.token.TokenStore;
import org.springframework.security.oauth2.provider.token.store.JdbcTokenStore;

import javax.sql.DataSource;

@Configuration
@EnableAuthorizationServer
public class AuthenticationServerConfiguration extends AuthorizationServerConfigurerAdapter {

    // 2、基于JDBC存储令牌
    @Bean
    @Primary
    @ConfigurationProperties(prefix = "spring.datasource")
    public DataSource dataSource(){
        // 配置数据源(注意,我使用的是 HikariCP 连接池),以上注解是指定数据源,否则会有冲突
        return DataSourceBuilder.create().build();
    }

    @Bean
    public TokenStore tokenStore(){
        // 基于 JDBC 实现,令牌保存到数据
        return new JdbcTokenStore(dataSource());
    }

    @Bean
    public ClientDetailsService jdbcClientDetails(){
        // 基于 JDBC 实现,需要事先在数据库配置客户端信息
        return new JdbcClientDetailsService(dataSource());
    }

    @Override
    public void configure(ClientDetailsServiceConfigurer clients) throws Exception {
        // 设置令牌
        clients.withClientDetails(jdbcClientDetails());
    }

    @Override
    public void configure(AuthorizationServerEndpointsConfigurer endpoints) {
        // 读取客户端配置
        endpoints.tokenStore(tokenStore());
    }
}
然后是服务器安全配置,创建一个类继承 WebSecurityConfigurerAdapter 并添加相关注解,和基于内存存储令牌一模一样,这里就不再贴出代码了。最后配置一下application.yml连接参数:
spring:
  application:
    name: oauth2-server
  datasource:
    type: com.zaxxer.hikari.HikariDataSource
    jdbcUrl: jdbc:mysql://127.0.0.1:3306/oauth2?useUnicode=true&characterEncoding=utf-8&useSSL=false
    driver-class-name: com.mysql.cj.jdbc.Driver
    username: root
    password: 12345678
    hikari:
      minimum-idle: 5
      idle-timeout: 600000
      maximum-pool-size: 10
      auto-commit: true
      pool-name: MyHikariCP
      max-lifetime: 1800000
      connection-timeout: 30000
      connection-test-query: SELECT 1
server:
  port: 8080
测试过程和上面一致
 操作成功后数据库 oauth_access_token 表中会增加一笔记录,效果图如下:

关于JWT的适用场景
谈论这个问题之前先要搞清楚什么是JWT,这一块可以参考阮一峰老师的博客 《JSON Web Token 入门教程》 。 很多人总是错误的想去比较 cookies 跟 JWT。这种比较是毫无意义的——cookies 是一种存储机制,而 JWT 是一种加密签名的令牌机制。它们之间并不是相互对立的,相反的,它们既可以独立使用还可以配合使用。真正应该比较的是 session 跟 JWT 以及 cookies 跟 Local Storage。
让我们再次回到认证 / 授权这个问题上来:
- 认证(Authentication):验证目标对象身份。比如,通过用户名和密码登录某个系统就是认证。
- 授权(Authorization):给予通过验证的目标对象操作权限。
更简单地说:认证解决了「你是谁」的问题,授权解决了「你能做什么」的问题。 HTTP 是无状态的,所以客户端和服务端需要解决的如何让之间的对话变得有状态。例如只有是登陆状态的用户才有权限调用某些接口,那么在用户登陆之后,需要记住该用户是已经登陆的状态,常见的方法是使用 session 机制。
JWT只是把用户信息,过期信息都打包到token里面去了,不需要在服务端存储而已,如何把JWT在服务端存储起来(比如内存和redis)来实现续签,注销等场景,相当于把重复把由web服务器实现的session重新造了一遍轮子而已。多了 JWT 的加解密计算资源不说,还没有session机制更安全。
说到这里我想到一个清晰移动的例子,这就好比你非要拿UDP去实现可靠传输,那么也就意味着需要手动实现 TCP 的特性,那还不如直接使用 TCP,同样的道理如果拿JWT会管理会话,需要手动扩展去解决续签,注销等操作那还不如直接使用 session。
那么 JWT 的最合适的应用场景是什么呢?那就是一次性验证,比如用户注册后需要发一封邮件让其激活账户,通常邮件中需要有一个链接,这个链接需要具备以下的特性:能够标识用户,该链接具有时效性(通常只允许几小时之内激活),不能被篡改以激活其他可能的账户。这种场景就和 JWT 的特性非常贴近,JWT 的 payload 中固定的参数:iss 签发者和 exp 过期时间正是为其做准备的。 JWT 适合做简单的 Restful API 认证,颁发一个固定有效期的 JWT,降低 JWT 暴露的风险,不要使用 JWT 做服务端的状态管理,这样才能体现出 JWT 无状态的优势。