SpringBoot启动流程探究
Spring的丰富生态备受开发者青睐,尤其是自从SpringBoot出现之后去掉了原来的复杂配置,因为SpringBoot的理念就是约定大于配置,这让我们省去了很多需要手动配置的过程,就拿SpringMVC来说吧各种XML配置直接劝退初学者,但是SpringBoot的易用性简直是成为了推广Spring生态的利器。本篇文章主要是结合SpringBoot的源码,来探究SpringBoot应用程序的启动流程!
新建一个SpringBoot项目,首先映入眼帘的恐怕就是下面的这个关键的Main函数与@SpringBootApplication注解吧,我们将从这个注解开始,逐步探究SpringBoot应用的启动流程:
@SpringBootApplication
public class SpringBootStartApplication {

    public static void main(String[] args) {
        SpringApplication.run(SpringBootStartApplication.class, args);
    }

}
@SpringBootApplication
@SpringBootApplication注解实际上是SpringBoot提供的一个复合注解,我们来看一看其源码:
@Target(ElementType.TYPE)
@Retention(RetentionPolicy.RUNTIME)
@Documented
@Inherited
@SpringBootConfiguration
@EnableAutoConfiguration
@ComponentScan(excludeFilters = { @Filter(type = FilterType.CUSTOM, classes = TypeExcludeFilter.class),
		@Filter(type = FilterType.CUSTOM, classes = AutoConfigurationExcludeFilter.class) })
public @interface SpringBootApplication {
    ...
}
关于这里面某些元注解的功能,可以参考我之前的写的一篇博客 《 注解的原理与实现 》 。在这里我们只需要看@SpringBootConfiguration、@EnableAutoConfiguration、@ComponentScan这三个注解。在 SpringBoot 应用的启动类上用这个三个注解代替@SpringBootApplication注解其实也是没问题的:
@SpringBootConfiguration
@EnableAutoConfiguration
@ComponentScan
public class SpringBootStartApplication {

    public static void main(String[] args) {
        SpringApplication.run(SpringBootStartApplication.class, args);
    }

}
那我们接下来就需要分贝探究这三个注解的功能。
@SpringBootConfiguration
@Target({ElementType.TYPE})
@Retention(RetentionPolicy.RUNTIME)
@Documented
@Configuration
public @interface SpringBootConfiguration {
    @AliasFor(
        annotation = Configuration.class
    )
    boolean proxyBeanMethods() default true;
}
@SpringBootConfiguration也是来源于@Configuration,二者功能都是将当前类标注为配置类,@Configuration用于定义配置类,可替换xml配置文件,被注解的类内部包含有一个或多个被@Bean注解的方法,这些方法将会被AnnotationConfigApplicationContext或AnnotationConfigWebApplicationContext类进行扫描,并用于构建Bean定义,初始化Spring容器,这个貌似一点都不新奇。
@EnableAutoConfiguration
@Target(ElementType.TYPE)
@Retention(RetentionPolicy.RUNTIME)
@Documented
@Inherited
@AutoConfigurationPackage
@Import(AutoConfigurationImportSelector.class)
public @interface EnableAutoConfiguration {
    ...
}
@EnableAutoConfiguration 注解启用自动配置,其中最关键的要属@Import(AutoConfigurationImportSelector.class),借AutoConfigurationImportSelector,@EnableAutoConfiguration可以帮助SpringBoot应用将所有符合条件的@Configuration配置都加载到当前SpringBoot创建并使用的IoC容器。
借助于Spring框架原有的一个工具类:SpringFactoriesLoader的支持,@EnableAutoConfiguration可以智能的自动配置功效才得以大功告成!
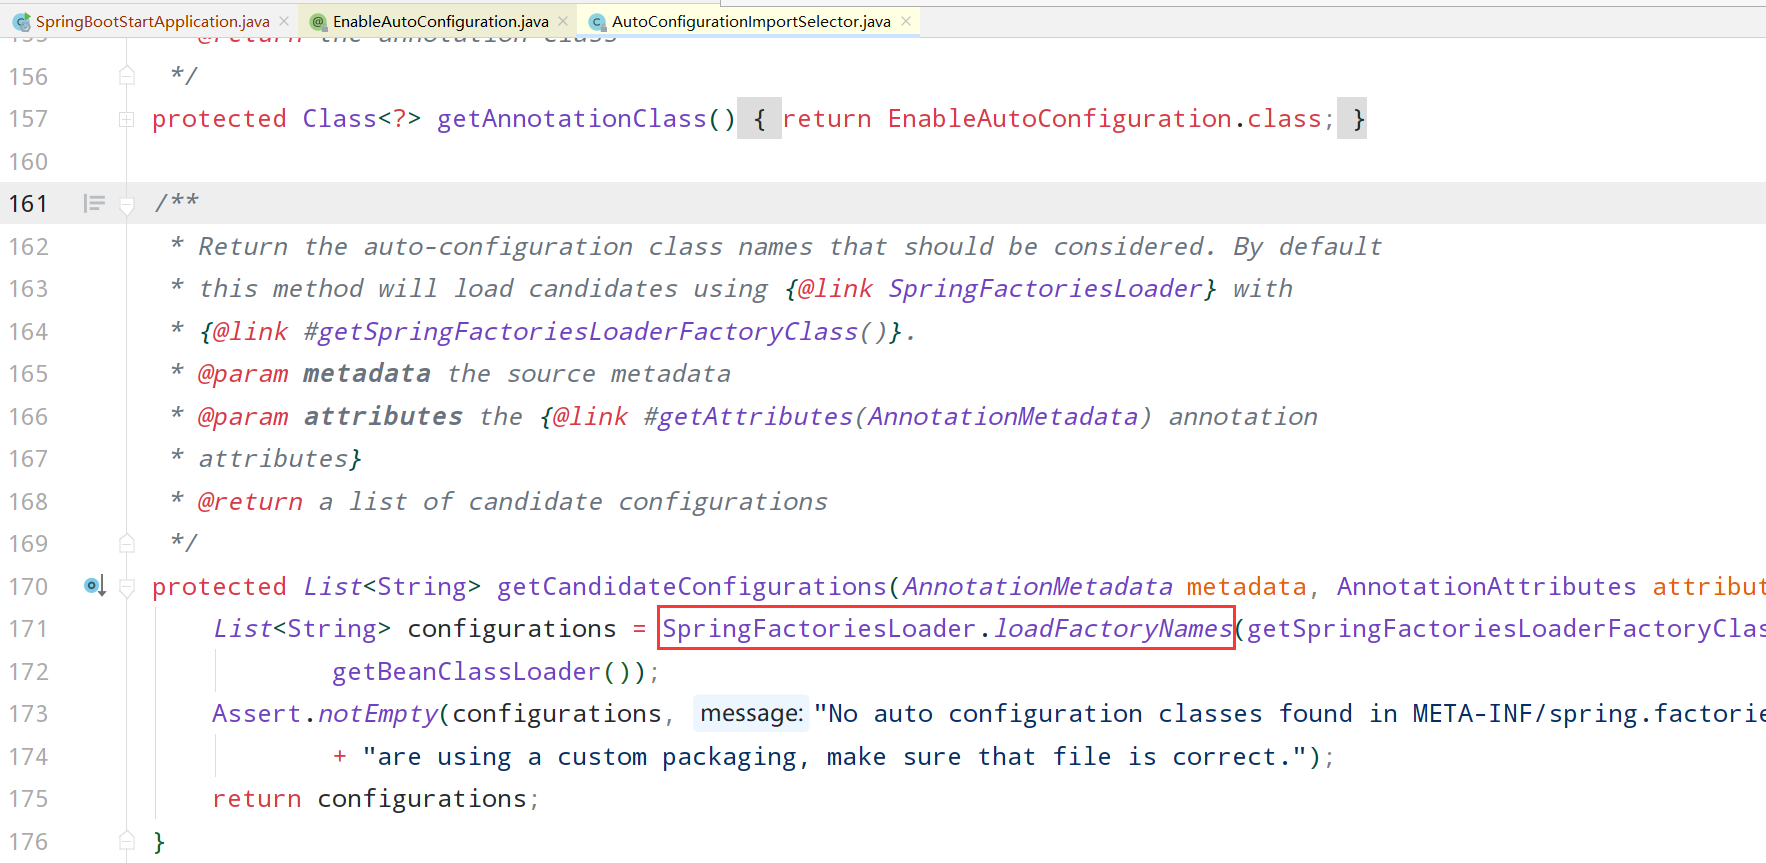
关于这个注解可以参考我的另一篇文章 《SpringBoot自动配置原理》 ,里面有详细介绍并且有例子。
@ComponentScan
@ComponentScan 对应于XML配置形式中的 context:component-scan,用于将一些标注了特定注解的bean定义批量采集注册到Spring的IoC容器之中,这些特定的注解大致包括:
- @Controller
- @Entity
- @Component
- @Service
- @Repository
对于该注解可以通过 basePackages 属性来更细粒度的控制该注解的自动扫描范围,比如:
@ComponentScan(basePackages = {"xpu.tim.controller","xpu.tim.entity"})
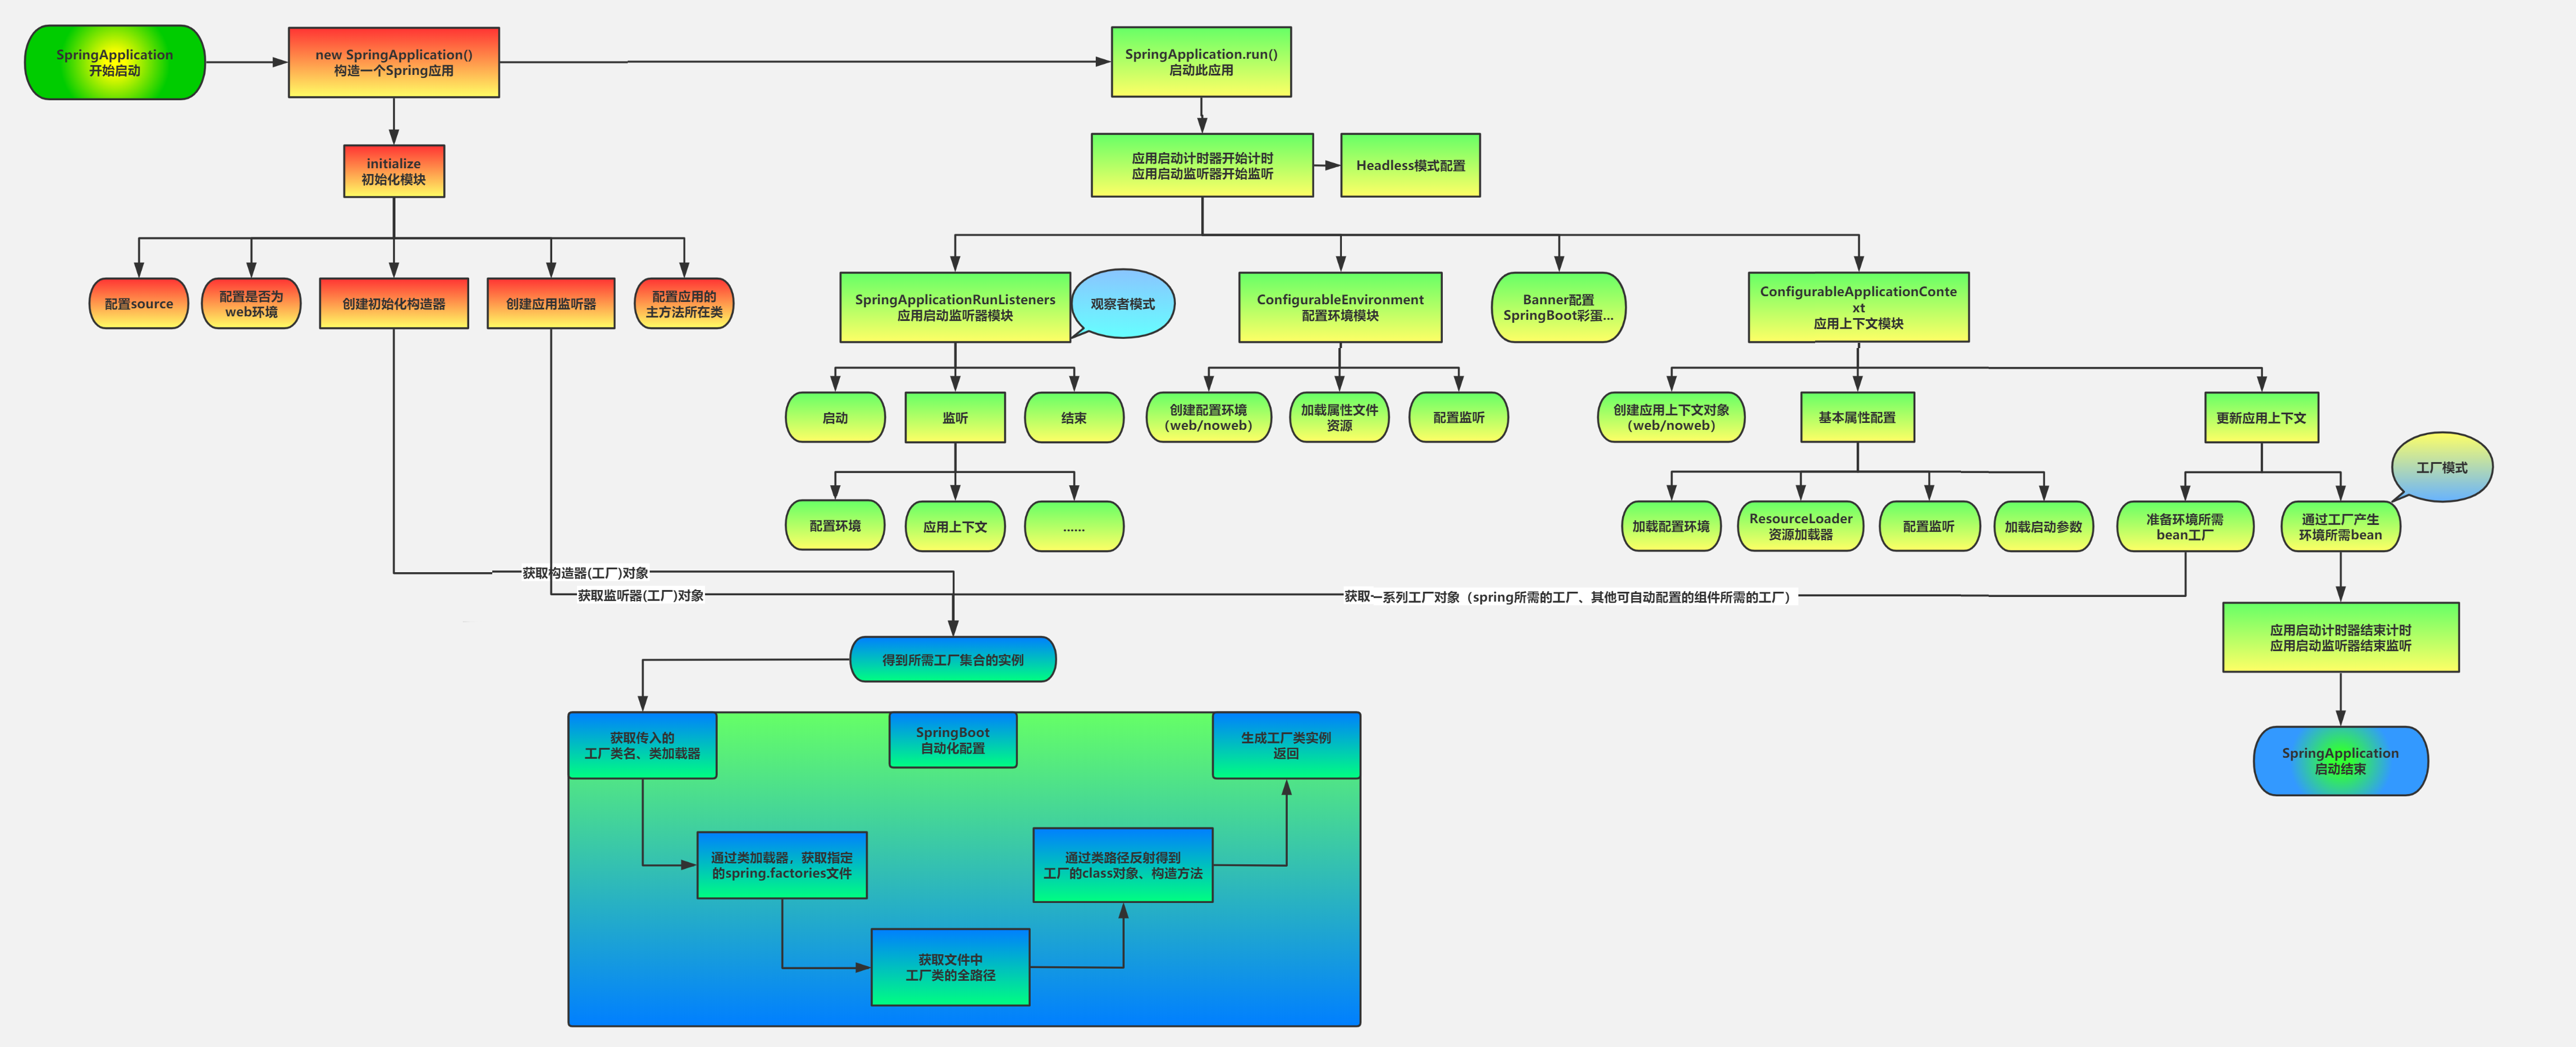
SpringApplication对象构造流程
@SpringBootApplication这个注解看完了, 那么接下来就来看看这个SpringApplication以及run()方法究竟干了些啥。原始的SpringCore中并没有这个类,SpringApplication里面封装了一套Spring 应用的启动流程,然而这对用户完全透明,因此我们上手 SpringBoot 时感觉简洁、轻量。
通过阅读run方法的源码我们不难发现,其实是需要构造一个SpringApplication对象:
/**
 * Static helper that can be used to run a {@link SpringApplication} from the
 * specified sources using default settings and user supplied arguments.
 * @param primarySources the primary sources to load
 * @param args the application arguments (usually passed from a Java main method)
 * @return the running {@link ApplicationContext}
 */
public static ConfigurableApplicationContext run(Class<?>[] primarySources, String[] args) {
    return new SpringApplication(primarySources).run(args);
}
默认的 SpringApplication执行流程已经可以满足大部分需求,但是若用户想干预这个过程,则可以通过SpringApplication在流程某些地方开启的扩展点来完成对流程的扩展,典型的扩展方案那就是使用 set 方法。
@SpringBootApplication
public class SpringBootStartApplication {
    public static void main(String[] args) {
        //SpringApplication.run(SpringBootStartApplication.class, args);
        SpringApplication application = new SpringApplication(SpringBootStartApplication.class);
        application.set...(); // 用户自定义扩展点
        application.set...(); // 用户自定义扩展点
        application.run(args);
    }
}
这样一拆解后我们发现,我们也需要先构造 SpringApplication 类对象,然后调用该对象的 run() 方法。那么接下来就讲讲 SpringApplication 的构造过程以及其 run() 方法的流程,搞清楚了这个,那么也就搞清楚了SpringBoot应用是如何运行起来的! 主要需要看以下四个方法:

1、deduceFromClasspath:用来推断应用的类型:创建的是 REACTIVE应用、SERVLET应用、NONE 三种中的一种
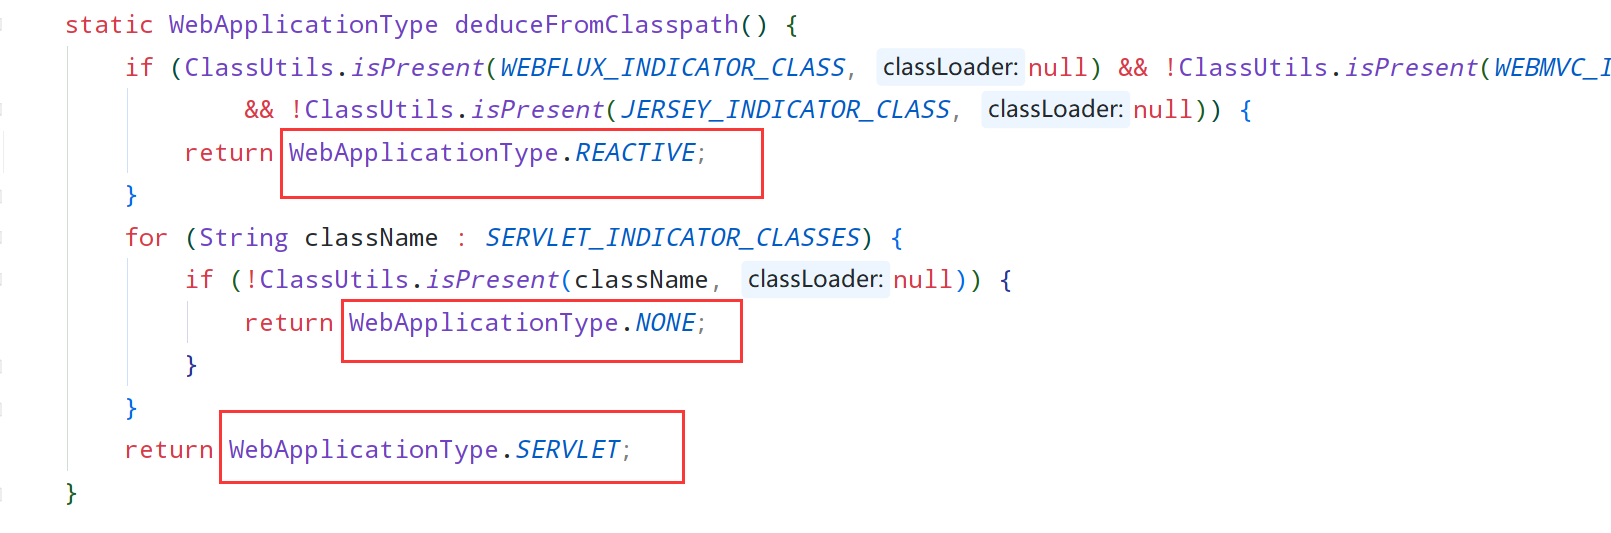
NONE表示当前的应用即不是一个web应用也不是一个REACTIVE应用,是一个纯后台的应用。SERVLET表示当前应用是一个标准的web应用。REACTIVE是spring5当中的新特性,表示是一个响应式的web应用。而判断的依据就是根据Classloader中加载的类。如果是servlet,则表示是web,如果是DispatcherHandler,则表示是一个REACTIVE应用,如果两者都不存在,则表示是一个非web环境的应用。
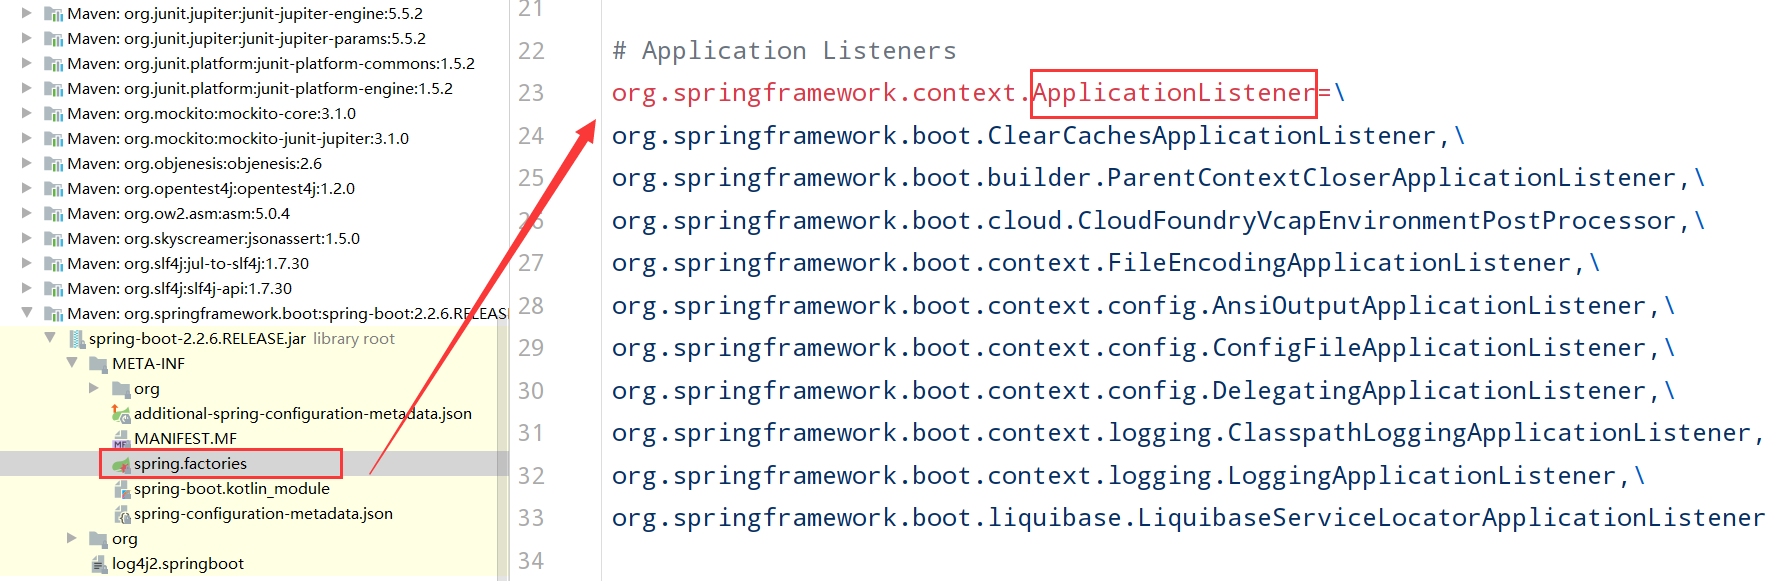
2、setInitializers:使用SpringFactoriesLoader查找并加载classpath下 META-INF/spring.factories文件中所有可用的 ApplicationContextInitializer
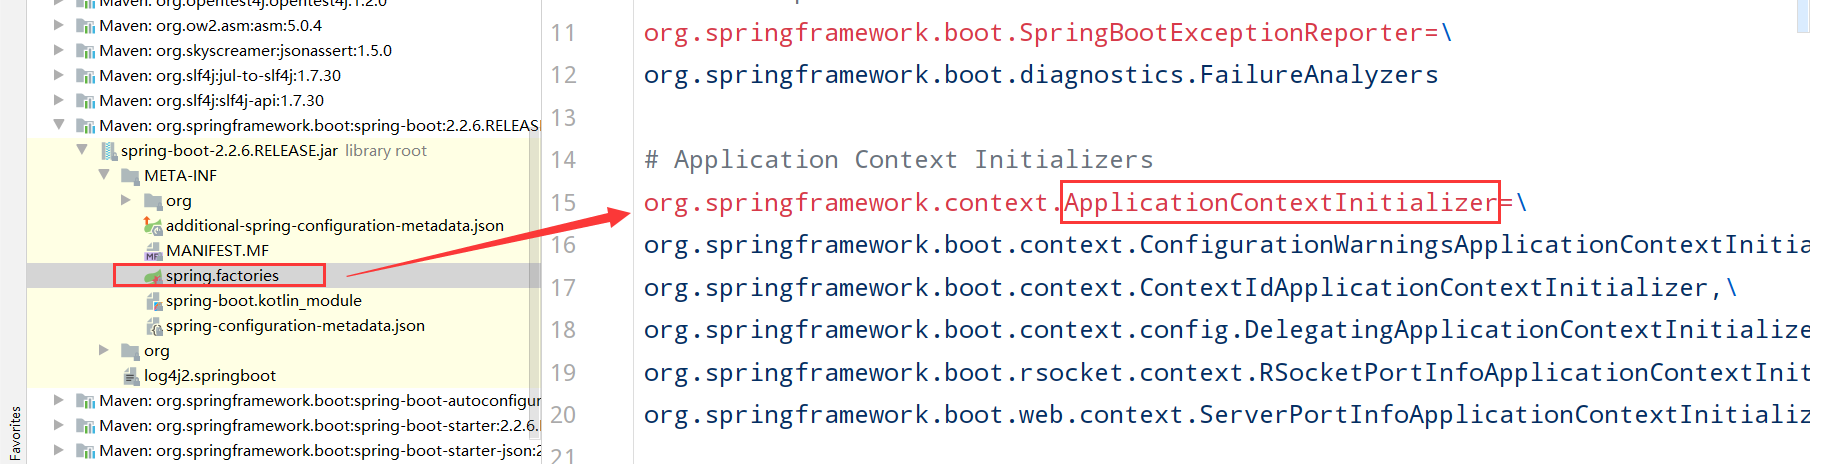
使用 SpringFactoriesLoader查找并加载classpath下META-INF/spring.factories文件中的所有可用的 ApplicationListener
3、setListeners:使用 SpringFactoriesLoader查找并加载classpath下 META-INF/spring.factories文件中的所有可用的 ApplicationListener
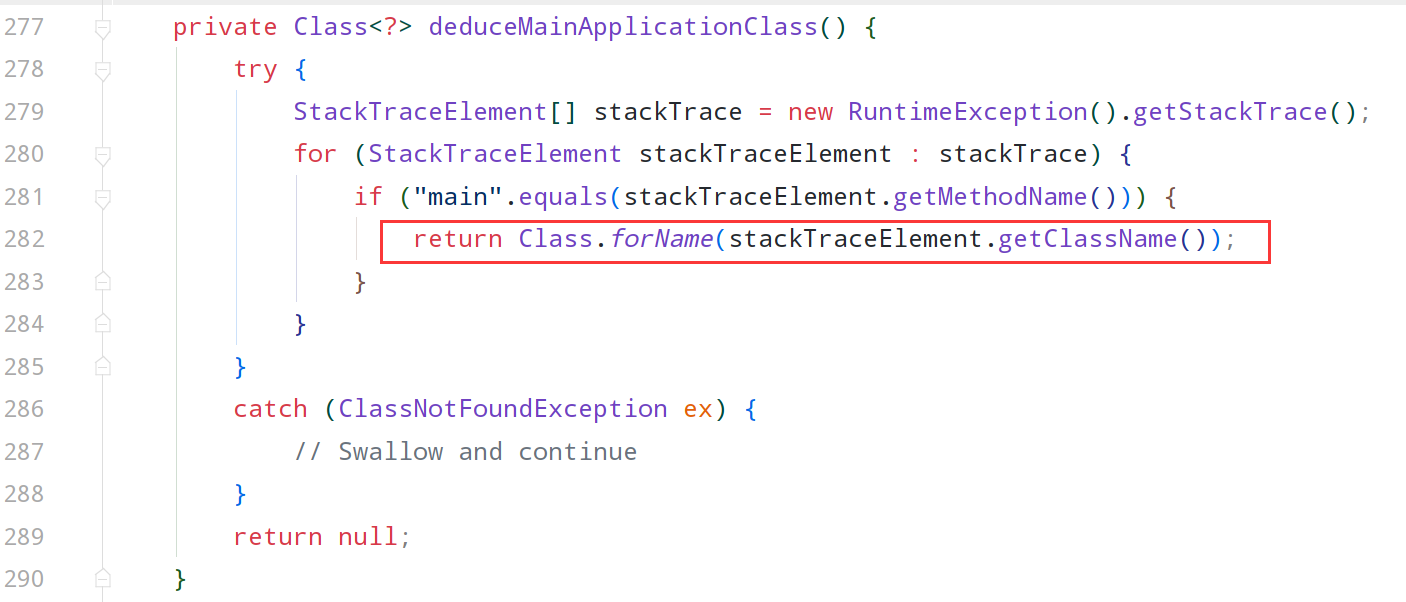
4、deduceMainApplicationClass:推断并设置main方法的定义类
通过这个几个关键步骤,SpringApplication完成了实例化。
run()方法探究
之前我们弄清楚了SpringApplication的实例化过程,现在看看它的run方法究竟干了什么:
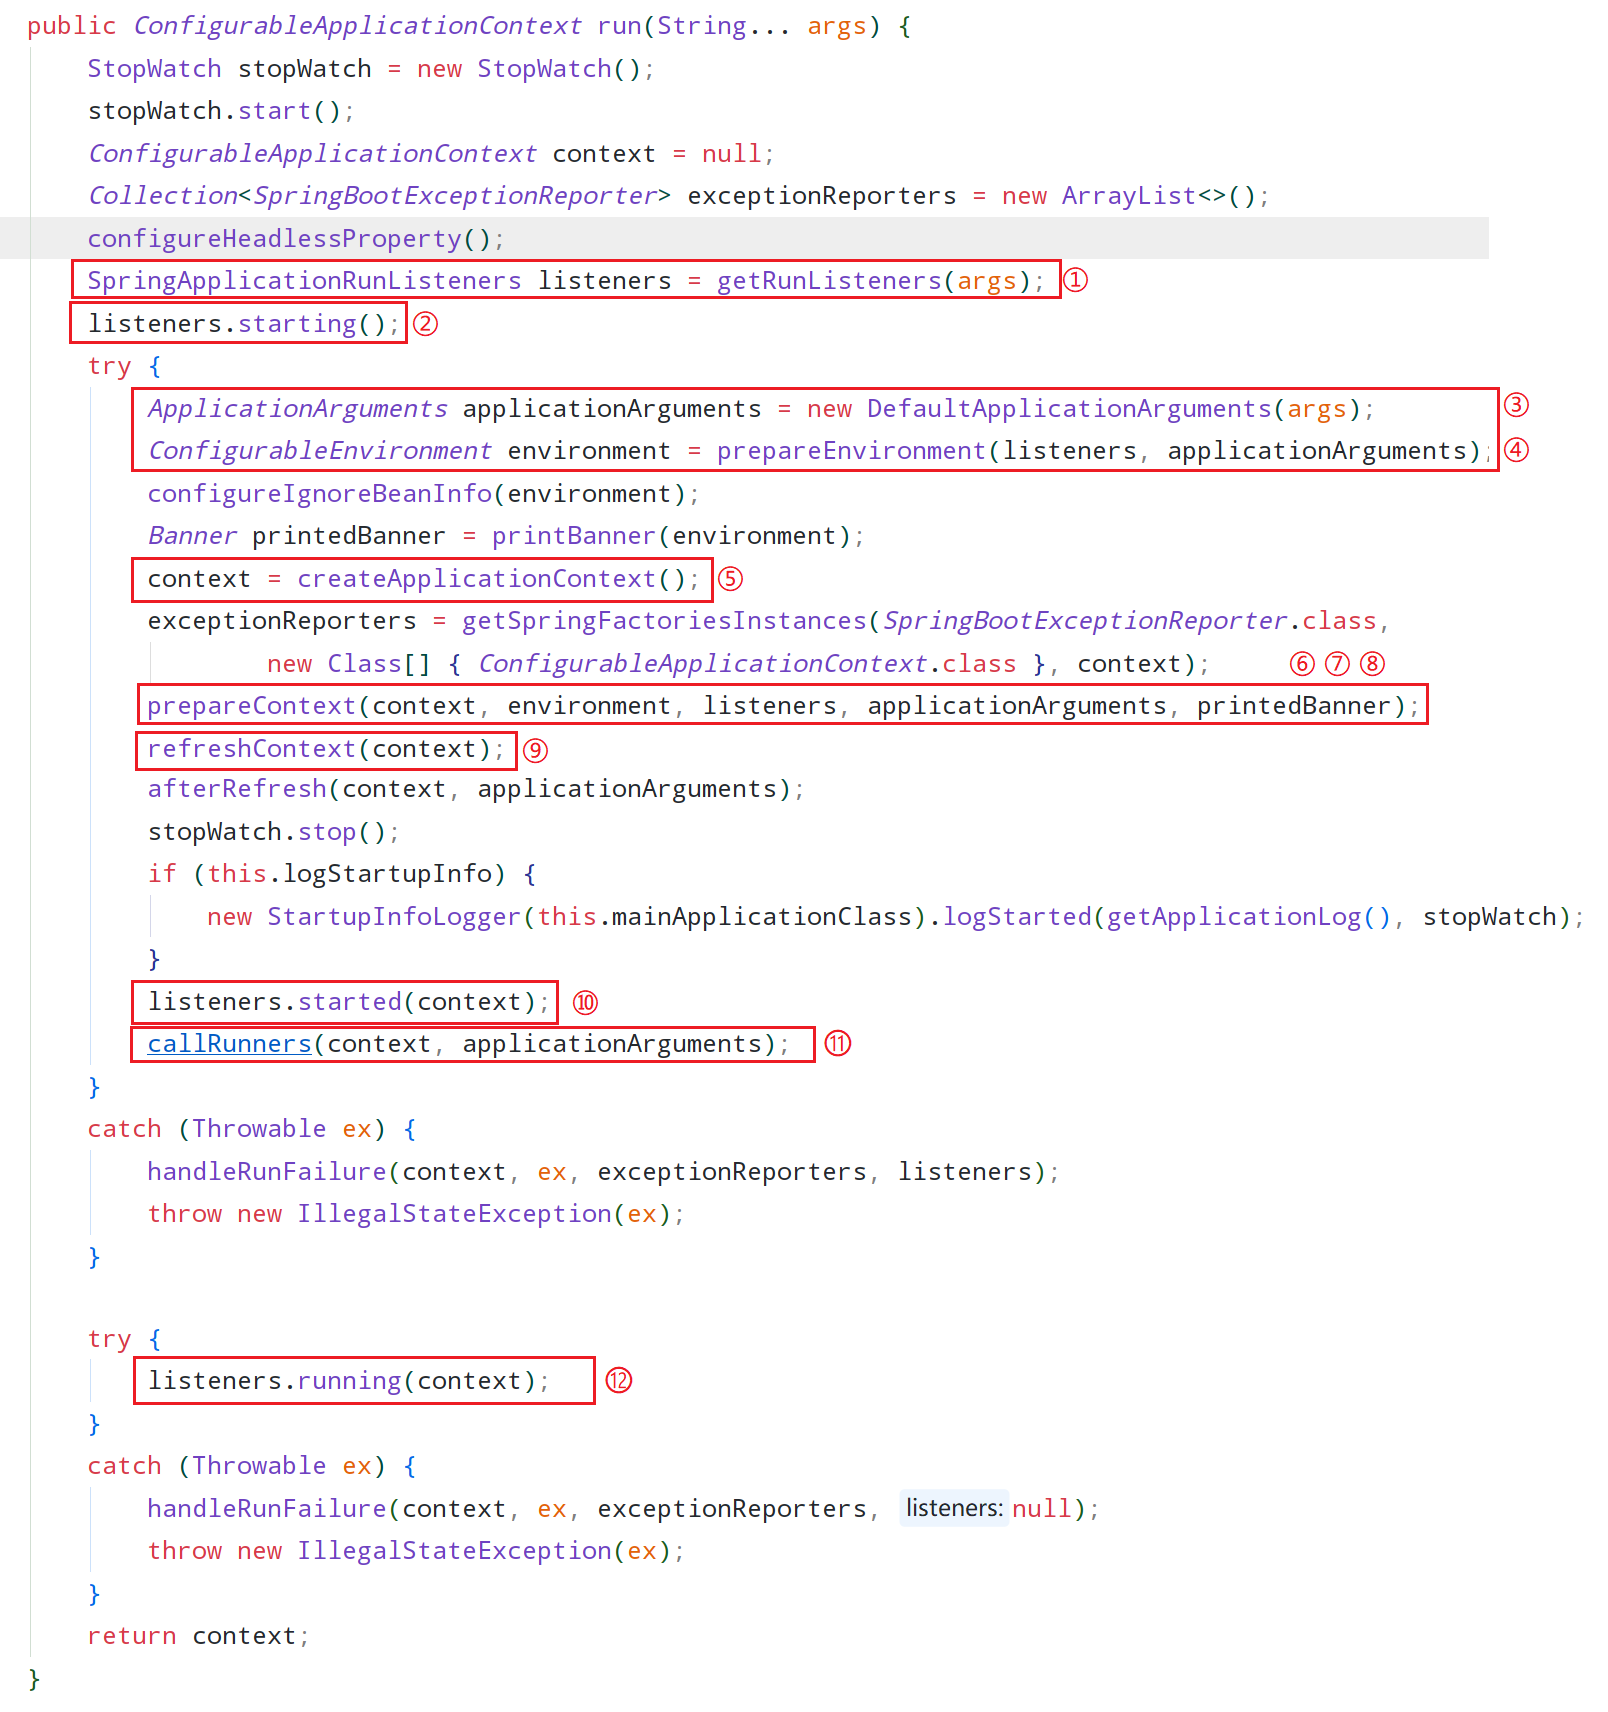
1、通过 SpringFactoriesLoader 加载META-INF/spring.factories文件,获取并创建SpringApplicationRunListener对象;
2、然后由SpringApplicationRunListener来发出starting消息;
3、把参数args封装成DefaultApplicationArguments,并配置当前SpringBoot应用将要使用的Environment;
4、完成之后,依然由SpringApplicationRunListener来发出 environmentPrepared(环境已准备)消息;
5、创建上下文,根据项目类型创建上下文;
6、初始化ApplicationContext,并设置 Environment,加载相关配置等;
7、由SpringApplicationRunListener来发出contextPrepared消息,告知SpringBoot应用使用的ApplicationContext已准备OK;
8、将各种 beans 装载入ApplicationContext,继续由SpringApplicationRunListener来发出contextLoaded消息,告知 SpringBoot 应用使用的ApplicationContext已装填OK;
9、refresh ApplicationContext,完成IoC容器可用的最后一步;
10、由SpringApplicationRunListener来发出started消息 ;
11、完成最终的程序的启动;
12、SpringApplicationRunListener来发出running消息,告知程序已运行起来了;
步骤4和5之间还有个PrintBanner,用来打印Banner
createApplicationContext()
下面这段代码主要是根据项目类型创建上下文,并且会注入几个核心组件类:
protected ConfigurableApplicationContext createApplicationContext() {
    Class<?> contextClass = this.applicationContextClass;
    if (contextClass == null) {
        try {
            switch (this.webApplicationType) {
                case SERVLET:
                    contextClass = Class.forName(DEFAULT_SERVLET_WEB_CONTEXT_CLASS);
                    break;
                case REACTIVE:
                    contextClass = Class.forName(DEFAULT_REACTIVE_WEB_CONTEXT_CLASS);
                    break;
                default:
                    contextClass = Class.forName(DEFAULT_CONTEXT_CLASS);
            }
        }
        catch (ClassNotFoundException ex) {
            throw new IllegalStateException(
                "Unable create a default ApplicationContext, please specify an ApplicationContextClass", ex);
        }
    }
    return (ConfigurableApplicationContext) BeanUtils.instantiateClass(contextClass);
}
Web类型项目创建上下文对象AnnotationConfigServletWebServerApplicationContext 。这里会把ConfigurationClassPostProcessor 、AutowiredAnnotationBeanPostProcessor 等一些核心组件加入到Spring容器。
refreshContext()
下面一起来看下refreshContext(context) 这个方法,这个方法启动spring的代码加载了bean,还启动了内置web容器:
private void refreshContext(ConfigurableApplicationContext context) {
    refresh(context);
    if (this.registerShutdownHook) {
        try {
            context.registerShutdownHook();
        }
        catch (AccessControlException ex) {
            // Not allowed in some environments.
        }
    }
}
点击跟进后发现方法里面是spring容器启动代码:
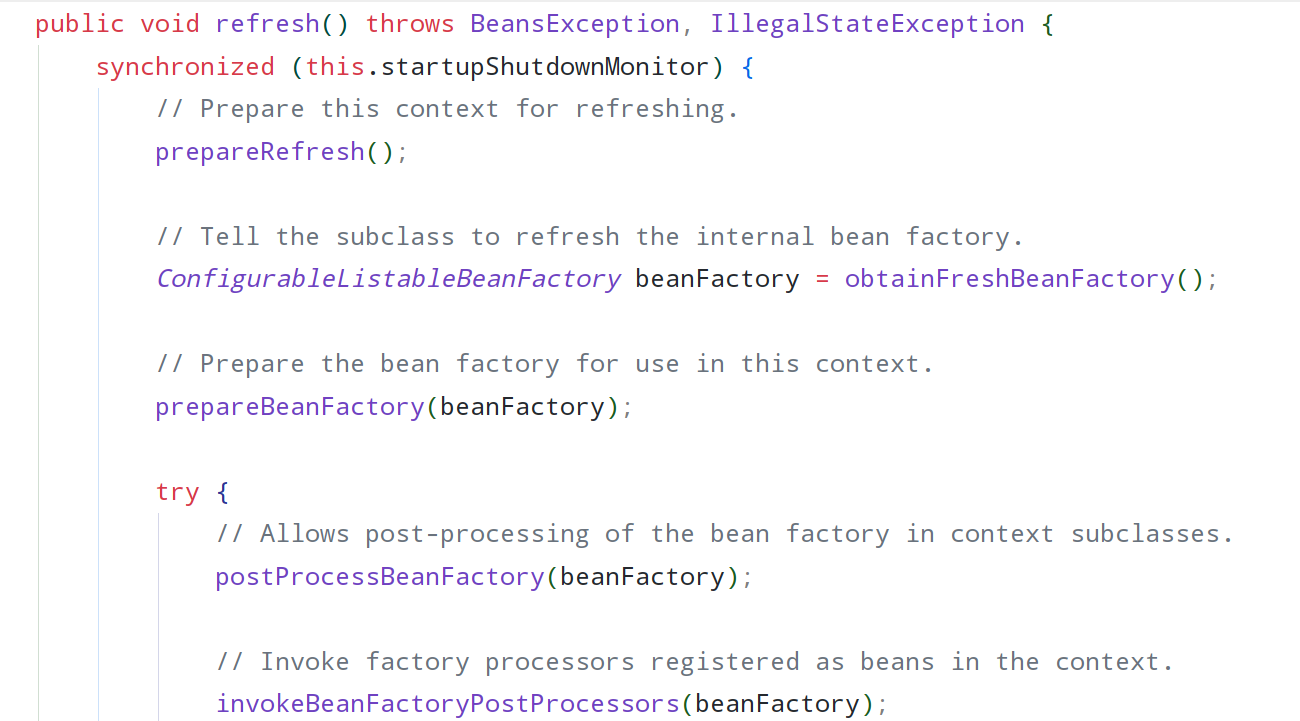
我们可以看到一个onRefresh方法,点进去需要看的是子类实现,我们只看其中一个子类实现:

@Override
protected void onRefresh() {
    super.onRefresh();
    try {
        createWebServer();
    }
    catch (Throwable ex) {
        throw new ApplicationContextException("Unable to start web server", ex);
    }
}

private void createWebServer() {
    WebServer webServer = this.webServer;
    ServletContext servletContext = getServletContext();
    if (webServer == null && servletContext == null) {
        // 这个获取webServerFactory还是要进去看看
        ServletWebServerFactory factory = getWebServerFactory();
        this.webServer = factory.getWebServer(getSelfInitializer());
    }
    else if (servletContext != null) {
        try {
            getSelfInitializer().onStartup(servletContext);
        }
        catch (ServletException ex) {
            throw new ApplicationContextException("Cannot initialize servlet context", ex);
        }
    }
    initPropertySources();
}
我们继续看下getWebServletFactory() 这个方法,这个里面其实就是选择出哪种类型的web容器了:
protected ServletWebServerFactory getWebServerFactory() {
    // Use bean names so that we don't consider the hierarchy
    String[] beanNames = getBeanFactory().getBeanNamesForType(ServletWebServerFactory.class);
    if (beanNames.length == 0) {
        throw new ApplicationContextException("Unable to start ServletWebServerApplicationContext due to missing "
                                              + "ServletWebServerFactory bean.");
    }
    if (beanNames.length > 1) {
        throw new ApplicationContextException("Unable to start ServletWebServerApplicationContext due to multiple "
                                              + "ServletWebServerFactory beans : " + StringUtils.arrayToCommaDelimitedString(beanNames));
    }
    return getBeanFactory().getBean(beanNames[0], ServletWebServerFactory.class);
}
我们再去看factory.getWebServer(getSelfInitializer()) ,转到定义就会看到很熟悉的名字tomcat:
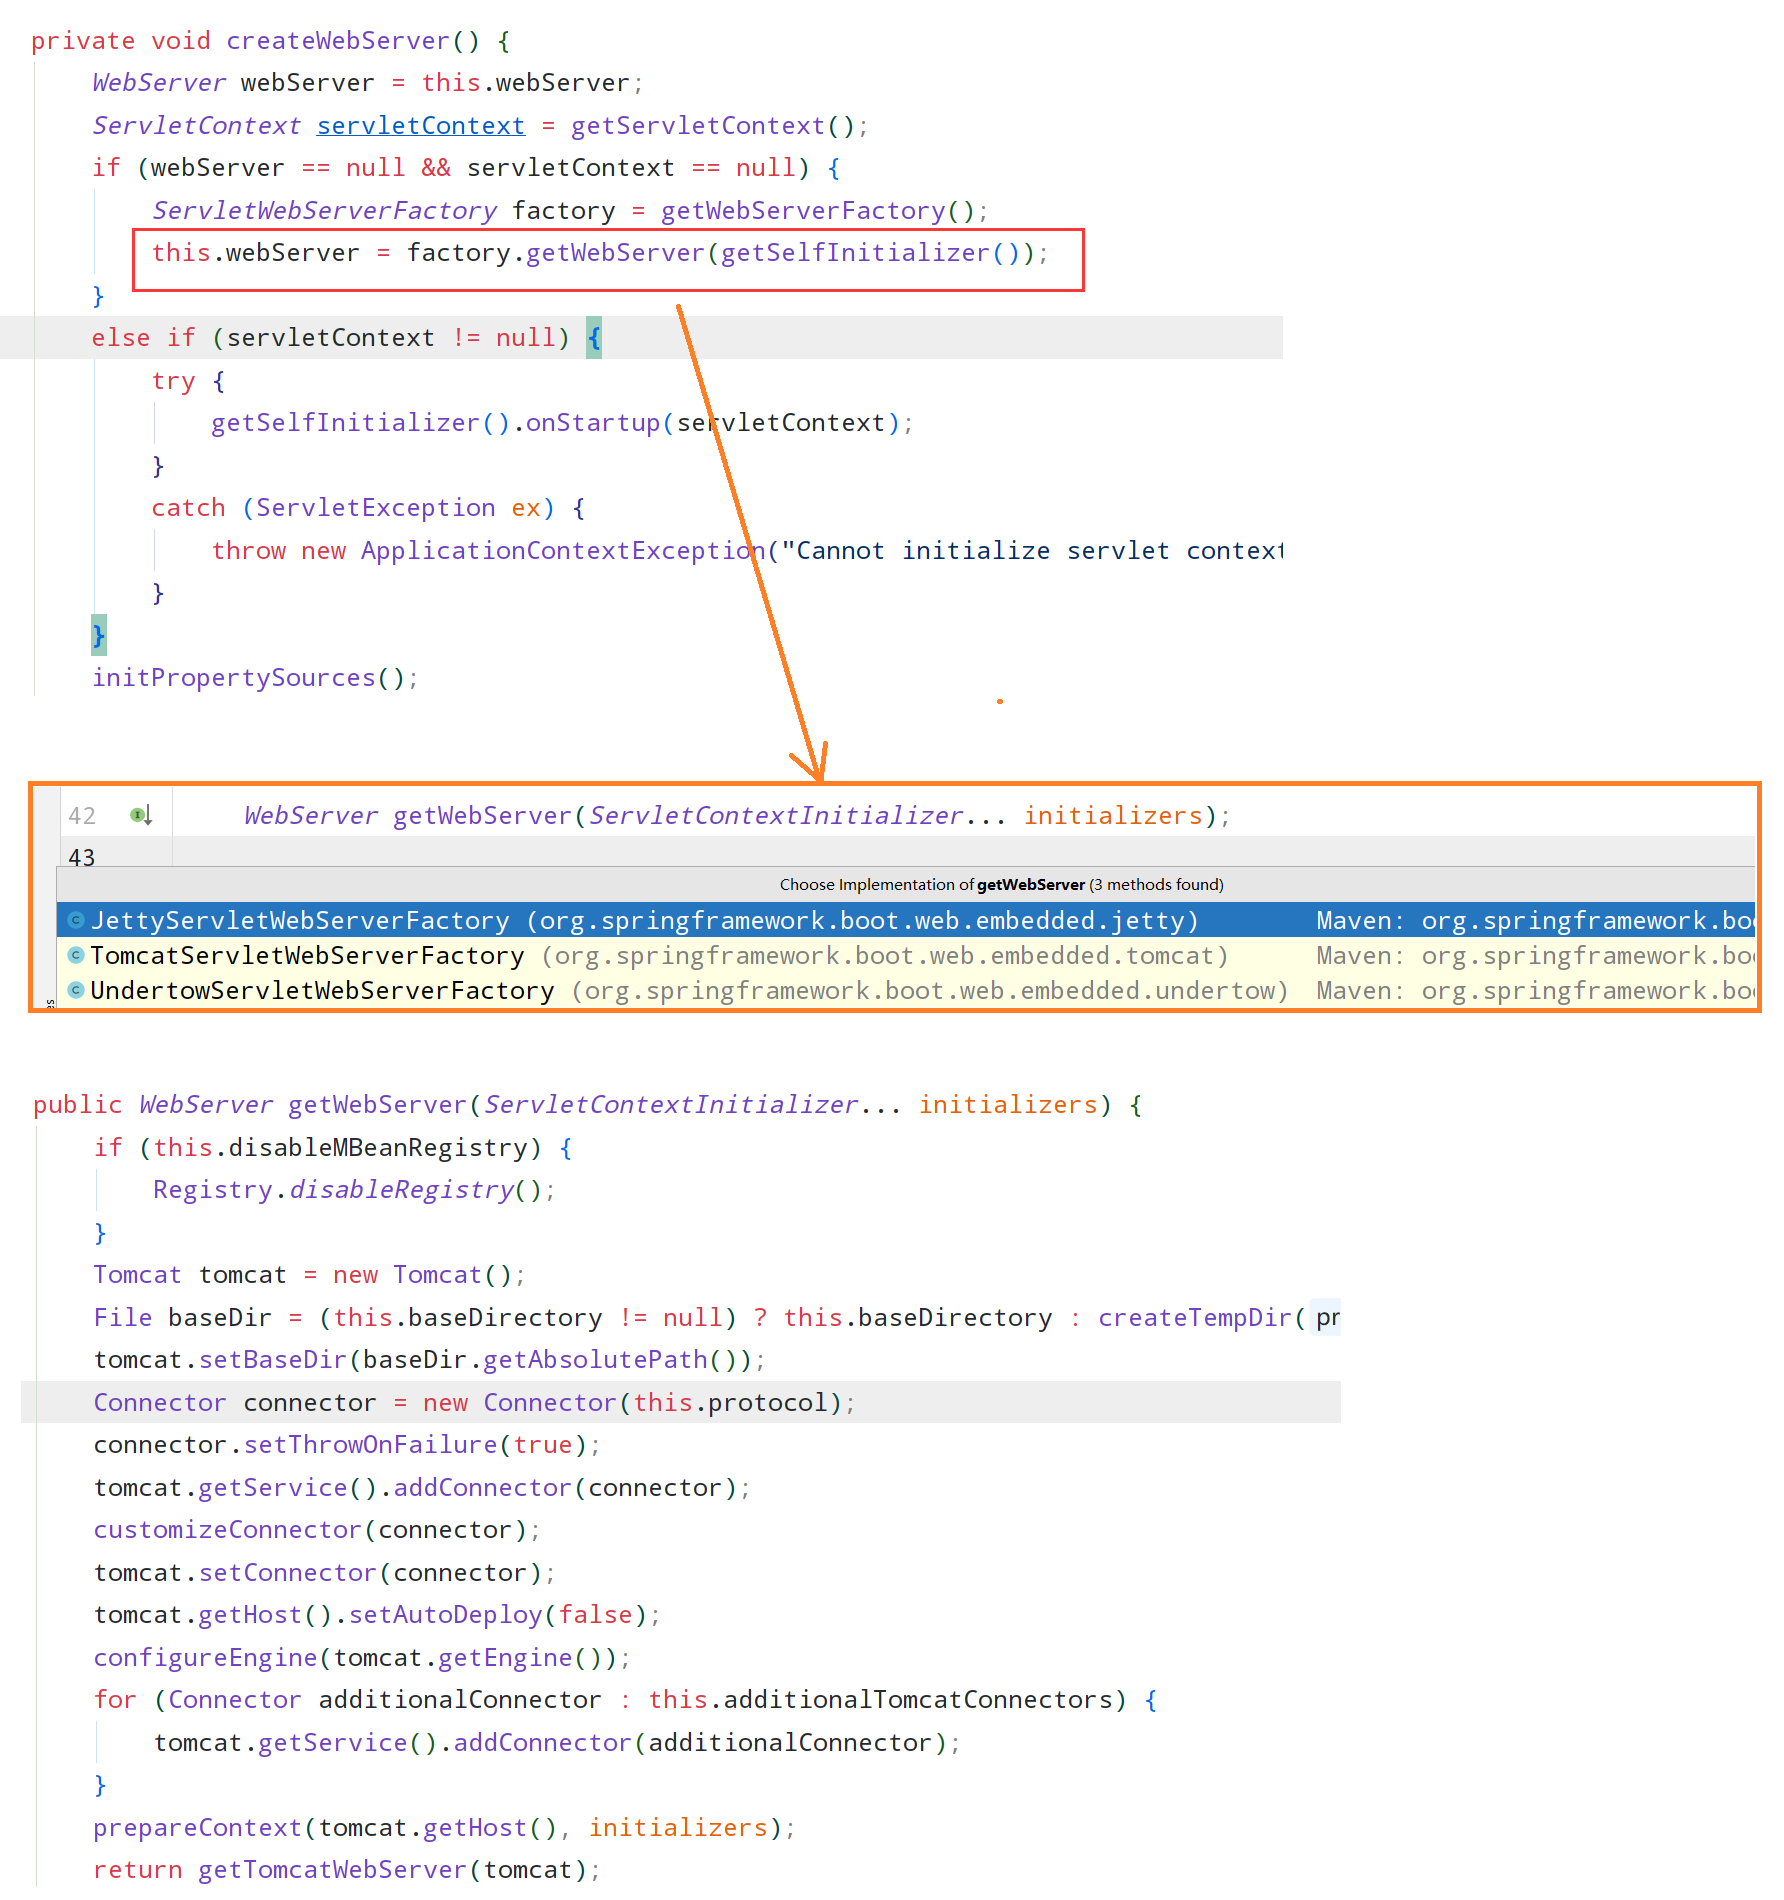
内置的Servlet容器就是在onRefresh()方法里面启动的,至此一个Servlet容器就启动OK了。
SpringBoot启动过程简述
1、new了一个SpringApplication对象,使用SPI技术加载加载 ApplicationContextInitializer、ApplicationListener 接口实例;
2、调用SpringApplication.run()方法;
3、调用createApplicationContext()方法创建上下文对象,创建上下文对象同时会注册spring的核心组件类(ConfigurationClassPostProcessor 、AutowiredAnnotationBeanPostProcessor 等);
4、调用refreshContext() 方法启动Spring容器和内置的Servlet容器;