Spring入门笔记(二)
SpringBean之间的关系
1、SpringBean之间的继承
假设现有一个Address类表示地点:
package com.xpu.bean;

public class Address {
	private String city;
	private String street;
	setter()/getter()....
}
现在如何需要两个对象,则可以这写:
<bean id="address1" class="com.xpu.bean.Address" p:city="Xian" p:street="Wulukou"></bean>

<bean id="address2" class="com.xpu.bean.Address" p:city="Xian" p:street="Beidajie"></bean>
但是这样写如果在类属性过多的时候就不是很好用了,所以,出现了配置之间的继承关系,但是这个和类之间的继承不是一回事:
<bean id="address1" class="com.xpu.bean.Address" p:city="Xian" p:street="Wulukou"></bean>

<!-- 配置之间的继承关系 :使用bean的parent属性指定-->
<bean id="address2" p:street="Beidajie" parent="address1"></bean>
Spring 允许继承 bean 的配置, 被继承的 bean 称为父 bean. 继承这个父 Bean 的 Bean 称为子 Bean,子 Bean 从父 Bean 中继承配置, 包括 Bean 的属性配置,子 Bean 也可以覆盖从父 Bean 继承过来的配置,父 Bean 可以作为配置模板, 也可以作为 Bean 实例。 若只想把父 Bean 作为模板, 可以设置
<-- 抽象bean不能被IOC容器实例化,只能用继承配置 -->
<bean id="address1" class="com.xpu.bean.Address" abstract="true"></bean>
一旦这样配置之后这个配置是不能实例化出对象的,而需要配置出他的子配置,否则就无法创建对象,若某一个bean的class未指定,那么该bean必须是一个抽象bean,可以忽略父 Bean 的 class 属性,让子 Bean 指定自己的类,而共享相同的属性配置。但此时 abstract 必须设为 true,并不是
2、SpringBean之间的依赖
Spring 允许用户通过 depends-on 属性设定 Bean 前置依赖的Bean,前置依赖的 Bean 会在本 Bean 实例化之前创建好 如果前置依赖于多个 Bean,则可以通过逗号,空格或的方式配置 Bean 的名称
public class Students {
	private int stuId;
	private String stuName;
	private int stuAge;
	private Address stuAdd;
	setter()/getter()...
}
这样需要在配置文件中的bean标签中使用depends-on属性来指定:
<bean id="address" class="com.xpu.bean.Address" p:city="BeiJing" p:street="Hello"></bean>

<bean id="student" class="com.xpu.bean.Students" p:stuId="1" p:stuName="Tim" p:stuAge="10" depends-on="address"></bean>
SpringBean的作用域
如何使用配置文件配置一个单例呢?
<bean id="address" class="com.xpu.bean.Address">
	<property name="city" value="BeiJing"></property>
	<property name="street" value="WuLuKou"></property>
</bean>
ApplicationContext context = new ClassPathXmlApplicationContext("beans-relation.xml");
Address bean1 = (Address) context.getBean("address");
Address bean2 = (Address) context.getBean("address");
System.out.println(bean1 == bean2);//true
由此可见,IOC容器对Bean的默认配置就是单例的:
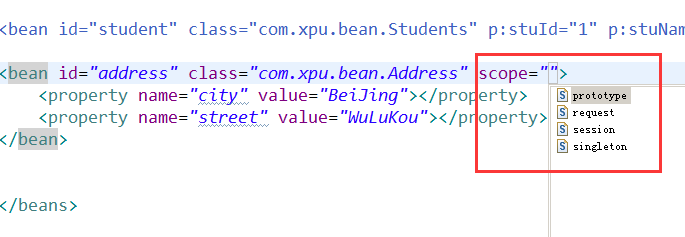 在 Spring 中, 可以在
 <bean> 元素的 scope 属性里设置 Bean 的作用域.
默认情况下, Spring 只为每个在 IOC 容器里声明的 Bean 创建唯一一个实例, 整个 IOC 容器范围内都能共享该实例:所有后续的 getBean() 调用和 Bean 引用都将返回这个唯一的 Bean 实例.该作用域被称为 singleton, 它是所有 Bean 的默认作用域,下面是scope 属性的说明:
| 类别 | 说明 |
|---|---|
| singleton | 在SpringIOC容器中仅存在一个Bean实例,Bean以单例的方式存在 |
| prototype | 每次调用getBean()时都会返回一个新的实例 |
| request | 每次HTTP请求都会创建一个新的Bean,该Bean作用域仅适用于WebApplicationContext环境 |
| session | 同一个HTTP Session共享一个Bean,不同的Http Session使用不同的Bean,仅适用于WebApplicationContext环境 |
在单例模式下,一旦执行
ApplicationContext context = new ClassPathXmlApplicationContext("beans-relation.xml");
就会构造出相应的对象,而无需等到context.getBean("address");,每次获取对象的时候都会返回已经创建好的Bean,你可以理解为这是饿汉式单例,而prototype每次等到context.getBean("address");才创建对象,你可以理解为这是一种很懒的方式,但是却不是单例模式
SpringBean使用外部属性文件
现在假设我们需要配置一个数据库连接,我们可以在配置文件中这样写:
<bean id="dataSource" class="com.mchange.v2.c3p0.ComboPooledDataSource">
	<property name="user" value="root"></property>
	<property name="password" value="1234"></property>
	<property name="driverClass" value="com.mysql.jdbc.Driver"></property>
	<property name="jdbcUrl" value="jdbc:mysql://localhost:3306/spring_demo"></property>
</bean>
接下来只需要这三个步骤便可以拿到数据库的连接对象:
ApplicationContext context = new ClassPathXmlApplicationContext("beans-properties.xml");
DataSource dataSources = (DataSource) context.getBean("dataSource");
Connection connection = dataSources.getConnection();
可是这样的做法在配置项目特别多的时候就特别复杂,我们还是希望在配置文件层面上能解耦合,把数据库的连接信息独立到一个配置文件中,于是可以使用外部属性文件来完成:
在配置文件里配置 Bean 时, 有时需要在 Bean 的配置里混入系统部署的细节信息(例如: 文件路径, 数据源配置信息等). 而这些部署细节实际上需要和 Bean 配置相分离
Spring 提供了一个 PropertyPlaceholderConfigurer 的 BeanFactory 后置处理器, 这个处理器允许用户将 Bean 配置的部分内容外移到属性文件中. 可以在 Bean 配置文件里使用形式为 ${var} 的变量, PropertyPlaceholderConfigurer 从属性文件里加载属性, 并使用这些属性来替换变量。 Spring 还允许在属性文件中使用 ${propName},以实现属性之间的相互引用。 这是我新建的db.properties配置文件:
user=root
password=1234
driverClass=com.mysql.jdbc.Driver
jdbcUrl=jdbc:mysql://127.0.0.1:3306/spring_demo
<!-- 导入属性配置文件 -->
<context:property-placeholder location="db.properties"/>

<bean id="dataSource" class="com.mchange.v2.c3p0.ComboPooledDataSource">
	<property name="user" value="${user}"></property>
	<property name="password" value="${password}"></property>
	<property name="driverClass" value="${driverClass}"></property>
	<property name="jdbcUrl" value="${jdbcUrl}"></property>
</bean>
Spring表达式语言:SpEL
Spring 表达式语言(简称SpEL):是一个支持运行时查询和操作对象图的强大的表达式语言。
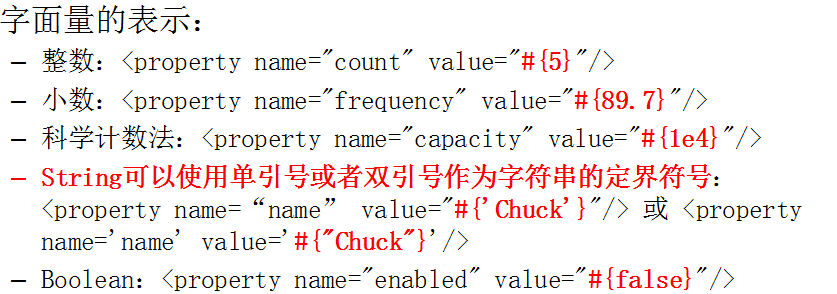
语法类似于 EL:SpEL 使用 #{…} 作为定界符,所有在大框号中的字符都将被认为是 SpEL
SpEL 为 bean 的属性进行动态赋值提供了便利
通过 SpEL 可以实现:
- 通过 bean 的 id 对 bean 进行引用
- 调用方法以及引用对象中的属性
- 计算表达式的值
- 正则表达式的匹配
1、字面量
2、引用 Bean、属性和方法
首先呢,还是拿Students和Address类作为演示:
public class Address {
	private String city;
	private String street;
	getter()/setter()...
}

public class Students {
	private int stuId;
	private String stuName;
	private int stuAge;
	private Address stuAdd;
	getter()/setter()...
}
- 引用其他对象,通过ID引用
<bean id="address" class="com.xpu.bean.Address" p:city="Xian" p:street="Wulukou"></bean>

<bean id="students"  class="com.xpu.bean.Students">
	<property name="stuId" value="1"></property>
	<property name="stuName" value="Tom"></property>
	<property name="stuAge" value="20"></property>
	<property name="stuAdd" value="#{address}"></property>
</bean>
- 引用其他对象的属性
<bean id="address" class="com.xpu.bean.Address" p:city="Xian" p:street="Wulukou"></bean>

<bean id="students"  class="com.xpu.bean.Students">
	<property name="stuId" value="1"></property>
	<property name="stuName" value="#{address.city}"></property>
	<property name="stuAge" value="20"></property>
	<property name="stuAdd" value="#{address}"></property>
</bean>
- 调用其他对象的方法,并支持链式调用
<bean id="address" class="com.xpu.bean.Address" p:city="Xian" p:street="Wulukou"></bean>

<bean id="students"  class="com.xpu.bean.Students">
	<property name="stuId" value="1"></property>
	<property name="stuName" value="#{address.toString().trim()}"></property>
	<property name="stuAge" value="20"></property>
	<property name="stuAdd" value="#{address}"></property>
</bean>
3、SpEL支持的运算符
算数运算符:
+,-,*,/,%,^加号还可以用作字符串连接
比较运算符:
<、>、==、<=、>=、lt、gt、eq、le、ge逻辑运算符号:
and、or、not、|if-else 运算符:
?: (ternary)、?: (Elvis)正则表达式:matches
调用静态方法或静态属性:通过 T() 调用一个类的静态方法,它将返回一个 Class Object,然后再调用相应的方法或属性,下面是一些使用示例:
<bean>
	<property name="add" value="#{students.id + 10}"></property>
	<property name="sub" value="#{students.id - 10}"></property>
	<property name="mul" value="#{students.id * 10}"></property>
	<property name="div" value="#{students.id / 10}"></property>
	<property name="rem" value="#{students.id % 10}"></property>
	<property name="pow" value="#{students.id ^ 10}"></property>
	<property name="stradd" value="#{students.name + '' +students.name}"></property>
	<property name="equal" value="{students.id == 1}"></property>
	<property name="logic_a" value="{students.id == 1 and students.age == 20}"></property>
	<property name="logic_o" value="{students.id == 1 or students.age == 20}"></property>
	<property name="logic_n" value="{not students.id == 1}"></property>
	<property name="if-else" value="{students.id == 1 ? 'Tom':'Tim'}"></property>
	<property name="PI" value="#{T(java.long.Math).PI}"></property>
</bean>
IOC容器中Bean的生命周期方法
Spring IOC 容器可以管理 Bean 的生命周期, Spring 允许在 Bean 生命周期的特定点执行定制的任务.。Spring IOC 容器对 Bean 的生命周期进行管理的过程:
- 1、通过构造器或工厂方法创建 Bean 实例
- 2、为 Bean 的属性设置值和对其他 Bean 的引用
- 3、调用 Bean 的初始化方法
- 4、Bean 可以使用了
- 5、当容器关闭时, 调用 Bean 的销毁方法
在 Bean 的声明里设置 init-method 和 destroy-method 属性, 为 Bean 指定初始化和销毁方法。
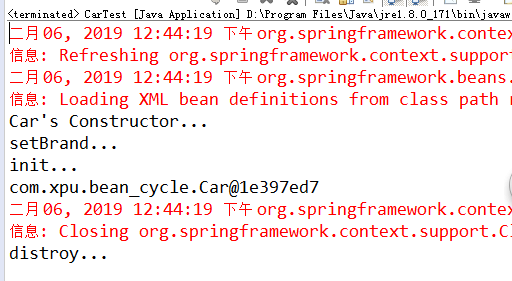
package com.xpu.bean_cycle;

public class Car {
	public Car() {
		System.out.println("Car's Constructor...");
	}

	private String brand;

	public void setBrand(String brand) {
		System.out.println("setBrand...");
		this.brand = brand;
	}

	public void init() {
		System.out.println("init...");
	}

	public void destroy() {
		System.out.println("distroy...");
	}
}

//测试代码:
public void test() {
	ClassPathXmlApplicationContext context = new ClassPathXmlApplicationContext("beans-cycle.xml");
	Car car = (Car) context.getBean("car");
	System.out.println(car);
	//关闭容器
	context.close();
}
bean的配置:
<bean id="car" class="com.xpu.bean_cycle.Car" init-method="init" destroy-method="destroy">
	<property name="brand" value="Audi"></property>
</bean>
Bean 后置处理器
Bean 后置处理器允许在调用初始化方法前后对 Bean 进行额外的处理。
Bean 后置处理器对 IOC 容器里的所有 Bean 实例逐一处理, 而非单一实例。 其典型应用是: 检查 Bean 属性的正确性或根据特定的标准更改 Bean 的属性。
对Bean 后置处理器而言, 需要实现 BeanPostProcessor 接口。 在初始化方法被调用前后, Spring 将把每个 Bean 实例分别传递给上述接口的以下两个方法:
public Object postProcessAfterInitialization(Object beanObject, String id)
public Object postProcessBeforeInitialization(Object beanObject, String id)
如何设置Bean的后置处理器呢?
使用一个类去实现BeanPostProcessor里面的上述两个方法,postProcessBeforeInitialization是在init方法之前被调用,postProcessAfterInitialization在init方法之后被调用,bean就是实例本身,beanName就是IOC容器中的bean配置的ID,返回值是实际上返回给用户的Bean,可以在以上两个方法中修改返回的Bean,甚至返回一个新的Bean,我们自己去实现BeanPostProcessor的类,只需要在IOC容器中配置一个Bean即可,无需指定ID和其他的东西,IOC容器会自动识别后置处理器:
<!-- 配置bean的后置处理器 -->
<bean class="com.xpu.bean_cycle.MyBeanPostProcessor"></bean>
添加Bean后置处理器后 Bean 的生命周期,Spring IOC 容器对 Bean 的生命周期进行管理的过程:
- 通过构造器或工厂方法创建 Bean 实例
- 为 Bean 的属性设置值和对其他 Bean 的引用
- 将 Bean 实例传递给 Bean 后置处理器的 postProcessBeforeInitialization 方法
- 调用 Bean 的初始化方法
- 将 Bean 实例传递给 Bean 后置处理器的 postProcessAfterInitialization方法 Bean 可以使用了
- 当容器关闭时, 调用 Bean 的销毁方法
public class MyBeanPostProcessor implements BeanPostProcessor{
	@Override
	public Object postProcessBeforeInitialization(Object bean, String beanName) throws BeansException {
		System.out.println("postProcessBeforeInitialization"+bean+","+beanName);
		if("Car".equals(beanName)) {
			//...
		}else if("XXX".equals(beanName)) {
			//...
		}
		return bean;
	}

	@Override
	public Object postProcessAfterInitialization(Object bean, String beanName) throws BeansException {
		System.out.println("postProcessAfterInitialization"+bean+","+beanName);
		if("Car".equals(beanName)) {
			//...
		}else if("XXX".equals(beanName)) {
			//...
		}
		return car;
	}
}
Bean 的配置方式
通过全类名(反射)、通过工厂方法(静态工厂方法 & 实例工厂方法)、FactoryBean,接下来我记录一下如何通过工厂方法来配置Bean:
1、静态工厂方法
调用静态工厂方法创建 Bean是将对象创建的过程封装到静态方法中. 当客户端需要对象时, 只需要简单地调用静态方法, 而不同关心创建对象的细节.
要声明通过静态方法创建的 Bean, 需要在 Bean 的 class 属性里指定拥有该工厂的方法的类, 同时在 factory-method 属性里指定工厂方法的名称. 最后, 使用 <constrctor-arg> 元素为该方法传递方法参数.
package com.xpu.bean_factory;

import java.util.HashMap;
import java.util.Map;

/**
 * 静态工厂方法:直接调用某一个类的静态方法就可以返回一个bean的实例
 */
public class StaticCarFactory {
	private static Map<String, Car> cars = new HashMap<>();

	static {
		cars.put("audi", new Car("audi",300000));
		cars.put("ford", new Car("ford",400000));
	}

	//静态工厂方法
	public static Car getCar(String name) {
		return cars.get(name);
	}
}
<!-- 通过静态方法工厂来配置Bean,注意不是配置静态方法工厂实例,而是Bean实例 -->
<!-- class属性指向静态方法工厂的Class
	 factory-method属性指向静态工厂的名字
	 constructor-arg如果工厂方法需要传入参数,则使用constructor-arg来配置参数
	 -->
<bean id="car1" class="com.xpu.bean_factory.StaticCarFactory" factory-method="getCar">
	<constructor-arg value="audi"></constructor-arg>
</bean>
2、实例工厂方法
实例工厂方法: 将对象的创建过程封装到另外一个对象实例的方法里. 当客户端需要请求对象时, 只需要简单的调用该实例方法而不需要关心对象的创建细节. 要声明通过实例工厂方法创建的 Bean
- 在 bean 的 factory-bean 属性里指定拥有该工厂方法的 Bean
- 在 factory-method 属性里指定该工厂方法的名称
- 使用 construtor-arg 元素为工厂方法传递方法参数
package com.xpu.bean_factory;

import java.util.HashMap;
import java.util.Map;

/**
 * 实例工厂的方法,即先需要创建工厂本身,再调用工厂的实例方法,再返回Bean实例
 */
public class InstanceCarFactory {
	private static Map<String, Car> cars = null;
	public InstanceCarFactory() {
		cars = new HashMap<>();
		cars.put("audi", new Car("audi",300000));
		cars.put("ford", new Car("ford",400000));
	}

	public Car getCar(String brand) {
		return cars.get(brand);
	}
}
<!-- 配置工厂的实例 -->
<bean id="carFactory" class="com.xpu.bean_factory.InstanceCarFactory"></bean>

<!-- 通过实例工厂方法来配置Bean -->
<!-- factory-bean属性指向实例方法工厂的Class
	 factory-method属性指向实例工厂的名字
	 constructor-arg如果工厂方法需要传入参数,则使用constructor-arg来配置参数
 -->
<bean id="car2" factory-bean="carFactory" factory-method="getCar">
	<constructor-arg value="ford"></constructor-arg>
</bean>
3、FactoryBean
实现 FactoryBean 接口在 Spring IOC 容器中配置 Bean,Spring 中有两种类型的 Bean, 一种是普通Bean, 另一种是工厂Bean,即FactoryBean.。
工厂 Bean 跟普通Bean不同,其返回的对象不是指定类的一个实例,其返回的是该工厂 Bean 的 getObject 方法所返回的对象 ,示例如下:
package com.xpu.factory_spring;

import org.springframework.beans.factory.FactoryBean;

//自定义的FactoryBean需要实现Spring提供的FactoryBean接口
public class CarFactoryBean implements FactoryBean<Car> {

	private String brand;
	public void setBrand(String brand) {
		this.brand = brand;
	}

	//返回Bean的对象
	@Override
	public Car getObject() throws Exception {
		return new Car(brand, 500000);
	}

	//返回Bean的类型
	@Override
	public Class<?> getObjectType() {
		return Car.class;
	}

	//是否是单例的
	@Override
	public boolean isSingleton() {
		return true;
	}
}
<!-- 通过FactoryBean来配置Bean的实例
	 class执行FactoryBean的全类名
	 property配置的是FactoryBean的属性,但是返回的FactoryBean的getObject()方法返回的实例
	 -->
<bean id="car" class="com.xpu.factory_spring.CarFactoryBean">
	<property name="brand" value="BMW"></property>
</bean>
4、基于注解的方式
接下来说说基于注解的方式配置Bean,这也是常见的方式: 组件扫描(component scanning): Spring 能够从 classpath 下自动扫描, 侦测和实例化具有特定注解的组件,特定组件包括:
@Component: 基本注解,标识了一个受 Spring 管理的组件@Respository: 标识持久层组件@Service: 标识服务层(业务层)组件@Controller: 标识表现层组件
对于扫描到的组件, Spring 有默认的命名策略: 使用非限定类名, 第一个字母小写, 也可以在注解中通过 value 属性值标识组件的名称
当在组件类上使用了特定的注解之后, 还需要在 Spring 的配置文件中声明需要扫描的包,而且不要忘记声明命名空间<context:component-scan> :
<context:component-scan base-package="com.xpu.annnotations"></context:component-scan>
base-package 属性指定一个需要扫描的基类包,Spring 容器将会扫描这个基类包里及其子包中的所有类。当需要扫描多个包时, 可以使用逗号分隔,如果仅希望扫描特定的类而非基包下的所有类,可使用 resource-pattern 属性过滤特定的类,示例:
<!-- 可以通过resource-pattern可以指定扫描的资源 -->
<context:component-scan base-package="com.xpu.annnotations" resource-pattern="service/*.class" ></context:component-scan>
<context:include-filter>子节点表示要包含的目标类<context:exclude-filter>子节点表示要排除在外的目标类<context:component-scan>下可以拥有若干个<context:include-filter>和<context:exclude-filter>子节点
<!-- context:exclude-filter就是排除哪些类 -->
<context:component-scan base-package="com.xpu.annnotations" use-default-filters="false">
	<context:exclude-filter type="annotation" expression="com.xpu.annnotations.controller.UserController"/>
</context:component-scan>

<context:component-scan base-package="com.xpu.annnotations" use-default-filters="false">
	<context:include-filter type="annotation" expression="com.xpu.annnotations.controller.UserController"/>
</context:component-scan>
注意对于那些已经配置了注解的类,想要使自己的过滤器生效,就需要配置一个use-default-filters="false" 要求不要使用默认的过滤器!
<context:include-filter> 和 <context:exclude-filter> 子节点支持多种类型的过滤表达式:
| 类别 | 示例 | 说明 |
|---|---|---|
| annotation | com.xpu.XxxAnnotation | 所有标注了XxxAnnotation的类,该类型采用目标类型是否标注了某个注解进行过滤 |
| assinable | com.xpu.XxxService | 继承或者扩展 XxxService的类,该类型采用目标类型是否继承或者拓展某个特定的类进行过滤 |
| aspectj | com.xpu.*Service+ | 所有类名以Service结束及继承或扩展它们的类,该类型采用aspectJ表达式进行过滤 |
| regex | com.xpu.anno.* | 所有com.xpu.anno包下的类,该类型采用正则表达式根据类名进行过滤 |
| custom | com.xpu.XxxTypeFilter | 采用XxxTypeFilter通过代码的方式定义过滤规则。该类必须实现org.springframework.core.type.TypeFilter接口 |
组件装配
<context:component-scan> 元素还会自动注册AutowiredAnnotationBeanPostProcessor 实例, 该实例可以自动装配具有 @Autowired 和 @Resource 、@Inject注解的属性:
1、使用 @Autowired 自动装配Bean
@Autowired 注解自动装配具有兼容类型的单个 Bean属性
构造器, 普通字段(即使是非 public),一切具有参数的方法都可以应用
@Authwired注解默认情况下, 所有使用 @Authwired 注解的属性都需要被设置,当 Spring 找不到匹配的 Bean 装配属性时,会抛出异常,若某一属性允许不被设置,可以设置 @Authwired 注解的 required 属性为 false
默认情况下, 当 IOC 容器里存在多个类型兼容的 Bean 时, 通过类型的自动装配将无法工作。 此时可以在 @Qualifier 注解里提供 Bean 的名称。 Spring 允许对方法的入参标注 @Qualifiter 已指定注入 Bean 的名称
@Authwired 注解也可以应用在数组类型的属性上, 此时 Spring 将会把所有匹配的 Bean 进行自动装配。
@Authwired 注解也可以应用在集合属性上,此时 Spring 读取该集合的类型信息, 然后自动装配所有与之兼容的 Bean.
@Authwired 注解用在 java.util.Map 上时,若该 Map 的键值为 String,那么 Spring 将自动装配与之 Map 值类型兼容的 Bean, 此时 Bean 的名称作为键值
@Controller("userController")
public class UserController {
	@Autowired(required=false)
	private UserService userService;

	@Autowired
	public void setUserService(UserService userService) {
		this.userService = userService;
	}

	public void execute() {
		System.out.println("UserController execute()...");
		userService.add();
	}
}
现在假设IOC容器中没有userService这个Bean,那么Spring会抛出异常,不过给配置一个@Autowired(required=false)即可,如果像这样的UserResponseImpl这样的类没有指定Repository中的名称,于是便可以使用@Qualifier("userResponseImpl")注解类中依赖的属性名称,这就好像如果你不自己给自己取个名字,那么就只能用系统给你的默认的名称,下面是示例:
@Service
public class UserService {
	@Autowired
	@Qualifier("userResponseImpl")
	private UserResponse userResponse;
	public void add() {
		System.out.println("UserService add()...");
		userResponse.save();
	}
	public UserResponse getUserResponse() {
		return userResponse;
	}
	public void setUserResponse(@Qualifier("userResponseImpl") UserResponse userResponse) {
		this.userResponse = userResponse;
	}
}
Spring 还支持 @Resource 和 @Inject 注解,这两个注解和 @Autowired 注解的功用类似: 1、@Resource 注解要求提供一个 Bean 名称的属性,若该属性为空,则自动采用标注处的变量或方法名作为 Bean 的名称 2、@Inject 和 @Autowired 注解一样也是按类型匹配注入的 Bean, 但没有 reqired 属性,建议使用 @Autowired 注解
Spring泛型依赖注入
Spring 4.x 中可以为子类注入子类对应的泛型类型的成员变量的引用: 现在假设有如下类,从UML中也可以看出这几个类的关系:
<context:component-scan base-package="com.xpu.generic"></context:component-scan>
public class BaseService<T> {
	@Autowired
	protected BasetRepository<T> repository;

	public void add() {
		System.out.println("add");
		System.out.println(repository);
	}
}

@Service
public class UserService extends BaseService<User>{ }

public class Demo{
	public void test(){
		ApplicationContext context = new ClassPathXmlApplicationContext("beans-generic-di.cml.xml");
UserService service = (UserService) context.getBean("userService");
		service.add();
	}
}
 泛型依赖注入就是允许我们在使用spring进行依赖注入的同时,利用泛型的优点对代码进行精简,将可重复使用的代码全部放到一个类之中,方便以后的维护和修改。同时在不增加代码的情况下增加代码的复用性。Spring 4.0开始支持的泛型依赖注入对于我们使用泛型非常重要,以后还会经常遇到的!