Spring入门笔记(三)
SpringAOP
AOP前奏
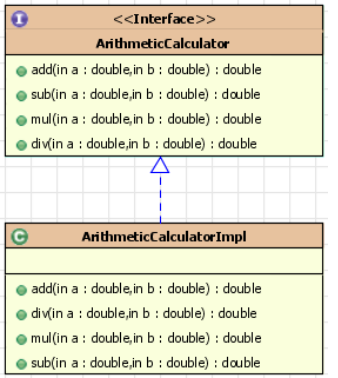
SpringAOP是面向切面编程,那么我们先来看看那什么是面向切面编程,首先看一个例子,假设我们有一个计算类的接口AtithmeticCalculator,有一个实现类AtithmeticCalculatorImpl:
- 需求1-日志:在程序执行期间追踪正在发生的活动
- 需求2-验证:希望计算器只能处理正数的运算
出现这样的需求该怎么办呢?我们先实现第一个需求(加入计算的日志),代码如下:
package com.xpu.hello;

public class AtithmeticCalculatorImpl_Logging implements AtithmeticCalculator {
    @Override
    public int add(int i, int j) {
        System.out.println("The method add begin with["+i+","+j+"]");
        int ret = i+j;
        System.out.println("The method add end with["+i+","+j+"]");
        return ret;
    }

    @Override
    public int sub(int i, int j) {
        System.out.println("The method sub begin with["+i+","+j+"]");
        int ret = i-j;
        System.out.println("The method sub end with["+i+","+j+"]");
        return ret;
    }

    @Override
    public int mul(int i, int j) {
        System.out.println("The method mul begin with["+i+","+j+"]");
        int ret = i*j;
        System.out.println("The method mul end with["+i+","+j+"]");
        return ret;
    }

    @Override
    public int div(int i, int j) {
        System.out.println("The method div begin with["+i+","+j+"]");
        int ret = i/j;
        System.out.println("The method div end with["+i+","+j+"]");
        return ret;
    }
}
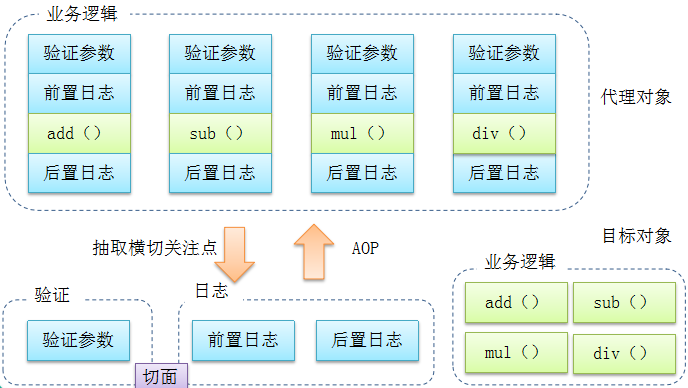
代码混乱:越来越多的非业务需求(日志和验证等)加入后,原有的业务方法急剧膨胀, 每个方法在处理核心逻辑的同时还必须兼顾其他多个关注点.。
代码分散: 以日志需求为例,只是为了满足这个单一需求, 就不得不在多个模块(方法)里多次重复相同的日志代码。 如果日志需求发生变化, 必须修改所有模块。
那么怎么样才能把打印日志的方法从其中抽离出来呢?当然是可以的,我们可以采用如下的方式实现:
动态代理
对于上面的问题,我们完全可以使用动态代理来完成:
package com.xpu.hello;

import java.lang.reflect.InvocationHandler;
import java.lang.reflect.Method;
import java.lang.reflect.Proxy;

/**
 * 动态代理此类
 */
class AtithmeticCalculatorLoggingproxy {

    //动态代理对象
    private AtithmeticCalculator target;

    //通过构造方法传入代理的对象
    AtithmeticCalculatorLoggingproxy(AtithmeticCalculator atithmeticCalculator) {
        this.target = atithmeticCalculator;
    }

    //获取代理后的执行对象
    AtithmeticCalculator getLoggingProxy() {
        AtithmeticCalculator proxy = null;

        //获取类加载器(代理对象由那个类加载器负责加载)
        ClassLoader classLoader = target.getClass().getClassLoader();

        //代理对象的类型,即其中有哪些方法
        Class[] instance = new Class[] {AtithmeticCalculator.class};

        //当调用代理对象其中的方法时,该执行的代码
        InvocationHandler invok = new InvocationHandler() {

            /**
             * proxy:正在返回的那个代理对象,一般情况下,在invoke方法中都不使用
             * method:正在被调用的方法
             * args:调用方法时传入的参数
             */
            @Override
            public Object invoke(Object proxy, Method method, Object[] args) throws Throwable {
                //获取到正在执行的方法名
                String method_name = method.getName();
                //日志start
                System.out.println("XPU-->The method "+method_name+" begin with["+args[0]+","+args[1]+"]");

                //执行运算方法
                Object ret = method.invoke(target, args);

                //日志end
                System.out.println("XPU-->The method "+method_name+" end with["+args[0]+","+args[1]+"]");
                return ret;
            }
        };

        //得到执行实例
        proxy = (AtithmeticCalculator) Proxy.newProxyInstance(classLoader, instance, invok);
        //返回执行实例
        return proxy;
    }
}
这样就是动态代理的做法,让AtithmeticCalculator对象成为动态代理类的一个成员,再通过反射的方式去执行被代理对象的方法,从而可以实现在方法执行的前后打印日志:
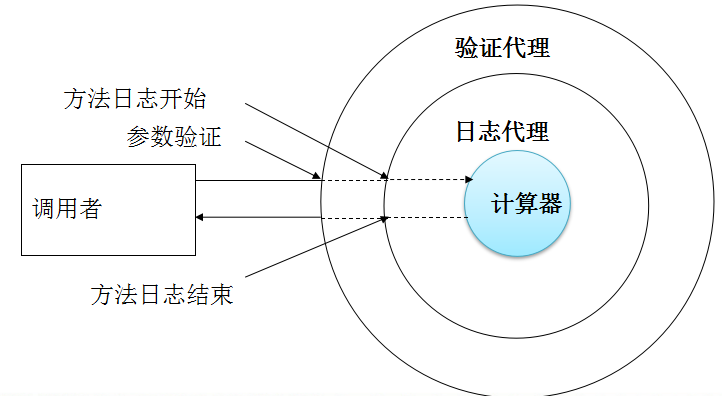
 代理设计模式的原理:使用一个代理将对象包装起来,然后用该代理对象取代原始对象,任何对原始对象的调用都要通过代理,代理对象决定是否以及何时将方法调用转到原始对象上。
什么是AOP
AOP(Aspect-Oriented Programming, 面向切面编程): 是一种新的方法论, 是对传统 OOP(Object-Oriented Programming,面向对象编程) 的补充。
AOP 的主要编程对象是切面(aspect), 而切面模块化横切关注点。 在应用 AOP 编程时, 仍然需要定义公共功能, 但可以明确的定义这个功能在哪里, 以什么方式应用,并且不必修改受影响的类。这样一来横切关注点就被模块化到特殊的对象(切面)里。
AOP 的好处:
- 每个事物逻辑位于一个位置,代码不分散,便于维护和升级
- 业务模块更简洁, 只包含核心业务代码
AOP相关术语
- 切面(Aspect): 横切关注点(跨越应用程序多个模块的功能)被模块化的特殊对象
- 通知(Advice): 切面必须要完成的工作
- 目标(Target): 被通知的对象
- 代理(Proxy): 向目标对象应用通知之后创建的对象
- 连接点(Joinpoint):程序执行的某个特定位置:如类某个方法调用前、调用后、方法抛出异常后等。**连接点由两个信息确定:方法表示的程序执行点;相对点表示的方位。**例如 ArithmethicCalculator#add() 方法执行前的连接点,执行点为 ArithmethicCalculator的add(); 方位为该方法执行前的位置
- 切点(pointcut):每个类都拥有多个连接点:例如 ArithmethicCalculator 的所有方法实际上都是连接点,即连接点是程序类中客观存在的事务。AOP 通过切点定位到特定的连接点 。类比:连接点相当于数据库中的记录,切点相当于查询条件。切点和连接点不是一对一的关系,一个切点匹配多个连接点,切点通过 org.springframework.aop.Pointcut 接口进行描述,它使用类和方法作为连接点的查询条件。
Spring的AOP
AspectJ:Java 社区里最完整最流行的 AOP 框架。 在 Spring2.0 以上版本中, 可以使用基于 AspectJ 注解或基于 XML 配置的 AOP
- 要在 Spring 应用中使用 AspectJ 注解,必须在 classpath 下包含 AspectJ 类库: aopalliance.jar、aspectj.weaver.jar 和 spring-aspects.jar
- 将 aop Schema 添加到
<beans>根元素中。 - 要在 Spring IOC 容器中启用 AspectJ 注解支持, 只要在 Bean 配置文件中定义一个空的 XML 元素
<aop:aspectj-autoproxy> - 当 Spring IOC 容器侦测到 Bean 配置文件中的
<aop:aspectj-autoproxy>元素时, 会自动为与 AspectJ 切面匹配的 Bean 创建代理。
<!-- 需要依赖的jar包-->
<dependency>
        <groupId>org.aspectj</groupId>
        <artifactId>aspectjweaver</artifactId>
        <version>1.9.1</version>
</dependency>

<dependency>
    <groupId>org.aspectj</groupId>
    <artifactId>aspectjrt</artifactId>
    <version>1.9.1</version>
</dependency>

<dependency>
    <groupId>aopalliance</groupId>
    <artifactId>aopalliance</artifactId>
    <version>1.0</version>
</dependency>
用 AspectJ 注解声明切面
要在 Spring 中声明 AspectJ 切面, 只需要在 IOC 容器中将切面声明为 Bean 实例。 当在 Spring IOC 容器中初始化 AspectJ 切面之后, Spring IOC 容器就会为那些与 AspectJ 切面相匹配的 Bean 创建代理。
在 AspectJ 注解中, 切面只是一个带有 @Aspect 注解的 Java 类。 通知是标注有某种注解的简单的 Java 方法。
AspectJ 支持 5 种类型的通知注解:
- @Before: 前置通知, 在方法执行之前执行
- @After: 后置通知, 在方法执行之后执行
- @AfterRunning: 返回通知, 在方法返回结果之后执行
- @AfterThrowing: 异常通知, 在方法抛出异常之后
- @Around: 环绕通知, 围绕着方法执行
下面通过AOP面向切面编程的思想完成这个日志功能; AtithmeticCalculatorImpl.java和AtithmeticCalculator.java都不变,需要把AtithmeticCalculatorImpl这个实现类通过@Component注解交给IOC容器管理,只是完成了计算的功能,现在新添加一个LoggingAspect类:
package com.xpu.aop;
import org.aspectj.lang.JoinPoint;
import org.aspectj.lang.annotation.After;
import org.aspectj.lang.annotation.Aspect;
import org.aspectj.lang.annotation.Before;
import org.springframework.stereotype.Component;
//把这个类声明为切面:1、把该类放入IOC容器中 2、再声明为一个切面
@Aspect
@Component
public class LoggingAspect {
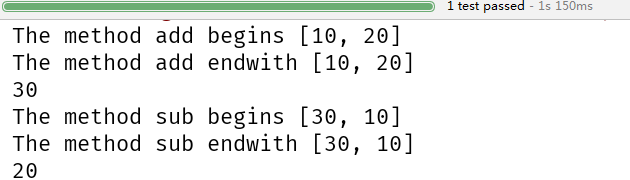
//声明该方法是一个前置通知:在目标方法开始之前执行
//@Before("execution(public int com.xpu.aop.AtithmeticCalculator.add(int,int))")
@Before("execution(public int com.xpu.aop.AtithmeticCalculator.*(int,int))")
public void beforeMethod(JoinPoint joinPoint){
String methodName = joinPoint.getSignature().getName();
Object[] args = joinPoint.getArgs();
System.out.println("The method "+ methodName +
" begins ["+args[0]+", "+args[1]+"]");
}
//声明该方法是一个后置通知:在目标方法开始之后执行
@After("execution(public int com.xpu.aop.AtithmeticCalculator.*(int,int))")
public void endMethod(JoinPoint joinPoint){
String methodName = joinPoint.getSignature().getName();
Object[] args = joinPoint.getArgs();
System.out.println("The method "+ methodName +
" endwith ["+args[0]+", "+args[1]+"]");
}
}
<!-- 配置自动扫描的scan -->
<context:component-scan base-package="com.xpu.aop">
</context:component-scan>

<!-- 使ApactJ注解起作用,自动为匹配的类生成代理对象 -->
<aop:aspectj-autoproxy></aop:aspectj-autoproxy>
这是测试方法:
@org.junit.Test
	public void fun(){
	//1、创建Spring的IOC容器
	ApplicationContext context = new ClassPathXmlApplicationContext("applicationContext.xml");

	//2、从IOC容器中获取Bean的实例
	AtithmeticCalculator bean = context.getBean(AtithmeticCalculator.class);

	//3.1 使用Bean的add
	int add = bean.add(10, 20);
	System.out.println(add);
	//3.2 使用Bean的sub
	int sub = bean.sub(30, 10);
	System.out.println(sub);
}
分析这个AOP示例
前置通知就是在方法执行之前执行的通知,可以直接了当地理解为一个方法!
前置通知使用 @Before 注解,并将切入点表达式的值作为注解值。其中@Aspect标识这是一个切面,同样的@Component也是要把自己交给IOC容器去管理,@After标识这个方法是个前置通知, 切点表达式表示执行ArithmeticCalculator 接口的 add() 方法, * 代表匹配任意修饰符及任意返回值, 参数列表中的..匹配任意数量的参数,execution里面是方法签名,利用方法签名编写 AspectJ 切入点表达式:
最典型的切入点表达式时根据方法的签名来匹配各种方法:
execution * com.atguigu.spring.ArithmeticCalculator.*(..) 匹配 ArithmeticCalculator 中声明的所有方法,第一个 * 代表任意修饰符及任意返回值。第二个 * 代表任意方法。 .. 匹配任意数量的参数。若目标类与接口与该切面在同一个包中, 可以省略包名
execution public * ArithmeticCalculator.*(..) 匹配 ArithmeticCalculator 接口的所有公有方法。
execution public double ArithmeticCalculator.*(..) 匹配 ArithmeticCalculator 中返回 double 类型数值的方法。
execution public double ArithmeticCalculator.*(double, ..) 匹配第一个参数为 double 类型的方法, .. 匹配任意数量任意类型的参数。
execution public double ArithmeticCalculator.*(double, double) 匹配参数类型为 double, double 类型的方法。
可以在通知方法中声明一个类型为 JoinPoint 的参数,然后就能访问链接细节, 如方法名称和参数值!
合并切入点表达式 在 AspectJ 中, 切入点表达式可以通过操作符
&&、||、!结合起来
后置通知
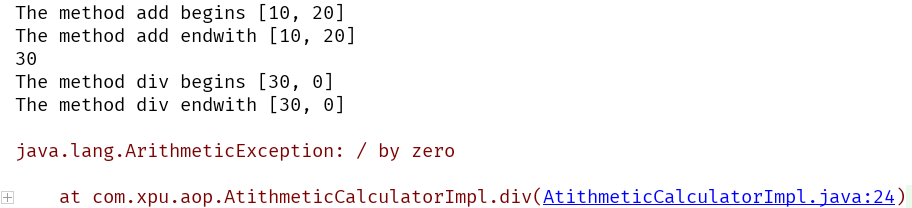
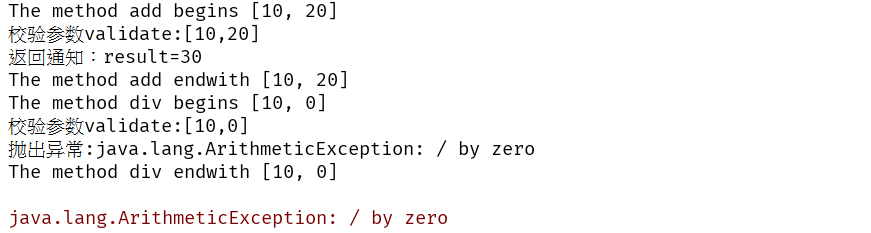
后置通知是在连接点完成之后执行的,即连接点返回结果或者抛出异常的时候, 下面的后置通知记录了方法的终止。在后置通知中还不能访问目标方法的执行结果,执行结果需要在返回通知里面访问,无论方法是否出现异常,后置通知都会执行,比如演示一个除零异常;
返回通知、异常通知和环绕通知
一个切面可以包括一个或者多个通知。
 我们可以看出,后置通知访问不到方法的返回值,而返回通知就是专门用来接收返回值,异常通知就是在方法执行中出现异常才会执行的代码,而且可以指定异常的种类来决定是否触发代码!
无论连接点是正常返回还是抛出异常,后置通知都会执行。如果只想在连接点返回的时候记录日志,应使用返回通知代替后置通知。在返回通知中,只要将 returning 属性添加到 @AfterReturning 注解中,就可以访问连接点的返回值。 该属性的值即为用来传入返回值的参数名称。
必须在通知方法的签名中添加一个同名参数, 在运行时, Spring AOP 会通过这个参数传递返回值。原始的切点表达式需要出现在 pointcut 属性中:
/**
 *返回通知:在方法正常结束后执行的代码
 */
@AfterReturning(pointcut="execution(public int com.xpu.aop.AtithmeticCalculator.*(int,int))", returning = "result")
public void afterReturning(JoinPoint joinPoint, Object result){
        String methodName = joinPoint.getSignature().getName();
        System.out.println("The method "+methodName+" result=" +result);
}
异常通知只在连接点抛出异常时才执行异常通知,将 throwing 属性添加到 @AfterThrowing 注解中, 也可以访问连接点抛出的异常。 Throwable 是所有错误和异常类的超类。 所以在异常通知方法可以捕获到任何错误和异常。如果只对某种特殊的异常类型感兴趣, 可以将参数声明为其他异常的参数类型。 然后通知就只在抛出这个类型及其子类的异常时才被执行。
/**
 * 异常通知,只有执行方法出现异常的时候才会用到
 */
@AfterThrowing(value="execution(public int com.xpu.aop.AtithmeticCalculator.*(int,int))", throwing = "e")
public void afterThrowing(JoinPoint joinPoint, Exception e){
    String methodName = joinPoint.getSignature().getName();
    System.out.println("The method "+methodName+" throwsException = " + e);
}
环绕通知是所有通知类型中功能最为强大的, 能够全面地控制连接点。 甚至可以控制是否执行连接点,对于环绕通知来说, 连接点的参数类型必须是 ProceedingJoinPoint 。 它是 JoinPoint 的子接口,允许控制何时执行, 是否执行连接点。
在环绕通知中需要明确调用 ProceedingJoinPoint 的 proceed() 方法来执行被代理的方法。 如果忘记这样做就会导致通知被执行了, 但目标方法没有被执行。
注意: 环绕通知的方法需要返回目标方法执行之后的结果, 即调用 joinPoint.proceed(); 的返回值,否则会出现空指针异常
/**
 * 环绕通知需要携带proceedingJoinPoint类型参数,类似于动态代理的全过程
 * @param proceedingJoinPoint 这个参数可以决定是否执行目标方法
 * 而且环绕通知必须有返回值,返回值即为目标方法的返回值
 */
@Around("execution(public int com.xpu.aop.AtithmeticCalculator.*(int,int))")
public Object aroundMethod(ProceedingJoinPoint proceedingJoinPoint){
    System.out.println("aroundMethod");
    return 100;
}
切面的优先级
在同一个连接点上应用不止一个切面时,除非明确指定,否则它们的优先级是不确定的。切面的优先级可以通过实现 Ordered 接口或利用 @Order 注解指定。实现 Ordered 接口, getOrder() 方法的返回值越小,优先级越高。若使用 @Order 注解, 序号出现在注解中!
@Order(1)
@Aspect
@Component
public class ValidationAspectJ {

    @Before(value = "execution(public int com.xpu.aop.AtithmeticCalculator.*(int,int))")
    public void validateArgs(JoinPoint joinPoint){
        System.out.println("validate:"+ Arrays.asList(joinPoint.getArgs()));
    }
}
重用切入点
在编写 AspectJ 切面时, 可以直接在通知注解中书写切入点表达式。 但同一个切点表达式可能会在多个通知中重复出现。
在 AspectJ 切面中,可以通过 @Pointcut 注解将一个切入点声明成简单的方法。 切入点的方法体通常是空的,因为将切入点定义与应用程序逻辑混在一起是不合理的。
切入点方法的访问控制符同时也控制着这个切入点的可见性。 如果切入点要在多个切面中共用,最好将它们集中在一个公共的类中。 在这种情况下, 它们必须被声明为 public。 在引入这个切入点时,必须将类名也包括在内。 如果类没有与这个切面放在同一个包中, 还必须包含包名。其他通知可以通过方法名称引入该切入点,使用示例如下:
package com.xpu.aop;

import org.aspectj.lang.JoinPoint;
import org.aspectj.lang.ProceedingJoinPoint;
import org.aspectj.lang.annotation.*;
import org.springframework.core.annotation.Order;
import org.springframework.stereotype.Component;

//把这个类声明为切面:1、把该类放入IOC容器中 2、再声明为一个切面
@Order(1)
@Aspect
@Component
public class LoggingAspect {
    //定义一个方法,用于声明切入点表达式,一般该方法中不需要在写入其他的代码
    @Pointcut(value = "execution(public int com.xpu.aop.AtithmeticCalculator.*(..))")
    public void declareJointPointExpression(){}


    //声明该方法是一个前置通知:在目标方法开始之前执行
    //@Before("execution(public int com.xpu.aop.AtithmeticCalculator.add(int,int))")
    //@Before("execution(public int com.xpu.aop.AtithmeticCalculator.*(..)")
    //@Before("execution(public int com.xpu.aop.AtithmeticCalculator.*(int,int))")
    @Before(value = "declareJointPointExpression()")
    public void beforeMethod(JoinPoint joinPoint){
        String methodName = joinPoint.getSignature().getName();
        Object[] args = joinPoint.getArgs();
        System.out.println("The method "+ methodName +
                " begins ["+args[0]+", "+args[1]+"]");
    }

    //@After("execution(public int com.xpu.aop.AtithmeticCalculator.*(int,int))")
    @After(value = "declareJointPointExpression()")
    public void endMethod(JoinPoint joinPoint){
        String methodName = joinPoint.getSignature().getName();
        Object[] args = joinPoint.getArgs();
        System.out.println("The method "+ methodName +
                " endwith ["+args[0]+", "+args[1]+"]");
    }

    /**
     *返回通知:在方法正常结束后执行的代码
     */
    //@AfterReturning(pointcut="execution(public int com.xpu.aop.AtithmeticCalculator.*(int,int))", returning = "result")
    @AfterReturning(pointcut = "declareJointPointExpression()", returning = "result")
    public void afterReturning(JoinPoint joinPoint, Object result){
        String methodName = joinPoint.getSignature().getName();
        System.out.println("The method "+methodName+" result=" +result);
    }

    /**
     * 异常通知,只有执行方法出现异常的时候才会用到
     */
    //@AfterThrowing(value="execution(public int com.xpu.aop.AtithmeticCalculator.*(int,int))", throwing = "e")
    @AfterThrowing(pointcut="declareJointPointExpression()", throwing = "e")
    public void afterThrowing(JoinPoint joinPoint, Exception e){
        String methodName = joinPoint.getSignature().getName();
        System.out.println("The method "+methodName+" throwsException = " + e);
    }

    /**
     * 环绕通知需要携带proceedingJoinPoint类型参数,类似于动态代理的全过程
     * @param proceedingJoinPoint 这个参数可以决定是否执行目标方法
     * 而且环绕通知必须有返回值,返回值即为目标方法的返回值
     */
    //@Around("execution(public int com.xpu.aop.AtithmeticCalculator.*(int,int))")
    @Around(value = "declareJointPointExpression()")
    public Object aroundMethod(ProceedingJoinPoint proceedingJoinPoint){
        System.out.println("aroundMethod");
        return 100;
    }
}
基于配置文件配置AOP
切入点使用 <aop:pointcut> 元素声明
切入点必须定义在 <aop:aspect> 元素下, 或者直接定义在 <aop:config> 元素下
- 定义在
<aop:aspect>元素下: 只对当前切面有效 - 定义在
<aop:config>元素下: 对所有切面都有效
基于 XML 的 AOP 配置不允许在切入点表达式中用名称引用其他切入点. 现在假设如下类:
import org.aspectj.lang.JoinPoint;

public class ValidationAspect {

    public void validateArgs(JoinPoint joinPoint){
        Object[] args = joinPoint.getArgs();
        System.out.println("校验参数validate:["+args[0]+","+args[1]+"]");
    }

    public void getReturn(JoinPoint joinPoint, Object ret){
        System.out.println("返回通知:result="+ret);

    }

    public void throwException(JoinPoint joinPoint, Exception e){
        System.out.println("抛出异常:"+e);
    }
}

public class LoggingAspect {

    public void beforeMethod(JoinPoint joinPoint){
        String methodName = joinPoint.getSignature().getName();
        Object[] args = joinPoint.getArgs();
        System.out.println("The method "+ methodName +
                " begins ["+args[0]+", "+args[1]+"]");
    }

    public void afterMethod(JoinPoint joinPoint){
        String methodName = joinPoint.getSignature().getName();
        Object[] args = joinPoint.getArgs();
        System.out.println("The method "+ methodName +
                " endwith ["+args[0]+", "+args[1]+"]");
    }
}

//测试代码
@org.junit.Test
public void fun(){
    ApplicationContext context = new ClassPathXmlApplicationContext
            ("applicationContext-xml.xml");

    AtithmeticCalculator calc = (AtithmeticCalculator)context.getBean("atithmeticCalculator");
    calc.add(10,20);

    calc.div(10,0);
}
在XML文件中做如下配置:
<!-- 配置bean -->
<bean id="atithmeticCalculator" class="com.xpu.xml.AtithmeticCalculatorImpl"/>

<!-- 配置切面的Bean -->
<bean id="LoggingAspect" class="com.xpu.xml.LoggingAspect"/>
<bean id="ValidationAspect" class="com.xpu.xml.ValidationAspect"/>

<!-- 配置AOP -->
<aop:config>
    <!-- 配置切点表达式 -->
    <aop:pointcut id="point" expression="execution(* com.xpu.xml.AtithmeticCalculator.*(..))"/>

    <!-- 配置切面及通知 -->
    <aop:aspect ref="LoggingAspect" order="0">
        <aop:after method="afterMethod" pointcut-ref="point"/>
        <aop:before method="beforeMethod" pointcut-ref="point"/>
    </aop:aspect>

    <aop:aspect ref="ValidationAspect" order="1">
        <aop:after method="validateArgs" pointcut-ref="point"/>
        <aop:after-returning method="getReturn" returning="ret" pointcut-ref="point"/>
        <aop:after-throwing method="throwException" throwing="e" pointcut-ref="point"/>
    </aop:aspect>
</aop:config>
很显然,使用xml配置AOP也是完全可以的!
Spring对JDBC的支持
为了使 JDBC 更加易于使用, Spring 在 JDBC API 上定义了一个抽象层, 以此建立一个 JDBC 存取框架。作为 Spring JDBC 框架的核心,JDBC 模板的设计目的是为不同类型的 JDBC 操作提供模板方法。 每个模板方法都能控制整个过程, 并允许覆盖过程中的特定任务。 通过这种方式, 可以在尽可能保留灵活性的情况下, 将数据库存取的工作量降到最低。
JdbcTemplate
先写一个配置文件db.properties
jdbc.user=root
jdbc.password=1234
jdbc.driverClass=com.mysql.jdbc.Driver
jdbc.jdbcUrl=jdbc:mysql://127.0.0.1/spring_demo

jdbc.initPoolSize=10
jdbc.maxPoolSize=50
<!-- 导入资源文件 -->
<context:property-placeholder location="classpath:db.properties"/>

<!-- 配置C3P0数据源 -->
<bean id="dataSource" class="com.mchange.v2.c3p0.ComboPooledDataSource">
    <property name="user" value="${jdbc.user}"/>
    <property name="password" value="${jdbc.password}"/>
    <property name="jdbcUrl" value="${jdbc.jdbcUrl}"/>
    <property name="driverClass" value="${jdbc.driverClass}"/>

    <property name="maxPoolSize" value="${jdbc.maxPoolSize}"/>
    <property name="initialPoolSize" value="${jdbc.initPoolSize}"/>
</bean>

<!-- 配置Spring的JDBCTemplate -->
<bean id="jdbcTemplate" class="org.springframework.jdbc.core.JdbcTemplate">
	<property name="dataSource" ref="dataSource"></property>
</bean>
private ApplicationContext context = null;
private JdbcTemplate jdbcTemplate = null;

{
	context = new ClassPathXmlApplicationContext("applicationContext.xml");
	jdbcTemplate = (JdbcTemplate) context.getBean("jdbcTemplate");
}

@Test
//测试数据源
public void fun() {
	DataSource dataSource = context.getBean(DataSource.class);
	try {
		Connection conn = dataSource.getConnection();
		System.out.println(conn);
	} catch (SQLException e) {
		e.printStackTrace();
	}
}

//测试修改
@Test
public void testUpdate() {
	String sql = "UPDATE employee SET LAST_NAME=? WHERE ID=?";
	int update = jdbcTemplate.update(sql, "JACKs", 5);
	System.out.println(update);
}


//批量更新
@Test
public void testBatch() {
	String sql = "INSERT INTO employee(LAST_NAME, EMAIL, DEPT_ID) values(?,?,?)";
	List<Object[]> list = new ArrayList<>();
	list.add(new Object[] {"ZhangSan", "137@qq.com", 2});
	list.add(new Object[] {"LiSi", "127@163.com", 2});
	list.add(new Object[] {"WangWu", "111@gmail.com", 3});
	int[] update = jdbcTemplate.batchUpdate(sql, list);
	System.out.println(Arrays.toString(update));
}

@Test
public void testQuery() {
	String sql = "SELECT ID id,LAST_NAME last_name, EMAIL email, DEPT_ID as \"department.id\" FROM employee WHERE ID=?";
	RowMapper<Employee> rowMapper = new BeanPropertyRowMapper<>(Employee.class);
	Employee employee = jdbcTemplate.queryForObject(sql,rowMapper , 1);
	System.out.println(employee);
}
太鸡肋,用到的时候再说吧……
Spring对事物的支持
事务管理是企业级应用程序开发中必不可少的技术, 用来确保数据的完整性和一致性。事务就是一系列的动作, 它们被当做一个单独的工作单元。 这些动作要么全部完成,要么全部不起作用。
事务的四个关键属性(ACID)
- 原子性(atomicity): 事务是一个原子操作, 由一系列动作组成。 事务的原子性确保动作要么全部完成要么完全不起作用。
- 一致性(consistency): 一旦所有事务动作完成, 事务就被提交。 数据和资源就处于一种满足业务规则的一致性状态中。
- 隔离性(isolation): 可能有许多事务会同时处理相同的数据, 因此每个事物都应该与其他事务隔离开来, 防止数据损坏。
- 持久性(durability): 一旦事务完成, 无论发生什么系统错误, 它的结果都不应该受到影响。 通常情况下, 事务的结果被写到持久化存储器中。
public void purchase() {
	Connection conn = null;
	try {
		conn = dataSource.getConnetction();
		conn.setAutoCommit(false);

		//....

		conn.commit();
	}catch(SQLException e) {
		e.printStackTrace();
		if(conn != null) {
			try {
				conn.rollback();
			}catch (SQLException e) {
				e.printStackTrace();
			}
		}
		throw new RuntimeException(e);
	}finally {
		if(conn != null) {
			try {
				conn.close();
			}catch (Exception e) {
				e.printStackTrace();
			}
		}
	}

}
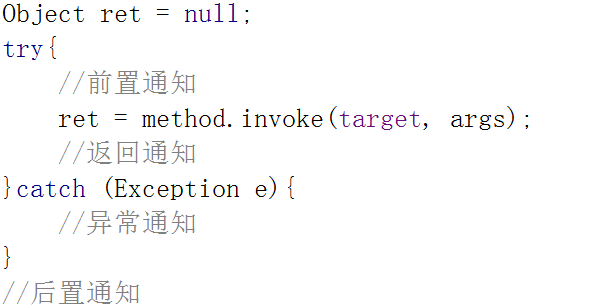
来看一看上面这段代码,其实获取连接在AOP中就是前置通知,提交事务就是返回通知呀,catch那一段就是异常通知,finally就是后置通知呀,现在再看AOP应该是比较清晰明了!
Spring中的事务管理:作为企业级应用程序框架, Spring 在不同的事务管理 API 之上定义了一个抽象层。 而应用程序开发人员不必了解底层的事务管理 API, 就可以使用 Spring 的事务管理机制。
Spring 既支持编程式事务管理,也支持声明式的事务管理。
- 编程式事务管理:将事务管理代码嵌入到业务方法中来控制事务的提交和回滚。 在编程式管理事务时, 必须在每个事务操作中包含额外的事务管理代码。
- 声明式事务管理:大多数情况下比编程式事务管理更好用, 它将事务管理代码从业务方法中分离出来,以声明的方式来实现事务管理。 事务管理作为一种横切关注点, 可以通过 AOP 方法模块化。Spring 通过 Spring AOP 框架支持声明式事务管理。
Spring 从不同的事务管理 API 中抽象了一整套的事务机制。开发人员不必了解底层的事务 API,就可以利用这些事务机制。有了这些事务机制, 事务管理代码就能独立于特定的事务技术了。Spring 的核心事务管理抽象是它为事务管理封装了一组独立于技术的方法。 无论使用 Spring 的哪种事务管理策略(编程式或声明式),事务管理器都是必须的。这就意味着处理Hibernate,处理MyBatis也是一样的!
Spring 的声明式事物
除了在带有切入点,通知和增强器的 Bean 配置文件中声明事务外, Spring 还允许简单地用 @Transactional 注解来标注事务方法。 为了将方法定义为支持事务处理的, 可以为方法添加 @Transactional 注解。 根据 Spring AOP 基于代理机制, 只能标注公有方法。
可以在方法或者类级别上添加 @Transactional 注解。当把这个注解应用到类上时, 这个类中的所有公共方法都会被定义成支持事务处理的。
在 Bean 配置文件中只需要启用 <tx:annotation-driven> 元素, 并为之指定事务管理器就可以了。
如果事务处理器的名称是 transactionManager,就可以在<tx:annotation-driven> 元素中省略 transaction-manager 属性。这个元素会自动检测该名称的事务处理器。
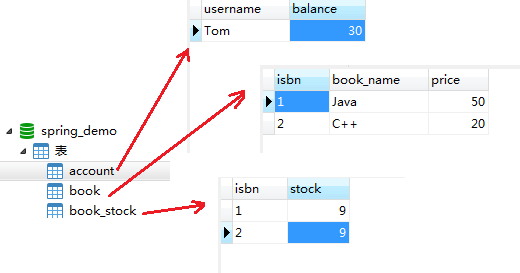
数据库如下,一个账户表,一个书的信息表,一个书的库存表:
SET NAMES utf8mb4;
SET FOREIGN_KEY_CHECKS = 0;

-- ----------------------------
-- Table structure for account
-- ----------------------------
DROP TABLE IF EXISTS `account`;
CREATE TABLE `account`  (
  `username` varchar(255) CHARACTER SET utf8 COLLATE utf8_general_ci NOT NULL,
  `balance` int(11) NOT NULL,
  PRIMARY KEY (`username`) USING BTREE
) ENGINE = InnoDB CHARACTER SET = utf8 COLLATE = utf8_general_ci ROW_FORMAT = Compact;

-- ----------------------------
-- Records of account
-- ----------------------------
INSERT INTO `account` VALUES ('Tom', 20);

-- ----------------------------
-- Table structure for book
-- ----------------------------
DROP TABLE IF EXISTS `book`;
CREATE TABLE `book`  (
  `isbn` varchar(255) CHARACTER SET utf8 COLLATE utf8_general_ci NOT NULL,
  `book_name` varchar(255) CHARACTER SET utf8 COLLATE utf8_general_ci DEFAULT NULL,
  `price` int(11) DEFAULT NULL,
  PRIMARY KEY (`isbn`) USING BTREE
) ENGINE = InnoDB CHARACTER SET = utf8 COLLATE = utf8_general_ci ROW_FORMAT = Compact;

-- ----------------------------
-- Records of book
-- ----------------------------
INSERT INTO `book` VALUES ('1', 'Java', 50);

-- ----------------------------
-- Table structure for book_stock
-- ----------------------------
DROP TABLE IF EXISTS `book_stock`;
CREATE TABLE `book_stock`  (
  `isbn` varchar(255) CHARACTER SET utf8 COLLATE utf8_general_ci DEFAULT NULL,
  `stock` int(255) DEFAULT NULL
) ENGINE = InnoDB CHARACTER SET = utf8 COLLATE = utf8_general_ci ROW_FORMAT = Compact;

-- ----------------------------
-- Records of book_stock
-- ----------------------------
INSERT INTO `book_stock` VALUES ('1', 7);
 applicationContext.xml的配置:
<!-- 导入资源文件 -->
<context:property-placeholder location="classpath:db.properties"/>

<!-- 配置C3P0数据源 -->
<bean id="dataSource" class="com.mchange.v2.c3p0.ComboPooledDataSource">
    <property name="user" value="${jdbc.user}"/>
    <property name="password" value="${jdbc.password}"/>
    <property name="jdbcUrl" value="${jdbc.jdbcUrl}"/>
    <property name="driverClass" value="${jdbc.driverClass}"/>

    <property name="maxPoolSize" value="${jdbc.maxPoolSize}"/>
    <property name="initialPoolSize" value="${jdbc.initPoolSize}"/>
</bean>

<!-- 配置Spring的JDBCTemplate -->
<bean id="jdbcTemplate" class="org.springframework.jdbc.core.JdbcTemplate">
	<property name="dataSource" ref="dataSource"></property>
</bean>

<!-- 配置事务管理器 -->
<bean id="transactionManager" class="org.springframework.jdbc.datasource.DataSourceTransactionManager">
	<property name="dataSource" ref="dataSource"></property>
</bean>

<!-- 启用事物注解 -->
<tx:annotation-driven transaction-manager="transactionManager"/>
@Repository("bookShopDao")
public class BookShopDaoImpl implements BookShopDao{
	@Autowired
	private JdbcTemplate jdbcTemplate;

	@Override
	public int findBookPriceByIsbn(String isbn) {
		String sql = "select price from book where isbn=?";
		return jdbcTemplate.queryForObject(sql, Integer.class, isbn);
	}

	@Override
	public void updateBookStock(String isbn) {
		//检查书的库存是否足够,若不够则抛出异常
		String sql2 = "select stock from book_stock where isbn=?";
		int stock = jdbcTemplate.queryForObject(sql2, Integer.class, isbn);
		if(stock == 0) {
			throw new BookStockException("库存不足");
		}
		String sql = "update book_stock set stock = stock - 1 where isbn = ?";
		jdbcTemplate.update(sql, isbn);

	}

	@Override
	public void updateUserAccount(String name, int price) {
		//检查用户余额是否足够,若不够则抛出异常
		String sql2 = "select balance from account where username=?";
		int balance = jdbcTemplate.queryForObject(sql2, Integer.class, name);
		if(balance < price) {
			throw new UserAccountException("余额不足");
		}
		String sql = "update account set balance=balance-? where username=?";
		jdbcTemplate.update(sql, price, name);
	}
}
@Service
public class BookShopServiceImpl implements BookShopService{
	@Autowired
	private BookShopDao bookShopDao;

	//添加事物注解
	@Transactional
	@Override
	public void purchase(String name, String isbn) {
		int price = bookShopDao.findBookPriceByIsbn(isbn);
		bookShopDao.updateBookStock(isbn);
		bookShopDao.updateUserAccount(name, price);
	}
}
事务传播属性
当事务方法被另一个事务方法调用时,必须指定事务应该如何传播。 例如: 方法可能继续在现有事务中运行, 也可能开启一个新事务,并在自己的事务中运行。事务的传播行为可以由传播属性指定。Spring 定义了 7 种类传播行为:
PROPAGATION_REQUIRED 如果当前没有事务,就新建一个事务,如果已经存在一个事务中,加入到这个事务中。这是最常见的选择。
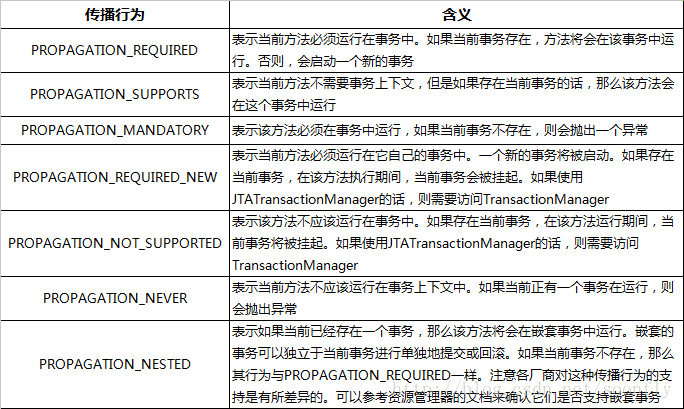 REQUIRED:业务方法需要在一个容器里运行。如果方法运行时,已经处在一个事务中,那么加入到这个事务,否则自己新建一个新的事务。
NOT_SUPPORTED:声明方法不需要事务。如果方法没有关联到一个事务,容器不会为他开启事务,如果方法在一个事务中被调用,该事务会被挂起,调用结束后,原先的事务会恢复执行。
REQUIRESNEW:不管是否存在事务,该方法总汇为自己发起一个新的事务。如果方法已经运行在一个事务中,则原有事务挂起,新的事务被创建。
MANDATORY:该方法只能在一个已经存在的事务中执行,业务方法不能发起自己的事务。如果在没有事务的环境下被调用,容器抛出例外。
SUPPORTS:该方法在某个事务范围内被调用,则方法成为该事务的一部分。如果方法在该事务范围外被调用,该方法就在没有事务的环境下执行。
NEVER:该方法绝对不能在事务范围内执行。如果在就抛例外。只有该方法没有关联到任何事务,才正常执行。
NESTED:如果一个活动的事务存在,则运行在一个嵌套的事务中。如果没有活动事务,则按REQUIRED属性执行。它使用了一个单独的事务,这个事务 拥有多个可以回滚的保存点。内部事务的回滚不会对外部事务造成影响。它只对DataSourceTransactionManager事务管理器起效。
REQUIRED 传播行为
当 bookService 的 purchase() 方法被另一个事务方法 checkout() 调用时,它默认会在现有的事务内运行。这个默认的传播行为就是 REQUIRED。 因此在 checkout() 方法的开始和终止边界内只有一个事务, 这个事务只在 checkout() 方法结束的时候被提交,结果用户一本书都买不了,事务传播属性可以在 @Transactional 注解的 propagation 属性中定义。
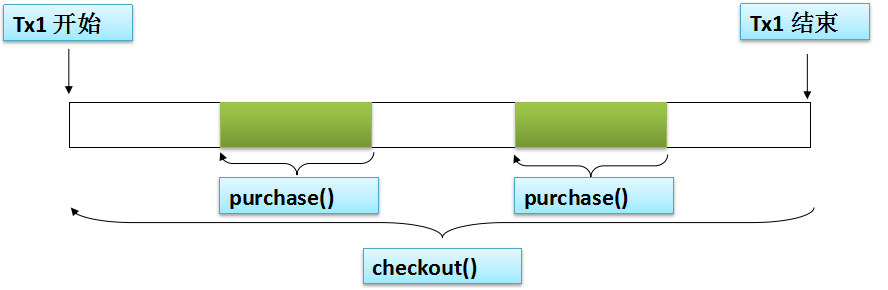 其实就是checkout里面定义了事物,purchase也定义了事物,但是只要在其中一个purchase中出现了异常,那么check中的所有事物都会回滚!
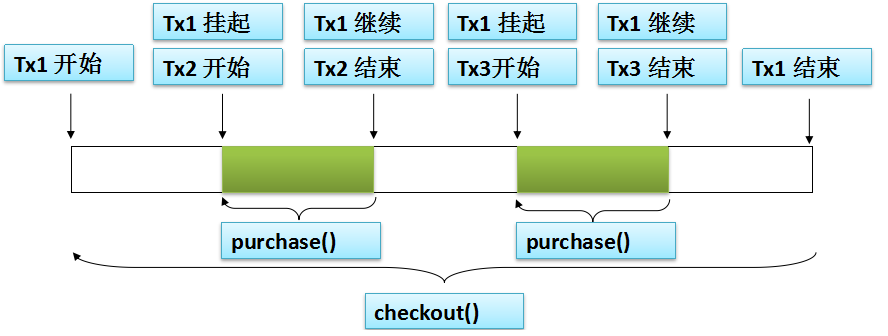
REQUIRES_NEW 传播行为
另一种常见的传播行为是 REQUIRES_NEW,它表示该方法必须启动一个新事务,并在自己的事务内运行,如果有事务在运行,就应该先挂起它。
//添加事物注解
//使用propagation指定事物的传播行为,即当前的事物方法被另外一个事物方法调用时
//REQUIRES_NEW使用自己的事物
@Transactional(propagation = Propagation.REQUIRES_NEW)
@Override
public void purchase(String name, String isbn) {
	int price = bookShopDao.findBookPriceByIsbn(isbn);
	bookShopDao.updateBookStock(isbn);
	bookShopDao.updateUserAccount(name, price);
}
并发事务所导致的问题
当同一个应用程序或者不同应用程序中的多个事务在同一个数据集上并发执行时,可能会出现许多意外的问题: 并发事务所导致的问题可以分为下面三种类型:
- 脏读: 对于两个事物 T1, T2, T1 读取了已经被 T2 更新但还没有被提交的字段。之后,若 T2 回滚,T1读取的内容就是临时且无效的。
- 不可重复读:对于两个事物 T1,T2,T1 读取了一个字段, 然后 T2 更新了该字段。之后, T1再次读取同一个字段, 值就不同了。
- 幻读:对于两个事物 T1, T2, T1 从一个表中读取了一个字段,然后 T2 在该表中插入了一些新的行。之后, 如果 T1 再次读取同一个表,就会多出几行。
事务的隔离级别
从理论上来说,事务应该彼此完全隔离, 以避免并发事务所导致的问题。然而,那样会对性能产生极大的影响,因为事务必须按顺序运行。
在实际开发中,为了提升性能,事务会以较低的隔离级别运行。事务的隔离级别可以通过隔离事务属性指定。
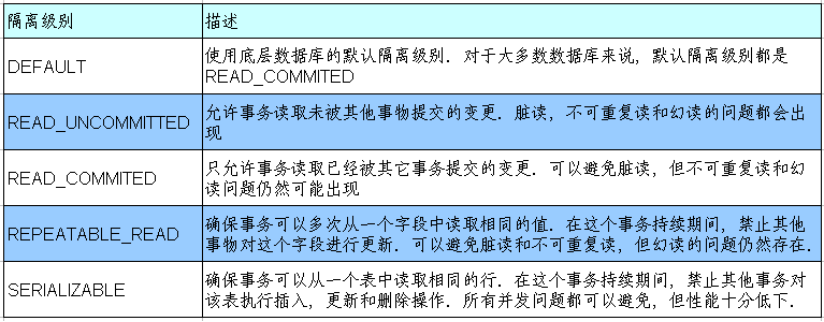 事务的隔离级别要得到底层数据库引擎的支持,而不是应用程序或者框架的支持。Oracle 支持的 2 种事务隔离级别:READ_COMMITED , SERIALIZABLE
Mysql 支持 4 中事务隔离级别。用 @Transactional 注解声明式地管理事务时可以在 @Transactional 的 isolation 属性中设置隔离级别:
事务的隔离级别要得到底层数据库引擎的支持,而不是应用程序或者框架的支持。Oracle 支持的 2 种事务隔离级别:READ_COMMITED , SERIALIZABLE
Mysql 支持 4 中事务隔离级别。用 @Transactional 注解声明式地管理事务时可以在 @Transactional 的 isolation 属性中设置隔离级别:
@Transactional(propagation = Propagation.REQUIRES_NEW ,
			isolation=Isolation.READ_COMMITTED)
默认情况下Spring的声明式事物对所有运行时异常回滚,也可以对相应的属性进行设置,默认情况下只有未检查异常(RuntimeException和Error类型的异常)会导致事务回滚。而受检查异常不会;
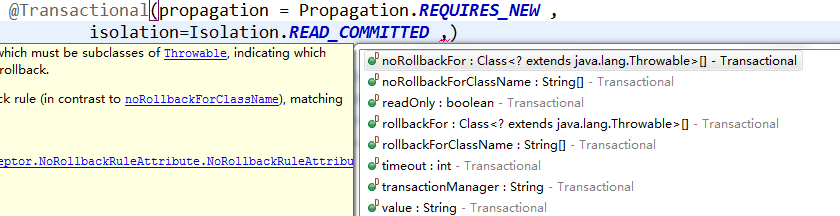
事务的回滚规则可以通过 @Transactional 注解的 rollbackFor 和 noRollbackFor 属性来定义,这两个属性被声明为 Class[] 类型的,因此可以为这两个属性指定多个异常类,rollbackFor: 遇到时必须进行回滚,noRollbackFor: 一组异常类,遇到时必须不回滚。
@Transactional(propagation = Propagation.REQUIRES_NEW ,
	isolation=Isolation.READ_COMMITTED ,noRollbackFor= {UserAccountException.class})
这样的话,假设UserAccountException这种运行时异常发生的时候就不会进行事物回滚,通过noRollbackFor属性就可以设置对哪些异常不进行回滚!使用readOnly属性可以指定为事物是否只读,如果这个事物真的只是一个读取数据库值的方法,那么应该设置为readOnly为true,这样可以帮助数据库引擎优化事物:
@Transactional(propagation = Propagation.REQUIRES_NEW ,
			isolation=Isolation.READ_COMMITTED ,noRollbackFor= {UserAccountException.class},
			readOnly=false)
由于事务可以在行和表上获得锁, 因此长事务会占用资源, 并对整体性能产生影响。如果一个事物只读取数据但不做修改,数据库引擎可以对这个事务进行优化。
超时事务属性::事务在强制回滚之前可以保持多久,这样可以防止长期运行的事务占用资源。
只读事务属性: 表示这个事务只读取数据但不更新数据, 这样可以帮助数据库引擎优化事务。使用timeout可以指定强制回滚事物之前可以占用的时间,可以防止链接占用时间过长,超时和只读属性可以在 @Transactional 注解中定义。超时属性以秒为单位来计算:
@Transactional(propagation = Propagation.REQUIRES_NEW ,
		isolation=Isolation.READ_COMMITTED ,noRollbackFor= {UserAccountException.class},
		readOnly=false, timeout=1)
Spring通过xml配置事物
<context:component-scan base-package="com.xpu.xml"></context:component-scan>

<!-- 导入资源文件 -->
<context:property-placeholder location="classpath:db.properties"/>

<!-- 配置C3P0数据源 -->
 <bean id="dataSource" class="com.mchange.v2.c3p0.ComboPooledDataSource">
     <property name="user" value="${jdbc.user}"/>
     <property name="password" value="${jdbc.password}"/>
     <property name="jdbcUrl" value="${jdbc.jdbcUrl}"/>
     <property name="driverClass" value="${jdbc.driverClass}"/>

     <property name="maxPoolSize" value="${jdbc.maxPoolSize}"/>
     <property name="initialPoolSize" value="${jdbc.initPoolSize}"/>
 </bean>

 <!-- 配置Bean -->
 <bean id="jdbcTemplate" class="org.springframework.jdbc.core.JdbcTemplate">
 	<property name="dataSource" ref="dataSource"></property>
 </bean>

 <bean id="bookShopDao" class="com.xpu.xml.BookShopDaoImpl">
 	<property name="jdbcTemplate" ref="jdbcTemplate"></property>
 </bean>

 <bean id="bookShopService" class="com.xpu.xml.BookShopServiceImpl">
 	<property name="bookShopDao" ref="bookShopDao"></property>
 </bean>

 <bean id="cashier" class="com.xpu.xml.CashierImpl">
 	<property name="bookShopService" ref="bookShopService"></property>
 </bean>

 <!-- 1、 配置事务管理器 -->
 <bean id="transactionManager" class="org.springframework.jdbc.datasource.DataSourceTransactionManager">
 	<property name="dataSource" ref="dataSource"></property>
 </bean>

 <!-- 2、 配置事物属性 -->
 <tx:advice id="txAdvice" transaction-manager="transactionManager">
 	<tx:attributes>
    		<tx:method name="checkout" propagation="REQUIRED"/>
    		<!-- 对只读事物配置只读属性 -->
    		<tx:method name="find*" read-only="true"/>
    		<tx:method name="get*" read-only="true"/>
    		<tx:method name="*" propagation="REQUIRED"/>
    </tx:attributes>
 </tx:advice>

 <!-- 3、 配置事物切点 -->
 <aop:config>
 	<aop:pointcut expression="execution(* com.xpu.xml.BookShopService.*(..))" id="txPointCut"/>

 	<aop:advisor advice-ref="txAdvice" pointcut-ref="txPointCut"/>
 </aop:config>