自定义View(一)
很多时候系统自带的View组件并不能满足我们的需求,当我们需要特定的显示风格,处理特有的用户交互,封装一个高内聚的视图组件,就需要用到Android给我们提供的自定义View的能力。有了自定义View,我们可以针对特定的应用场景开发出适合该场景的View组件,比如自定义的下拉刷新组件,自定义的进度条组件等等。本片文章主要介绍自定义View的基础知识,为自定义View做充足的准备。
自定义View基础知识
视图(View)表现为显示在屏幕上的各种视图,如TextView、LinearLayout等。视图分为View与ViewGroup,View即单个视图,比如Button、TextView等。ViewGroup包含多个视图,如LinearLayout、RelativeLayout等。View类是Android中各种组件的基类,ViewGroup也是继承自View。
View的部分构造函数如下:
public View(Context context) {
	super(context);
}

// 如果View是在.xml里声明的,则调用第二个构造函数
// 自定义属性是从AttributeSet参数传进来的【自定义View最常用】
public View(Context context, AttributeSet attrs) {
  super(context, attrs);
}

// 在第二个构造函数里如果View有style属性时才会调用
public View(Context context, AttributeSet attrs, int defStyleAttr) {
  super(context, attrs, defStyleAttr);
}
对于多View的视图,结构是树形结构:最顶层是ViewGroup,ViewGroup下可能有多个ViewGroup或View,如下图:
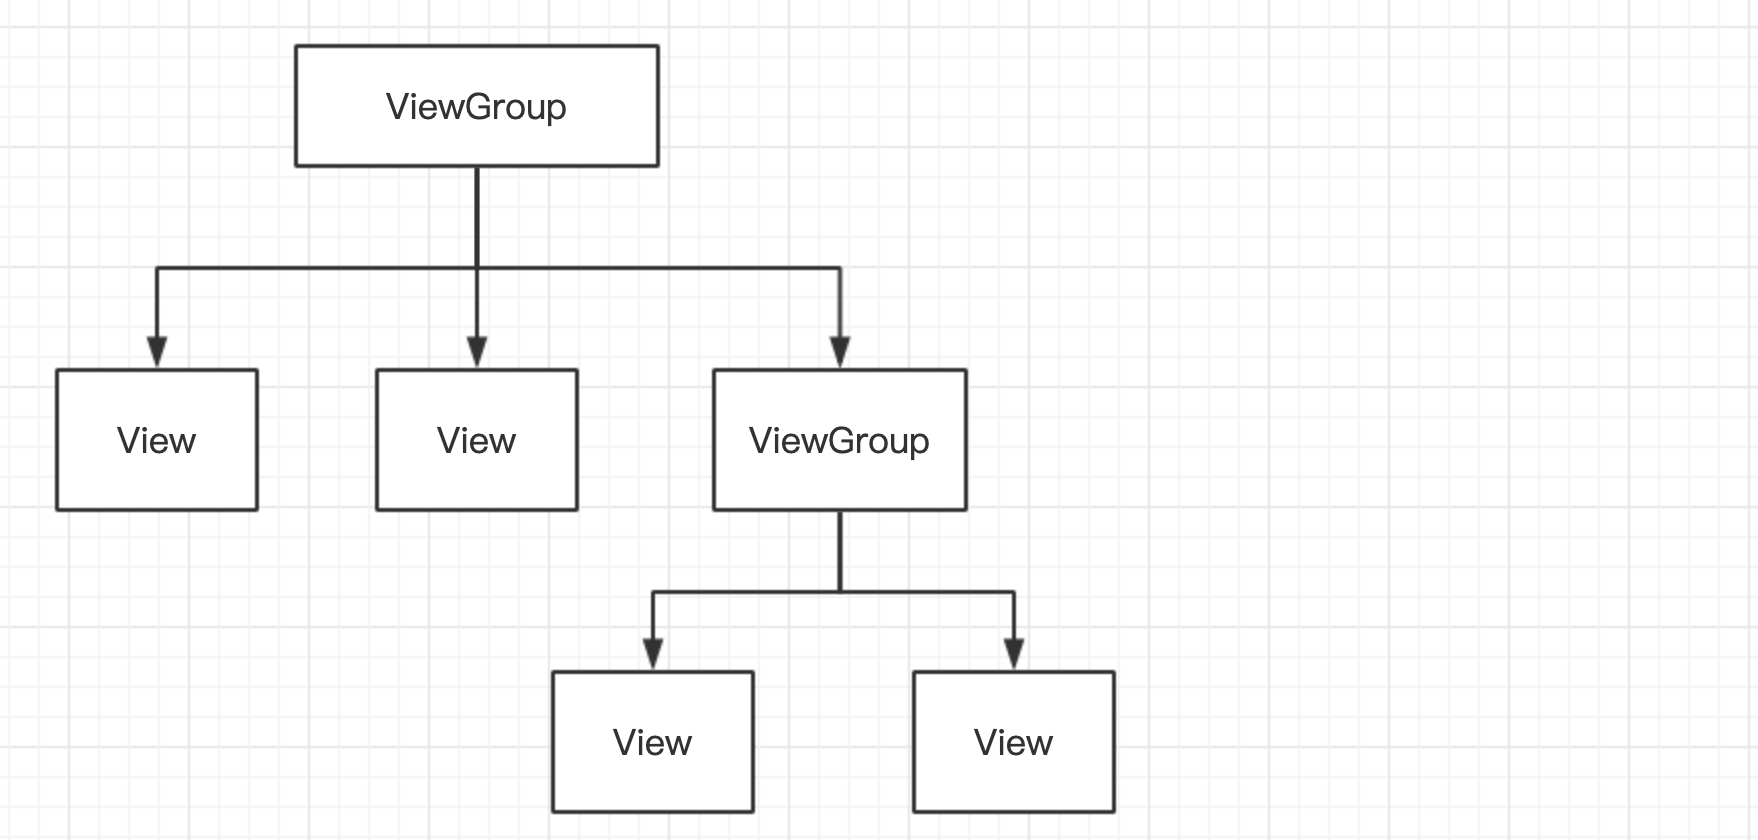
无论是measure过程、layout过程还是draw过程,永远都是从View树的根节点开始测量或计算(即从树的顶端开始),一层一层、一个分支一个分支地进行(即树形递归),最终计算整个View树中各个View,最终确定整个View树的相关属性。
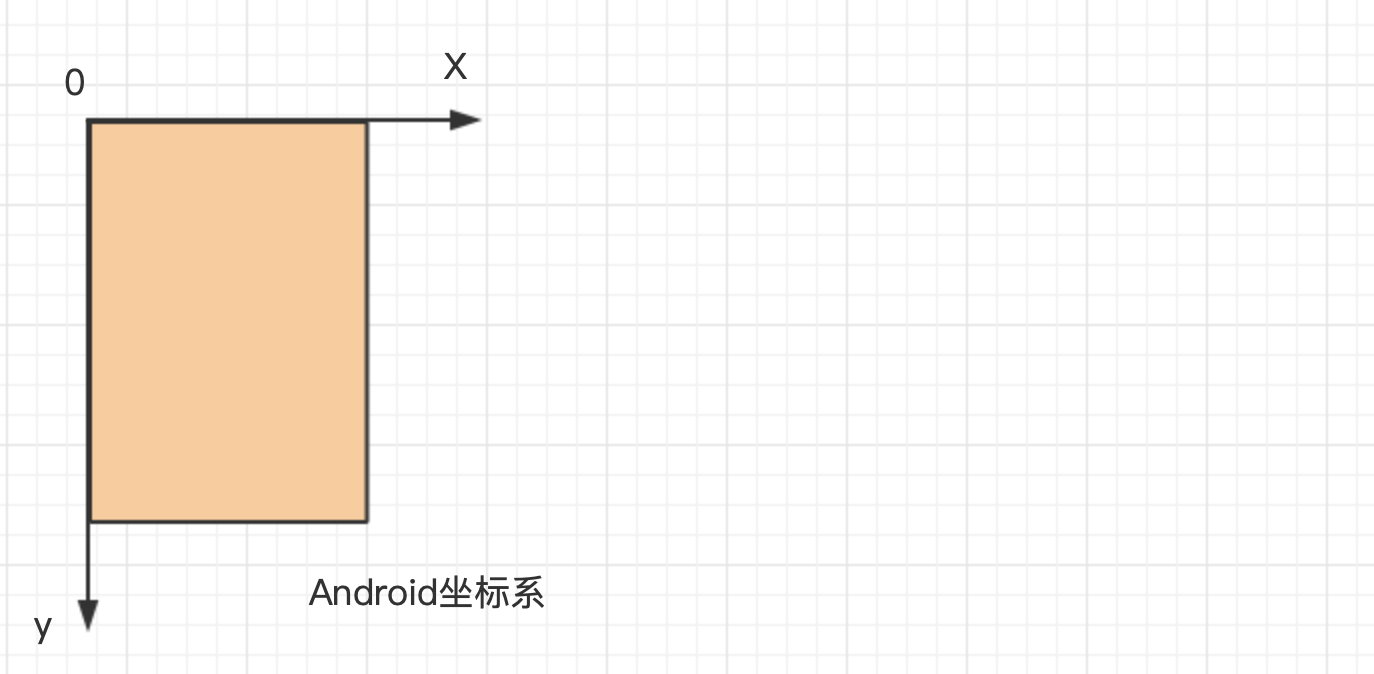
Android的坐标系定义为:屏幕的左上角为坐标原点,向右为x轴增大方向,向下为y轴增大方向,具体如下图:
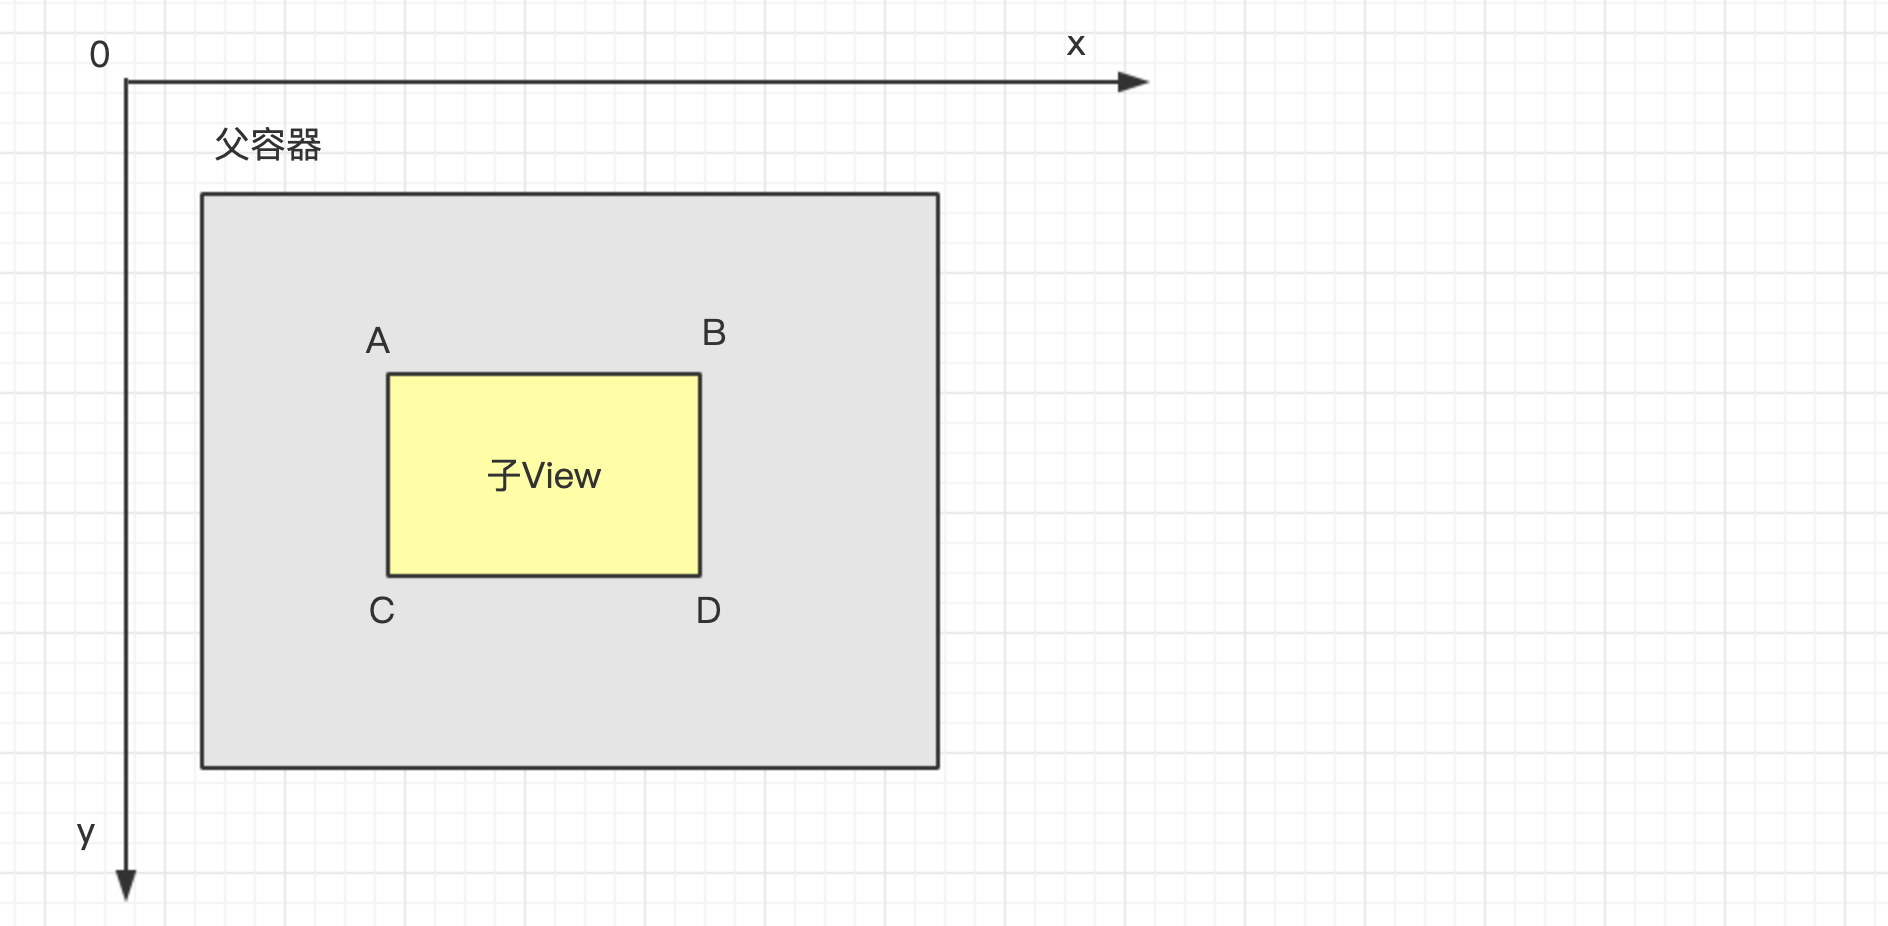
View位置(坐标)描述:View的位置由4个顶点决定的(如下A、B、C、D)
Top:子View上边界到父view上边界的距离,Left:子View左边界到父view左边界的距离,Bottom:子View下边距到父View上边界的距离,Right:子View右边界到父view左边界的距离。
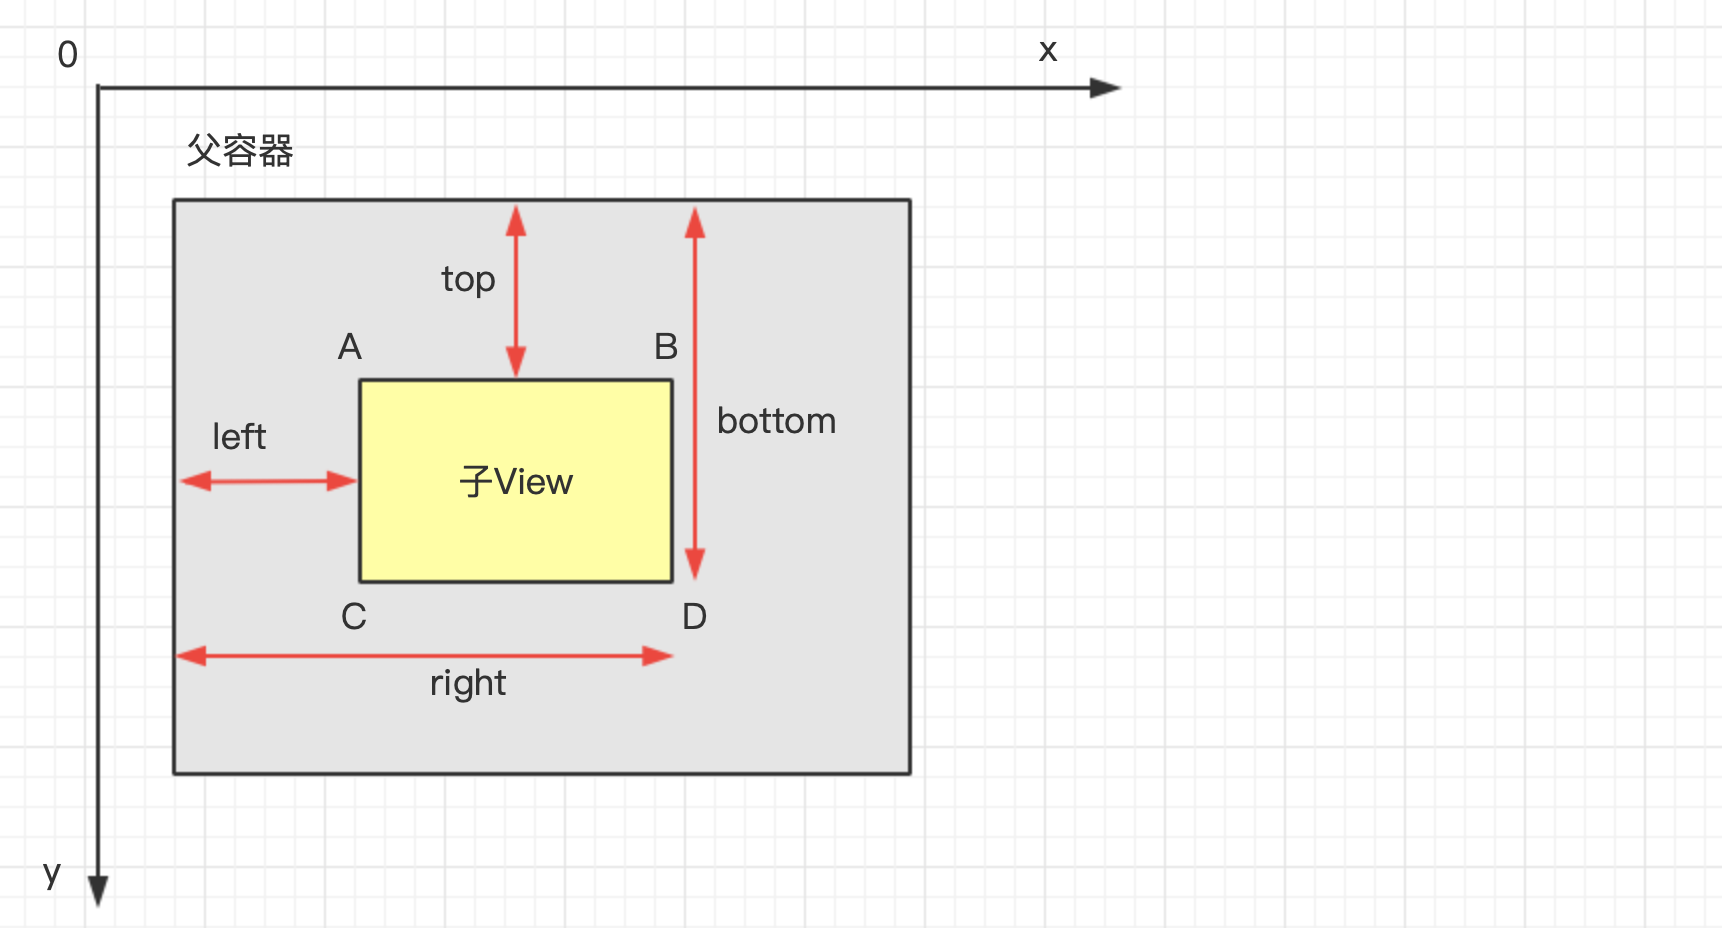
View的位置是通过view.getxxx()函数进行获取:
// 获取Top位置
public final int getTop() {
    return mTop;
}

// 其余如下:
getLeft();      //获取子View左上角距父View左侧的距离
getBottom();    //获取子View右下角距父View顶部的距离
getRight();     //获取子View右下角距父View左侧的距离
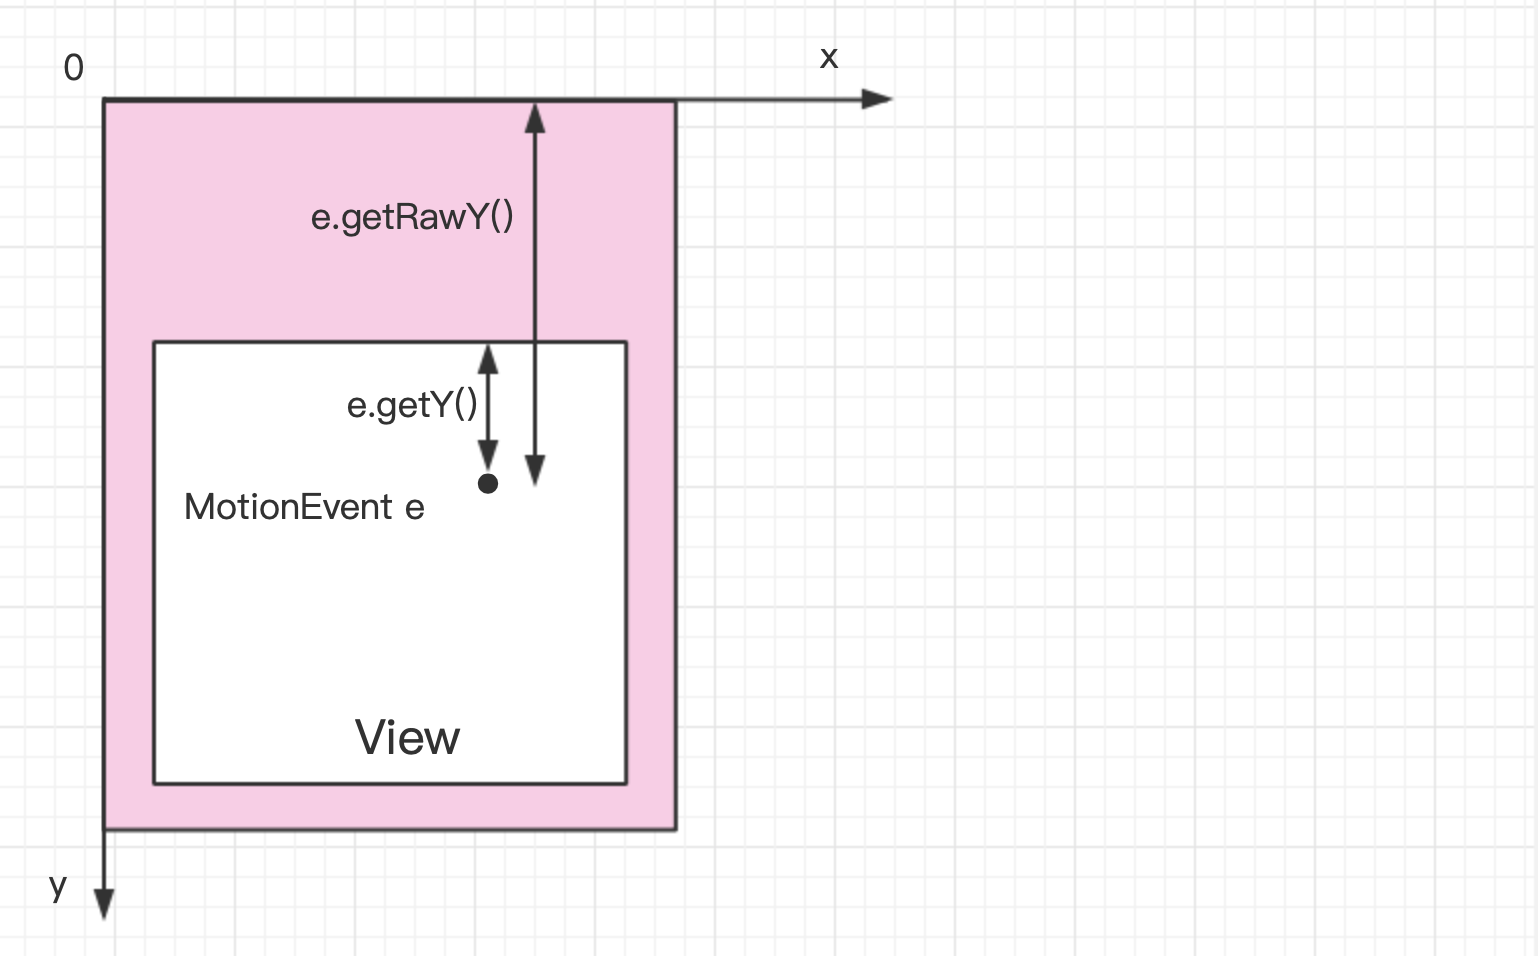
与MotionEvent中 get()和getRaw()的区别
//get() :触摸点相对于其所在组件坐标系的坐标
event.getX();
event.getY();

//getRaw() :触摸点相对于屏幕默认坐标系的坐标
event.getRawX();
event.getRawY();
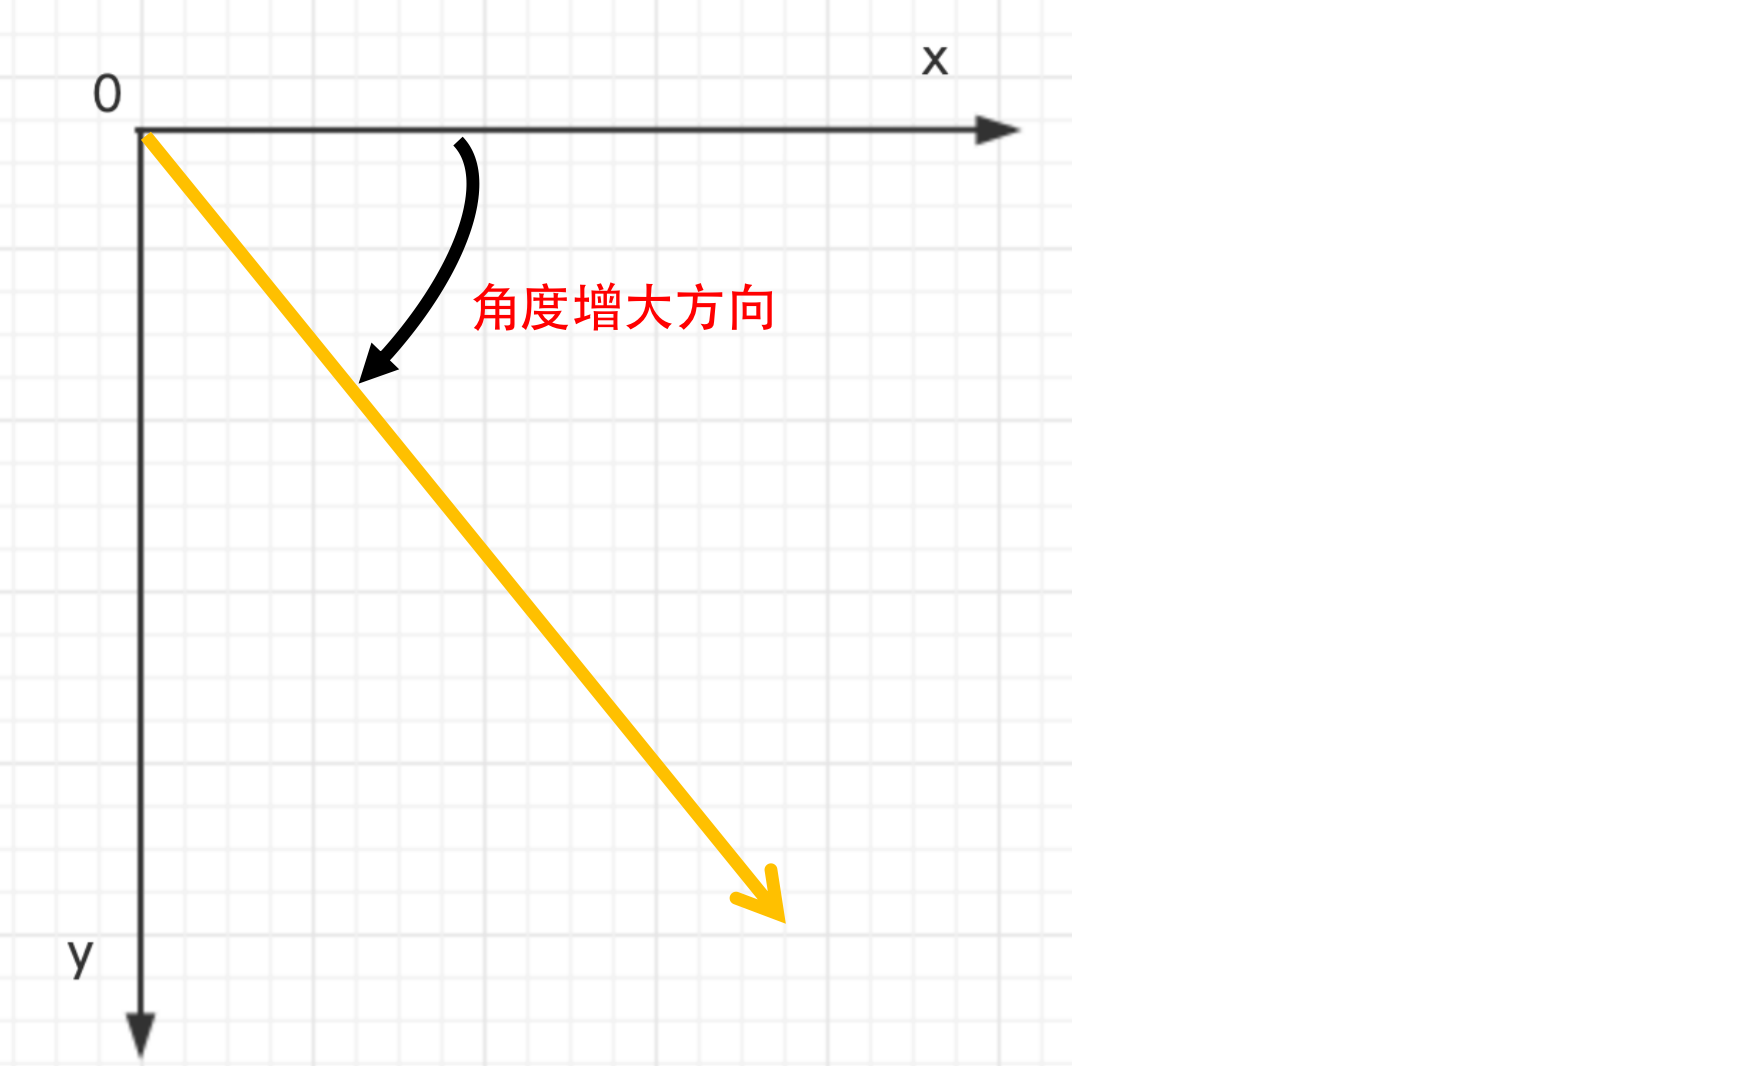
自定义View实际上是将一些简单的形状通过计算,从而组合到一起形成的效果。这会涉及到画布的相关操作(旋转)、正余弦函数计算等,即会涉及到角度(angle)与弧度(radian)的相关知识,不会很复杂,但是有时候遇到稍微复杂一点的情况就可以准备一个草稿本,用手画一下很容易就能搞清楚。
角度 = (弧长 / 周长 )×360°,弧度 = 弧长 / 半径R。在常见的数学坐标系中角度增大方向为逆时针,但是在Android中角度增大的方向是顺时针:
再来看看颜色相关的内容,Android中的颜色相关内容包括颜色模式,创建颜色的方式,以及颜色的混合模式等。
| 颜色模式 | 解释 |
|---|---|
| ARGB8888 | 四通道高精度(32位) |
| ARGB4444 | 四通道高精度(16位) |
| RGB565 | Android屏幕默认模式(16位) |
| Alpha8 | 仅有透明通道(8位) |
| 备注 | 字母表示通道类型,数值表示该类型用多少位二进制来描述。比如:ARGB8888,表示有四个通道(ARGB),每个对应的通道均用8位来描述。 |
以ARGB8888为例介绍颜色定义:
A(Alpha,透明度),取值范围0 - 255 ,R(Red)取值范围0 - 255 ,G(Green)取值范围0 - 255 ,B(Blue)取值范围0 - 255 。那么如何在Java中定义颜色:
// Java中使用Color类定义颜色
int color = Color.GRAY; // 灰色

// Color类是使用ARGB值进行表示
int color = Color.argb(127, 255, 0, 0);   // 半透明红色
int color = 0xaaff0000;                   // 带有透明度的红色
在/res/values/color.xml文件中如下定义:
<?xml version="1.0" encoding="utf-8"?>
<resources>
    // 定义了红色(没有alpha(透明)通道)
    <color name="red">#ff0000</color>

    // 定义了蓝色(没有alpha(透明)通道)
    <color name="green">#00ff00</color>
</resources>
在xml文件中以#开头定义颜色,后面跟十六进制的值,有如下几种定义方式:
#f00            //低精度 - 不带透明通道红色
#af00           //低精度 - 带透明通道红色

#ff0000         //高精度 - 不带透明通道红色
#aaff0000       //高精度 - 带透明通道红色
在Java文件中引用xml中定义的颜色:
//方法1
int color = getResources().getColor(R.color.mycolor);

//方法2(API 23及以上)
int color = getColor(R.color.myColor);
在xml文件(layout或style)中引用或者创建颜色:
<!--在style文件中引用-->
<style name="AppTheme" parent="Theme.AppCompat.Light.DarkActionBar">
	<item name="colorPrimary">@color/red</item>
</style>

<!--在layout文件中引用在/res/values/color.xml中定义的颜色-->
android:background="@color/red"

<!--在layout文件中创建并使用颜色-->
android:background="#ff0000"
颜色都是用RGB值定义的,而我们一般是无法直观的知道自己需要颜色的值,需要借用取色工具直接从图片或者其他地方获取颜色的RGB值。
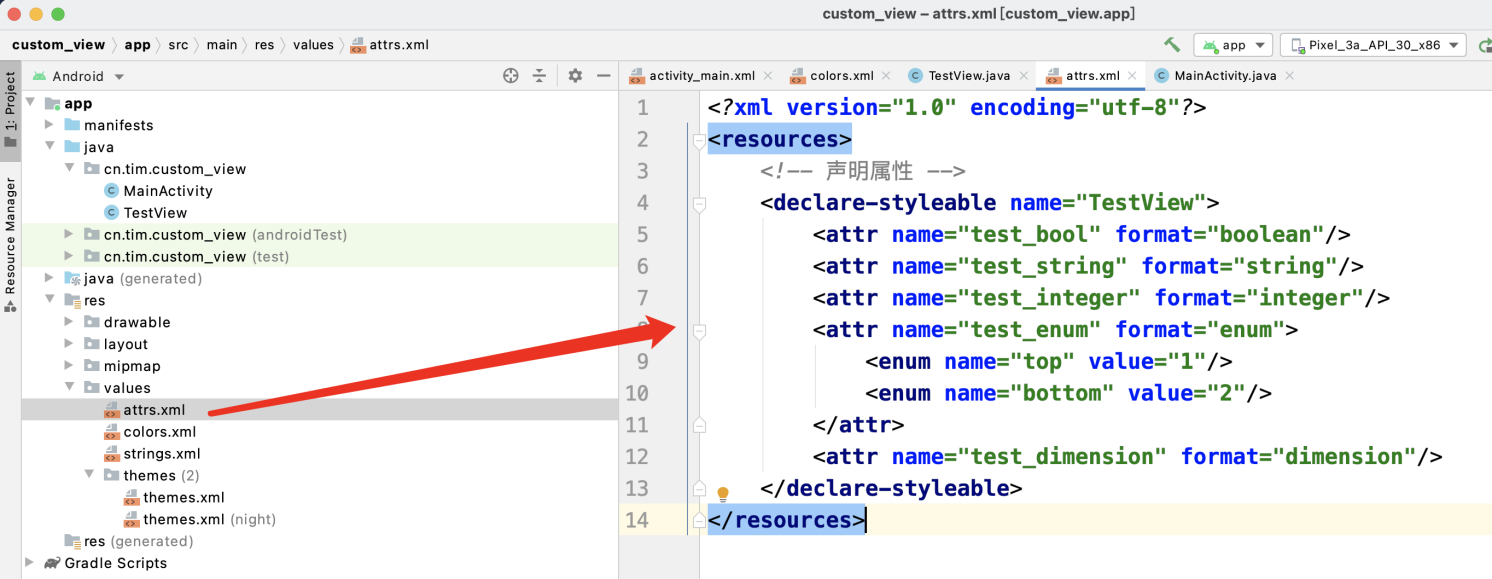
自定义View的属性获取
自定义View我们需要分析需要的自定义属性,然后在res/ valus/atrs.xm定义声明,在layout.xml文件中进行使用,在View的构造方法中进行获取,先在values文件夹下新建一个attrs.xml文件,里面就可以编写我们的自定义属性了,需要注意的是自定义属性的类型,比如boolean、string、enum、integer……
在代码中去定义我们的自定义View,顺便在初始化的时候获取对应的属性,下面是activity_main.xml:
<?xml version="1.0" encoding="utf-8"?>
<RelativeLayout
    xmlns:android="http://schemas.android.com/apk/res/android"
    xmlns:tim="http://schemas.android.com/apk/res-auto"
    xmlns:tools="http://schemas.android.com/tools"
    android:layout_width="match_parent"
    android:layout_height="match_parent"
    tools:context=".MainActivity">

    <cn.tim.custom_view.TestView
        android:layout_centerInParent="true"
        android:background="#FFBB86FC"
        tim:test_bool="true"
        tim:test_dimension="100dp"
        tim:test_enum="top"
        tim:test_integer="10086"
				tim:test_string="Tim"
        android:layout_width="100dp"
        android:layout_height="100dp"/>

</RelativeLayout>
获取属性的方式一:
public class TestView extends View {
    private static final String TAG = "TestView";

    public TestView(Context context, @Nullable AttributeSet attrs) {
        super(context, attrs);
        TypedArray typedArray = context.obtainStyledAttributes(attrs, R.styleable.TestView);
        boolean booleanTest = typedArray.getBoolean(R.styleable.TestView_test_bool, false);
        int integerTest = typedArray.getInteger(R.styleable.TestView_test_integer, -1);
        String stringTest = typedArray.getString(R.styleable.TestView_test_string);
        int enumTest = typedArray.getInt(R.styleable.TestView_test_enum, 0);
        float dimensionTest = typedArray.getDimension(R.styleable.TestView_test_dimension, 0);
        Log.i(TAG, "TestView: booleanTest=" + booleanTest);
        Log.i(TAG, "TestView: integerTest=" + integerTest);
        Log.i(TAG, "TestView: stringTest=" + stringTest);
        Log.i(TAG, "TestView: enumTest=" + enumTest);
        Log.i(TAG, "TestView: dimensionTest=" + dimensionTest);
        typedArray.recycle();
    }
}
获取属性的方式二:
public class TestView extends View {
    private static final String TAG = "TestView";

    public TestView(Context context, @Nullable AttributeSet attrs) {
        super(context, attrs);
        TypedArray typedArray = context.obtainStyledAttributes(attrs, R.styleable.TestView);
        boolean booleanTest = false;
        int integerTest = 0;
        String stringTest = null;
        int enumTest = 0;
        float dimensionTest = 0;
        int indexCount = typedArray.getIndexCount();
        for (int i = 0; i < indexCount; i++) {
            int index = typedArray.getIndex(i);
            switch (index){
                case R.styleable.TestView_test_bool:
                    booleanTest = typedArray.getBoolean(R.styleable.TestView_test_bool, false);
                    break;
                case R.styleable.TestView_test_integer:
                    integerTest = typedArray.getInteger(R.styleable.TestView_test_integer, -1);
                    break;
                case R.styleable.TestView_test_string:
                    stringTest = typedArray.getString(R.styleable.TestView_test_string);
                    break;
                case R.styleable.TestView_test_enum:
                    enumTest = typedArray.getInt(R.styleable.TestView_test_enum, 0);
                    break;
                case R.styleable.TestView_test_dimension:
                    dimensionTest = typedArray.getDimension(R.styleable.TestView_test_dimension, 0);
                    break;
            }
        }
        typedArray.recycle();

        Log.i(TAG, "TestView: booleanTest=" + booleanTest);
        Log.i(TAG, "TestView: integerTest=" + integerTest);
        Log.i(TAG, "TestView: stringTest=" + stringTest);
        Log.i(TAG, "TestView: enumTest=" + enumTest);
        Log.i(TAG, "TestView: dimensionTest=" + dimensionTest);
    }
}
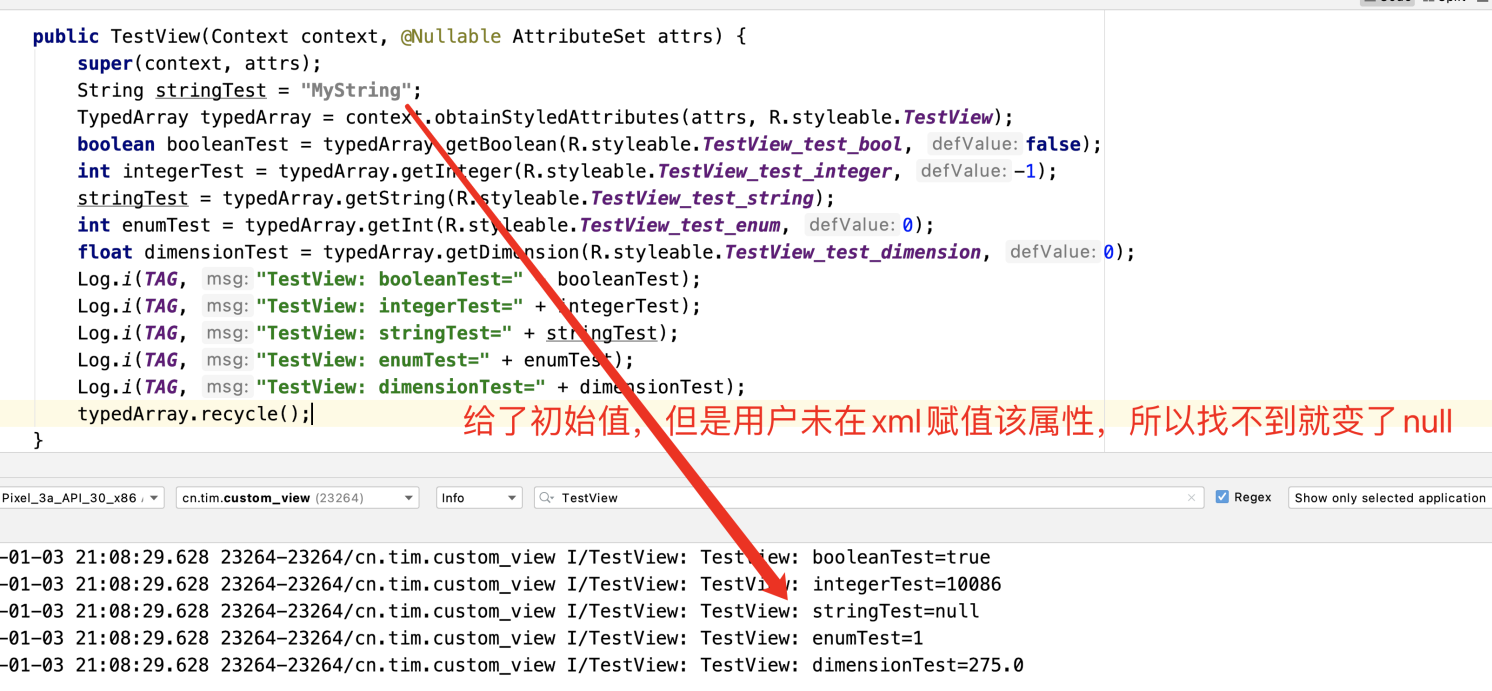
这两种方式区别就是第一种方式是有缺点的,用户假设没有在控件中设置值,直接获取的方式如果找不到用户设置的值的时候,就会设置为null,从而覆盖原来的初始值,假设用户使用时写的控件属性如下:
<?xml version="1.0" encoding="utf-8"?>
<RelativeLayout
    xmlns:android="http://schemas.android.com/apk/res/android"
    xmlns:tim="http://schemas.android.com/apk/res-auto"
    xmlns:tools="http://schemas.android.com/tools"
    android:layout_width="match_parent"
    android:layout_height="match_parent"
    tools:context=".MainActivity">

    <cn.tim.custom_view.TestView
        android:layout_centerInParent="true"
        android:background="#FFBB86FC"
        tim:test_bool="true"
        tim:test_dimension="100dp"
        tim:test_enum="top"
        tim:test_integer="10086"

        android:layout_width="100dp"
        android:layout_height="100dp"/>

</RelativeLayout>
所以还是比较推荐使用第二种写法,根据需要获取属性即可。
Measure (测量过程)
自定义View的子二个步骤就是测量,在自定义View的时候,我们需要测量出View的宽和高,在某些情况下,需要多次测量才能确定View最终的宽/高;该情况下,measure过程后得到的宽和高可能不准确,因此最好是在layout过程中通过onLayout()方法去获取最终的宽和高。
ViewGroup 的子类(RelativeLayout、LinearLayout)有其对应的ViewGroup.LayoutParams子类,比如:RelativeLayout的 ViewGroup.LayoutParams子类就是RelativeLayoutParams,它们的作用就是指定视图View的高度和宽度等布局参数。
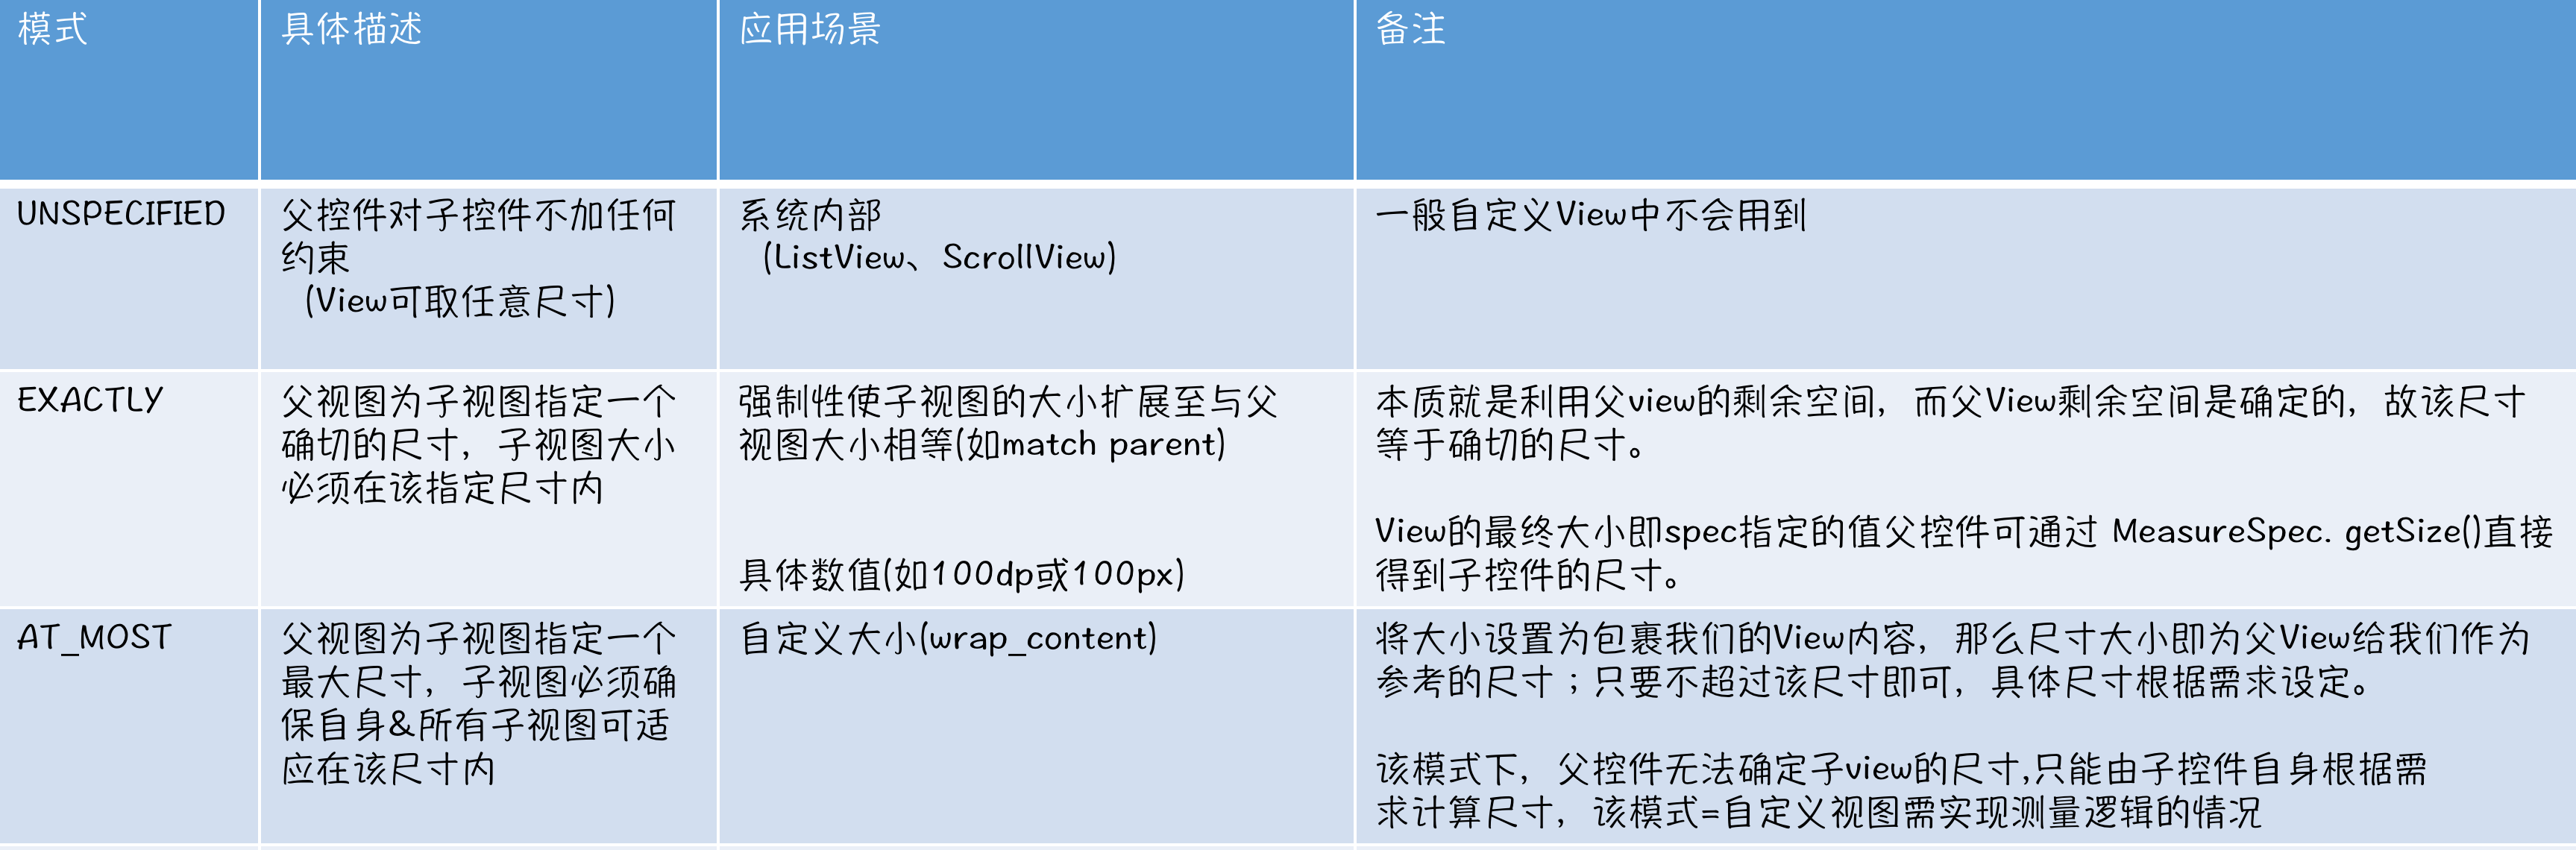
在测量过程中,需要重点理解的是测量规格,测量规格(MeasureSpec) = 测量模式(mode) + 测量大小(size)。其中测量模式有三种:MeasureSpec.UNSPECIFIED、MeasureSpec.EXACTLY、MeasureSpec.AT_MOST。MeasureSpec是父控件提供给子View的一个参数,作为设定自身大小参考,只是个参考,要多大,还是View自己说了算。
1、UNSPECIFIED(未指定模式),父控件对子控件不加任何束缚,子元素可以得到任意想要的大小。比如ScrollView、ListView……,它的子View可以随意设置大小,无论多高,都能滚动显示,这个时候heightSize就没什么意义。
2、EXACTLY(精确模式),父控件为子View指定确切大小,希望子View完全按照自己给定尺寸来处理,这时的MeasureSpec一般是父控件根据自身的MeasureSpec跟子View的布局参数来确定的。
3、AT_MOST(最大值模式),父为子元素指定最大参考尺寸,希望子View的尺寸不要超过这个尺寸。这种模式也是父控件根据自身的MeasureSpec跟子View的布局参数来确定的,一般是子View的布局参数采用wrap_content的时候。
通过下表可以清晰的对比一下三者的区别:
MeasureSpec 被封装在View类中的一个内部类里:MeasureSpec类,MeasureSpec类用1个变量封装了2个数据:size与mode,通过使用二进制将测量模式与测量大小打包成一个int值来,并提供了打包与解包的方法,使用该措施的目的就是减少对象内存分配。所以待会儿看到这样的代码并不要觉得惊讶:
int specMode = MeasureSpec.getMode(measureSpec);
int specSize = MeasureSpec.getSize(measureSpec);
// 通过Mode和Size生成新的SpecMode
int measureSpec = MeasureSpec.makeMeasureSpec(specSize, specMode);
因为这就是获取了测量模式,也获取了测量值:
// 测量的代码
@Override
protected void onMeasure(int widthMeasureSpec, int heightMeasureSpec) {
    int widthMode = MeasureSpec.getMode(widthMeasureSpec);
    int widthSize = MeasureSpec.getSize(widthMeasureSpec);
    int width = 0;
    if(widthMode == MeasureSpec.EXACTLY){
        width = widthSize;
    }else {
        //int needWidth = measureWidth();
        // 想要支持Padding
        int needWidth = measureWidth() + getPaddingLeft() + getPaddingRight();
        if(widthMode == MeasureSpec.AT_MOST){
            width = Math.min(needWidth, widthSize);
        }else { //MeasureSpec.UNSPECIFIED 无限制
            width = widthSize;
        }
    }

    int heightMode = MeasureSpec.getMode(heightMeasureSpec);
    int heightSize = MeasureSpec.getSize(heightMeasureSpec);
    int height = 0;
    if(heightMode == MeasureSpec.EXACTLY){
        height = heightSize;
    }else {
        int needHeight = measureHeight() + getPaddingTop() + getPaddingBottom();
        if(heightMode == MeasureSpec.AT_MOST){
            height = Math.min(needHeight, heightSize);
        }else {
        		//MeasureSpec.UNSPECIFIED 无限制
            height = heightSize;
        }
    }
    setMeasuredDimension(width, height);
}

// 根据显示的内容去计算
private int measureHeight() {
    return 0;
}

// 根据显示的内容去计算
private int measureWidth() {
    return 0;
}
MeasureSpec值的计算,上面说了那么久MeasureSpec,那么MeasureSpec值到底是如何计算得来?其实子View的MeasureSpec值是根据子View的布局参数(LayoutParams)和父容器的MeasureSpec值计算得来的,具体计算逻辑封装在getChildMeasureSpec()方法里。
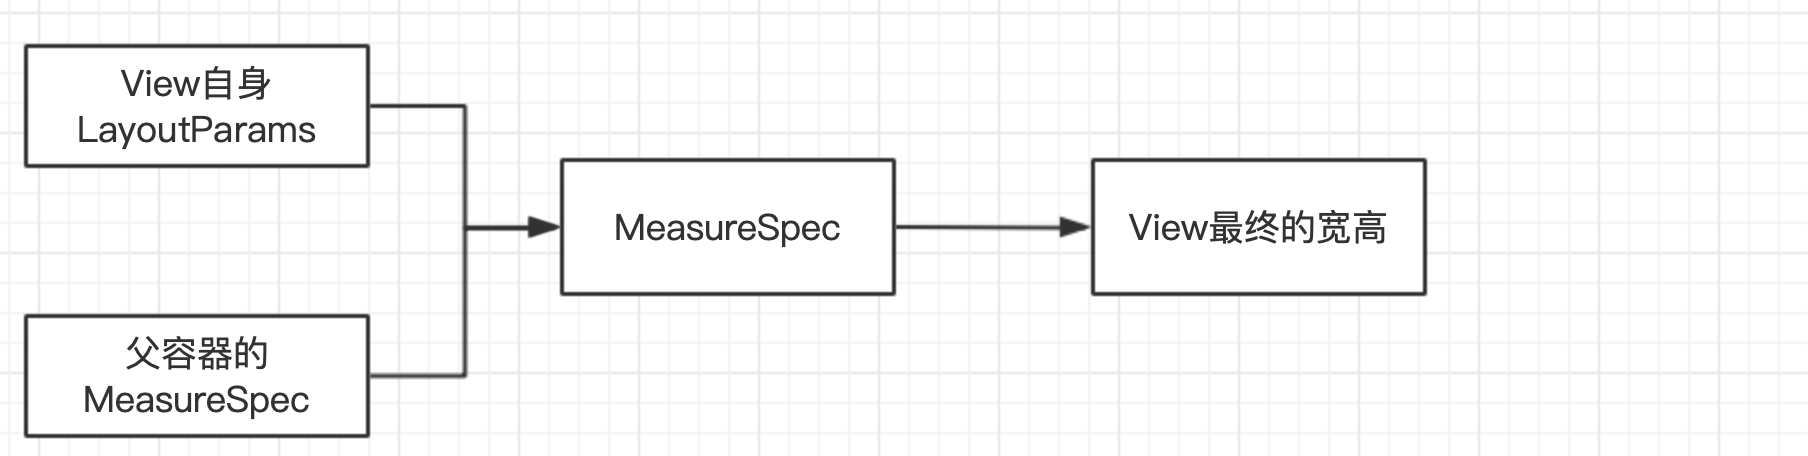
即子View的大小是由父View的MeasureSpec值和子View的LayoutParams属性共同决定的。关于getChildMeasureSpec()方法里对子View的测量模式 & 大小的判断逻辑有点复杂,具体请看下表:
| 子视图布局参数 \ 父视图测量模式 | EXACTLY | AT_MOST | UNSPECIFIED |
|---|---|---|---|
| 具体数值(dp / px) | EXACTLY + childSize | EXACTLY + childSize | EXACTLY + childSize |
| match_parent | EXACTLY + parentSize(父容器的剩余空间) | AT_MOST + parentSize(大小不超过父容器的剩余空间) | UNSPECIFIED + 0 |
| wrap_content | AT_MOST + parentSize(大小不超过父容器的剩余空间) | AT_MOST + parentSize(大小不超过父容器的剩余空间) | UNSPECIFIED + 0 |
其中的规律总结:(以子View为标准,横向观察)
| 规律前提 | 子view的 MeasureSpec值 |
|---|---|
| 当子View采用具体数值(dp/px)时 | 测量模式 = EXACTLY 测量大小 = 其自身设置的具体数值 |
| 当子View采用match_parent时 | 测量模式 = 父容器的测量模式测量大小: 若父容器的测量模式为EXACTLY,那么测量大小等于父容器的剩余空间 若父容器的测量模式为AT_MOST,那么测大小不超过父容器的剩余 |
| 当子View采用wrap_content时 | 测量模式 = AT MOST 测量大小 = 不超过父容器的剩余空间 |
实际上,上面那段代码的实现和与getDefaultSize()方法是一样的:
/**
 * Utility to return a default size. Uses the supplied size if the
 * MeasureSpec imposed no constraints. Will get larger if allowed
 * by the MeasureSpec.
 *
 * @param size Default size for this view
 * @param measureSpec Constraints imposed by the parent
 * @return The size this view should be.
 */
public static int getDefaultSize(int size, int measureSpec) {
    int result = size;
    int specMode = MeasureSpec.getMode(measureSpec);
    int specSize = MeasureSpec.getSize(measureSpec);

    switch (specMode) {
        case MeasureSpec.UNSPECIFIED:
            result = size;
            break;
        case MeasureSpec.AT_MOST:
        case MeasureSpec.EXACTLY:
            result = specSize;
            break;
    }
    return result;
}
getDefaultSize()方法是一种默认计算View的宽高值的方法,所以即使在自定义View的时候不覆写onMeasure,也会走默认的getDefaultSize()方法,使用setMeasuredDimension()方法来存储测量后的View宽高参数。