JDK8新特性
虽然已经用过了一些Java8的新特性,但是总来没有仔细总结一下。Java8自从2014年就发布了,到目前为止只有一小部分公司在用JDK7及其以下的版本,大部分已经迁移至Java8,甚至Java11(关于Java9和Java11的特性我会在之后两篇文章中记述),目前只看Java8那些最主要的、也是最常用的新特性,我到目前为止用到的最多的也就是Stream API和Lambda表达式,新时间日期的API也比较常用。
Java8新特性简介
JDK8的新特性主要的从以下几个方面谈起:
1、速度更快: 优化垃圾回收机制(永久代被移除,使用元空间,元空间受物理内存大小限制);数据结构整改(如HashMap,这也就意味着HashSet也跟着变化了);ConcurrentHashMap也变了,从之前的锁分段机制改成了大量的CAS操作,HashMap和ConcurrentHashMap都是由原来的链表改成了链表+红黑树的结构;所以速度明显提高。
2、代码更少: 通过Lambda表达式来减少不必要的代码编写量,代码更少更简洁。
3、强大的Stream API: 有了Stream API就意味着在Java中操作数据就像SQL语句一样简单,其实比SQL语句还简单
4、便于并行: 对Fork/Join框架进行了提升,之前得开发者自己给任务做分隔,代码复杂度很高。但是自从JDK8以来,对Fork/Join框架进行了大幅度的提升,很方便的从串行切换到并行。
5、最大化减少空指针异常 Optional: 通过Optional容器类来提供一些解决方法,最大化避免空指针异常
Lambda表达式
Lambda是一个匿名函数,我们可以把Lambda表达式理解为是一段可以传递的代码(将代码像数据一样进行传递)。可以写出更简洁、更灵活的代码。作为一种更紧凑的代码风格,使Java的语言表达能力得到了提升。
 1public class LambdaDemo {
 2    public static void main(String[] args) {
 3        Comparator<Integer> integerComparator = new Comparator<Integer>() {
 4            @Override
 5            public int compare(Integer o1, Integer o2) {
 6                return o1.compareTo(o2);
 7            }
 8        };
 9        TreeSet<Integer> integerTreeSet = new TreeSet<>(integerComparator);
10
11        //lambda表达式
12        Comparator<Integer> integerComparator1 = (o1, o2) -> Integer.compare(o1, o2);
13        TreeSet<Integer> integerTreeSet1 = new TreeSet<>(integerComparator1);
14
15        //lambda表达式
16        Comparator<Integer> integerComparator2 = Integer::compare;
17        TreeSet<Integer> integerTreeSet2 = new TreeSet<>(integerComparator1);
18    }
19}
上面的例子可能不是很形象的说明Lambda表达式的作用,下面可以看看实际一点的使用例子,有一个员工集合Employee,现在需要根据年龄或者薪水过滤出对应的数据:
 1public class Employee {
 2
 3    private int age; // 年龄
 4
 5    private int salary; // 薪水
 6
 7    private String name; // 姓名
 8
 9    public Employee(int age, int salary, String name) {
10        this.age = age;
11        this.salary = salary;
12        this.name = name;
13    }
14	// Getter / Setter / toString
15}
各种过滤条件的演示:
 1public class LambdaDemo {
 2    public static void main(String[] args) {
 3        List<Employee> employeeList = Arrays.asList(
 4                new Employee(18, 5500, "Tom"),
 5                new Employee(28, 4500, "Jone"),
 6                new Employee(20, 3500, "Jack"),
 7                new Employee(25, 8500, "Tim")
 8        );
 9
10        List<Employee> retListByAge = filterByAge(employeeList);
11        retListByAge.forEach(System.out::println);
12
13        System.out.println("----------------------------------------");
14
15        List<Employee> retListBySalary = filterBySalary(employeeList);
16        retListBySalary.forEach(System.out::println);
17
18    }
19
20    // 根据年龄过滤
21    private static List<Employee> filterByAge(List<Employee> employeeList) {
22        ArrayList<Employee> retList = new ArrayList<>();
23        for(Employee employee: employeeList){
24            if(employee.getAge() > 20) retList.add(employee);
25        }
26        return retList;
27    }
28
29    // 根据工资过滤
30    private static List<Employee> filterBySalary(List<Employee> employeeList) {
31        ArrayList<Employee> retList = new ArrayList<>();
32        for(Employee employee: employeeList){
33            if(employee.getSalary() > 5000) retList.add(employee);
34        }
35        return retList;
36    }
37}
现在我们用策略模式进行改进:
策略对应的实现类:
 1// 根据年龄定义的过滤器
 2public class EmployeeAgeFilterPredict implements MyFilterPredict {
 3    @Override
 4    public boolean filter(Employee employee) {
 5        return employee.getAge() > 20;
 6    }
 7}
 8
 9// 根据薪水定义的过滤器
10public class EmployeeSalaryFilterPredict implements MyFilterPredict {
11    @Override
12    public boolean filter(Employee employee) {
13        return employee.getSalary() > 5000;
14    }
15}
使用的时候:
 1public class LambdaDemo {
 2    public static void main(String[] args) {
 3        List<Employee> employeeList = Arrays.asList(
 4                new Employee(18, 5500, "Tom"),
 5                new Employee(28, 4500, "Jone"),
 6                new Employee(20, 3500, "Jack"),
 7                new Employee(25, 8500, "Tim")
 8        );
 9
10        List<Employee> retListByAge = commonFilter(employeeList, new EmployeeAgeFilterPredict());
11        retListByAge.forEach(System.out::println);
12
13        System.out.println("-----------------------------");
14
15        List<Employee> retListBySalary = commonFilter(employeeList, new EmployeeSalaryFilterPredict());
16        retListBySalary.forEach(System.out::println);
17    }
18
19    // 按照自定义策略过滤
20    private static List<Employee> commonFilter(List<Employee> employeeList, MyFilterPredict myFilterPredict) {
21        ArrayList<Employee> retList = new ArrayList<>();
22        for (Employee employee: employeeList)
23            if(myFilterPredict.filter(employee)) retList.add(employee);
24        return retList;
25    }
26}
但是我们实际上并不需要写策略接口对应的实现类,直接使用匿名内部类即可:
 1public static void main(String[] args) {
 2    List<Employee> employeeList = Arrays.asList(
 3        new Employee(18, 5500, "Tom"),
 4        new Employee(28, 4500, "Jone"),
 5        new Employee(20, 3500, "Jack"),
 6        new Employee(25, 8500, "Tim")
 7    );
 8
 9    List<Employee> retListByAge = commonFilter(employeeList, new MyFilterPredict() {
10        @Override
11        public boolean filter(Employee employee) {
12            return employee.getAge() > 20;
13        }
14    });
15    retListByAge.forEach(System.out::println);
16
17    System.out.println("-----------------------------");
18
19    List<Employee> retListBySalary = commonFilter(employeeList, new MyFilterPredict() {
20        @Override
21        public boolean filter(Employee employee) {
22            return employee.getSalary() > 5000;
23        }
24    });
25    retListBySalary.forEach(System.out::println);
26}
直接使用匿名内部类那么就意味着可以直接用Lambda表达式来代替:
 1public static void main(String[] args) {
 2    List<Employee> employeeList = Arrays.asList(
 3        new Employee(18, 5500, "Tom"),
 4        new Employee(28, 4500, "Jone"),
 5        new Employee(20, 3500, "Jack"),
 6        new Employee(25, 8500, "Tim")
 7    );
 8
 9    List<Employee> retListByAge = commonFilter(employeeList, employee -> employee.getAge() > 20);
10    retListByAge.forEach(System.out::println);
11
12    System.out.println("-----------------------------");
13
14    List<Employee> retListBySalary = commonFilter(employeeList, employee -> employee.getSalary() > 5000);
15    retListBySalary.forEach(System.out::println);
16}
其实,retListByAge.forEach(System.out::println); 也是Lambda表达式的一个用法。但是还有更骚的用法,那就是用Stream来解决这个问题:
 1public class LambdaDemo {
 2    public static void main(String[] args) {
 3        List<Employee> employeeList = Arrays.asList(
 4                new Employee(18, 5500, "Tom"),
 5                new Employee(28, 4500, "Jone"),
 6                new Employee(20, 3500, "Jack"),
 7                new Employee(25, 8500, "Tim")
 8        );
 9        employeeList.stream()
10                .filter((e) -> e.getAge() > 20)
11                .forEach(System.out::println);
12
13        System.out.println("-----------------------------");
14
15        employeeList.stream()
16                .filter((e) -> e.getSalary() > 5000)
17                .forEach(System.out::println);
18    }
19
20    // 薪水大于1000的有4个,但是我只需要前面两个
21    employeeList.stream()
22        .filter((e) -> e.getSalary() > 1000)
23        .limit(2)
24        .forEach(System.out::println);
25
26    // 只把名字提取出来
27    List<String> nameList = employeeList.stream()
28        .map(Employee::getName)
29        .collect(Collectors.toList());
30    nameList.forEach(System.out::println);
31}
不知道上面的例子是否能体会到Lambda表达式的简介易用呢?现在具体来看看Lambda表达式的语法:
Lambda表达式在Java语言中引入了一个新的语法元素和操作符。这个操作符为->,该操作符被称为Lambda操作符或箭头操作符。它将Lambda 分为两个部分:
- 左侧:指定了Lambda表达式需要的所有参数;
- 右侧:指定了Lambda体,即Lambda表达式要执行的功能。
语法格式一:无参数、无返回值
1public class LambdaDemo {
2    public static void main(String[] args) {
3        Runnable runnable = ()-> System.out.println("Hello");
4    	runnable.run();
5    }
6}
语法格式二:有一个参数、无返回值(只有一个参数时,参数的小括号可不写)
 1import java.util.function.Consumer;
 2
 3public class LambdaDemo {
 4    public static void main(String[] args) {
 5        Consumer<String> consumer = (e) -> System.out.println(e);
 6        consumer.accept("Hello");
 7
 8        Consumer<String> consumer = e -> System.out.println(e);
 9        consumer.accept("Hello");
10    }
11}
语法格式三:有两个以上的参数、并且Lambda体中有多条语句
1public class LambdaDemo {
2    public static void main(String[] args) {
3        Comparator<Integer> comparator = (x, y) -> {
4            System.out.println("Hello");
5            return Integer.compare(x, y);
6        };
7
8    }
9}
语法格式四:若Lambda体中一条语句,return 和大括号都可以省略不写
1public class LambdaDemo {
2    public static void main(String[] args) {
3        Comparator<Integer> comparator = (x, y) -> Integer.compare(x, y);
4    }
5}
语法格式六:Lambda表达式中的参数列表的数据类型可以不写,JVM会根据上下文推导
1public class LambdaDemo {
2    public static void main(String[] args) {
3        Comparator<Integer> comparator = (Integer x, Integer y) -> Integer.compare(x, y);
4        Comparator<Integer> comparator = (x, y) -> Integer.compare(x, y);
5    }
6}
Lambda表达式需要函数式接口的支持,接口中只有一个抽象方法的接口,称为函数式接口。可以使用@FunctionInterface注解修饰,可以检查是否是函数式接口,如下图MyFilterPredict接口由于有两个接口,所以不能被称作是函数式接口,@FunctionInterface注解自然就会报错,因为如果接口中含有两个或两个以上的接口,那么Lambda表达式就无法表示到执行的是哪个方法,所以就不能被称为函数式接口:

下面我们看看Jaba提供的四大内置核心函数式接口:
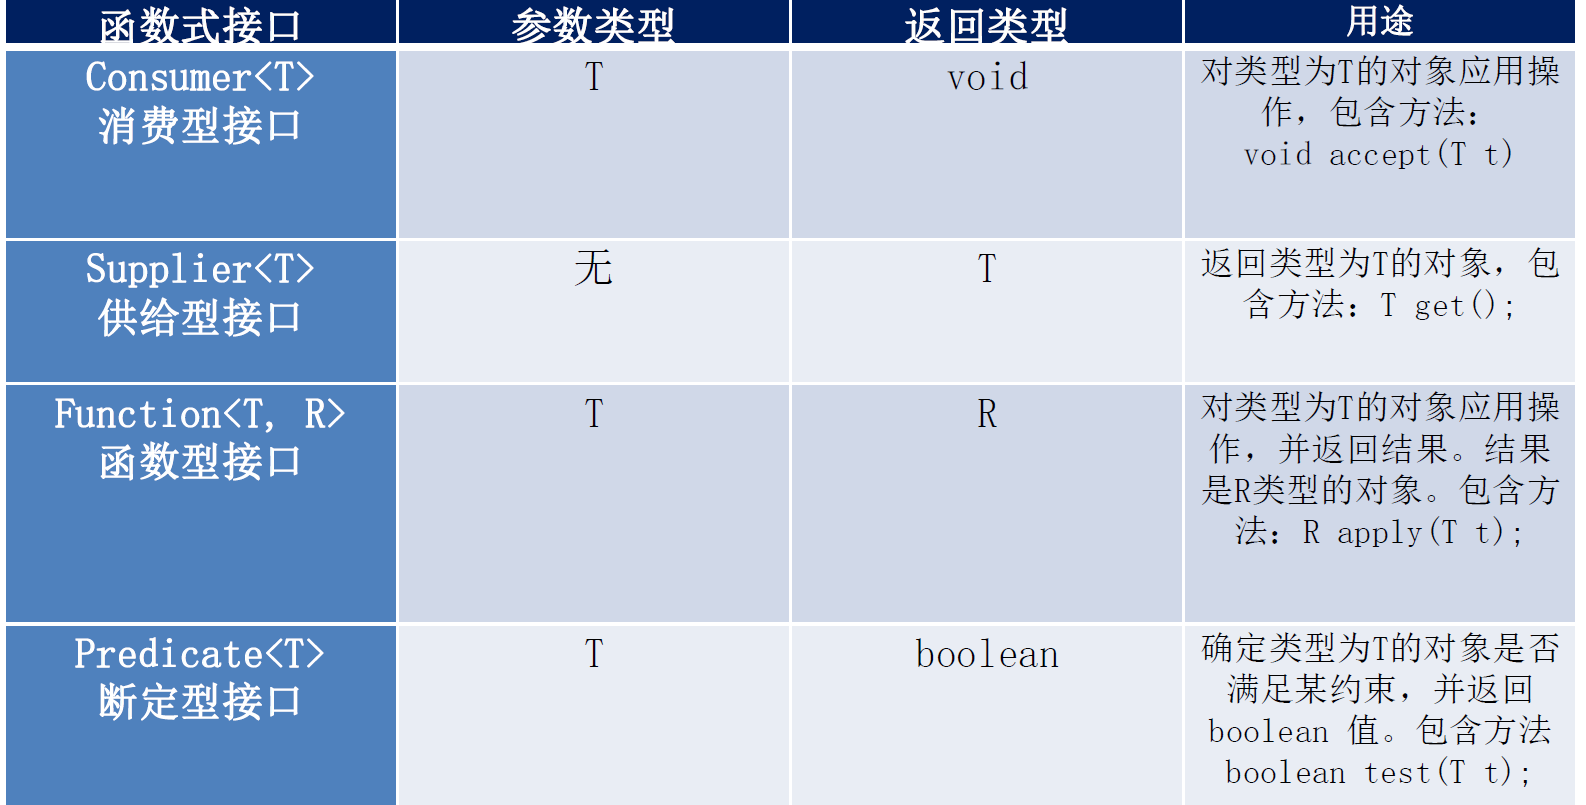
消费型接口:对传入的参数进行操作,并且无返回值
1public class LambdaDemo {
2    public static void main(String[] args) {
3        consume(100.0, (m)-> System.out.println("旅游消费金额:" + m + "元"));
4    }
5
6    private static void consume(double money, Consumer<Double> consumer) {
7        consumer.accept(money);
8    }
9}
消费型接口:对传入的参数进行操作,并且无返回值
 1import java.util.function.Supplier;
 2
 3public class LambdaDemo {
 4    public static void main(String[] args) {
 5        //Lambda表达式内定义数字的产生方式
 6        List<Integer> integerList = supply(10, () -> (int) (Math.random() * 100));
 7        integerList.forEach(System.out::println);
 8    }
 9
10	//获得N个数字存入的List
11    private static List<Integer> supply(int length, Supplier<Integer> supplier) {
12        List<Integer> list = new ArrayList<>();
13        for (int i = 0; i < length; i++)
14            list.add(supplier.get());
15        return list;
16    }
17}
函数型接口:参数类型为T、返回类型是R
 1public class LambdaDemo {
 2    public static void main(String[] args) {
 3        Integer length = calcLength("Hello", (x) -> x.length());
 4        System.out.println(length);
 5    }
 6
 7    private static Integer calcLength(String string, Function<String, Integer> function) {
 8        return function.apply(string);
 9    }
10}
断言型接口:做一些判断操作
 1import java.util.ArrayList;
 2import java.util.Arrays;
 3import java.util.List;
 4import java.util.function.Predicate;
 5import java.util.stream.Collectors;
 6
 7public class LambdaDemo {
 8    public static void main(String[] args) {
 9        List<String> stringList = Arrays.asList("And", "Animal", "Basic", "ABC");
10        List<String> retList = predication(stringList, (x) -> x.startsWith("A"));
11        for(String str: retList) System.out.print(str + " ");
12    }
13
14    private static List<String> predication(List<String> stringList, Predicate<String> predicate) {
15        return stringList.stream()
16                .filter(predicate)
17                .collect(Collectors.toList());
18    }
19}
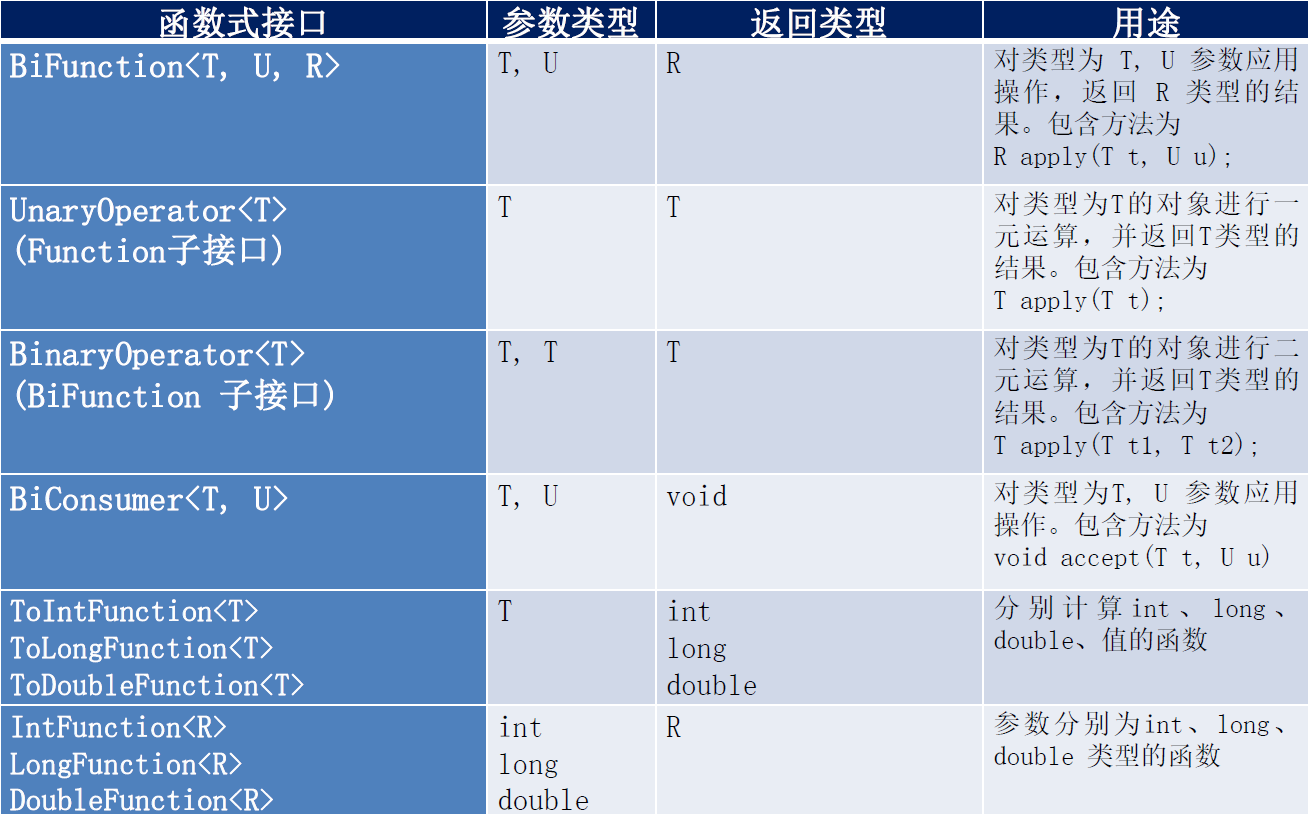
其实除了这四大核心函数式接口还有其他的接口:
方法引用与构造器引用
方法引用
当要传递给Lambda体的操作,已经有实现的方法了,可以使用方法引用!(实现抽象方法的参数列表,必须与方法引用方法的参数列表保持一致! )
方法引用:使用操作符:: 将方法名和对象或类的名字分隔开来。如下三种主要使用情况:
对象 :: 实例方法类 :: 静态方法类 :: 实例方法
下面是 对象::实例方法 这种格式:
1import java.util.function.Consumer;
2
3public class MedthodRef {
4    public static void main(String[] args) {
5        Consumer<String> consumer = (x) -> System.out.println(x);
6        Consumer<String> consumer = System.out::println;
7    }
8}
下面是 类::静态方法 这种格式:
1import java.util.function.Supplier;
2
3public class MedthodRef {
4    public static void main(String[] args) {
5        Supplier<Double> supplier = Math::random;
6        Comparator<Integer> comparator = Integer::compareTo;
7    }
8}
Lambda体中调用方法的参数列表与返回值类型,要与函数式接口中抽象方法的函数列表和返回值类型保持一致!
下面是 类::实例方法 这种格式:
1import java.util.function.BiPredicate;
2
3public class MedthodRef {
4    public static void main(String[] args) {
5        BiPredicate<String, String> biPredicate = (x, y) -> x.equals(y);
6        BiPredicate<String, String> biPredicate = String::equals;
7    }
8}
注意:当需要引用方法的第一个参数是调用对象,并且第二个参数是需要引用方法的第二个参数(或无参数)时:ClassName: :methodName
构造器引用
格式:ClassName::new 与函数式接口相结合,自动与函数式接口中方法兼容。可以把构造器引用赋值给定义的方法,与构造器参数列表要与接口中抽象方法的参数列表一致!
 1public class Employee {
 2    // 年龄
 3    private int age;
 4    // 薪水
 5    private int salary;
 6    // 姓名
 7    private String name;
 8
 9    public Employee() { }
10
11    public Employee(int age, int salary, String name) {
12        this.age = age;
13        this.salary = salary;
14        this.name = name;
15    }
16
17    public Employee(int age) {
18        this.age = age;
19    }
20
21    public Employee(Integer age, Integer salary) {
22        this.age = age;
23        this.salary = salary;
24    }
25
26    // Getter / Setter / toString ...
27}
由于构造器参数列表要与接口中抽象方法的参数列表一致,所以我给Employee类加了上述几个构造方法
 1import java.util.Comparator;
 2import java.util.function.BiFunction;
 3import java.util.function.BiPredicate;
 4import java.util.function.Function;
 5import java.util.function.Supplier;
 6
 7public class MedthodRef {
 8    public static void main(String[] args) {
 9        // 自动匹配无参构造器
10        Supplier<Employee> supplier = Employee::new;
11
12        Function<Integer, Employee> function0 = (x) -> new Employee(x);
13
14        // 自动匹配Age带参构造器
15        Function<Integer, Employee> function1 = Employee::new;
16        Employee employee0 = function1.apply(18);
17        System.out.println(employee0);
18
19        BiFunction<Integer, Integer, Employee> biFunction = Employee::new;
20        Employee employee1 = biFunction.apply(18, 5500);
21        System.out.println(employee1);
22    }
23}
数组引用
数组引用其实也是和上面一样的:
 1import java.util.function.Function;
 2
 3public class MedthodRef {
 4    public static void main(String[] args) {
 5        Function<Integer, String[]> function = (x) -> new String[x];
 6
 7        Function<Integer, String[]> function = String[]::new;
 8        String[] strings = function.apply(10);
 9        System.out.println(strings.length);
10    }
11}
Stream API
Java8中有两大最为重要的改变。第一个是Lambda 表达式;另外一个则是Stream API(java.util.stream.*)。Stream是Java8中处理集合的关键抽象概念,它可以指定你希望对集合进行的操作,可以执行非常复杂的查找、过滤和映射数据等操作。使用Stream API对集合数据进行操作,就类似于使用SQL 执行的数据库查询。也可以使用Stream API来并行执行操作。简而言之,StreamAPI提供了一种高效且易于使用的处理数据的方式。
Stream的概念
那么流(Stream)到底是什么呢?其实流可以理解为数据渠道,用于操作数据源(集合、数组等)所生成的元素序列。集合讲的是数据,流讲的是计算!需要注意以下几点:
- Stream自己不会存储元素。
- Stream不会改变源对象。相反,他们会返回一个持有结果的新Stream。
- Stream操作是延迟执行的。这意味着他们会等到需要结果的时候才执行。
Stream三个操作步骤
1、创建Stream:一个数据源(如:集合、数组) ,获取一个流
2、中间操作:一个中间操作链,对数据源的数据进行处理
3、终止操作(终端操作):一个终止操作,执行中间操作链,并产生结果
下面是常用的创建的操作:
 1import java.util.ArrayList;
 2import java.util.Arrays;
 3import java.util.List;
 4import java.util.stream.Stream;
 5
 6/*
 7 *	Stream<E> stream() 返回一个顺序流
 8 * 	Stream<E> parallelStream() 返回一个并行流
 9 */
10
11public class StreamDemo {
12    public static void main(String[] args) {
13        // 1、获取流的第一种方式: stream()获取数组流
14        List<String> list = new ArrayList<>();
15        Stream<String> stringStream0 = list.stream();
16
17        // 2、获取流的第二种方式:Arrays的静态方法stream()获取数组流
18        Employee[] employeeArray = new Employee[10];
19        Stream<Employee> employeeStream = Arrays.stream(employeeArray);
20
21        // 3、获取流的第三种方式:通过Stream类中的静态方法of()
22        Stream<String> stringStream1 = Stream.of("AAA", "BBB", "CCC");
23
24        // 4、获取流的第四种方式:创建无限流
25        // ①迭代的方式
26        Stream<Integer> integerStream = Stream.iterate(0, (x) -> x + 2);
27        integerStream.limit(10).forEach(System.out::println);
28
29        // ②生成的方式
30        Stream<Double> doubleStream = Stream.generate(() -> Math.random());
31        doubleStream.limit(5).forEach(System.out::println);
32    }
33}
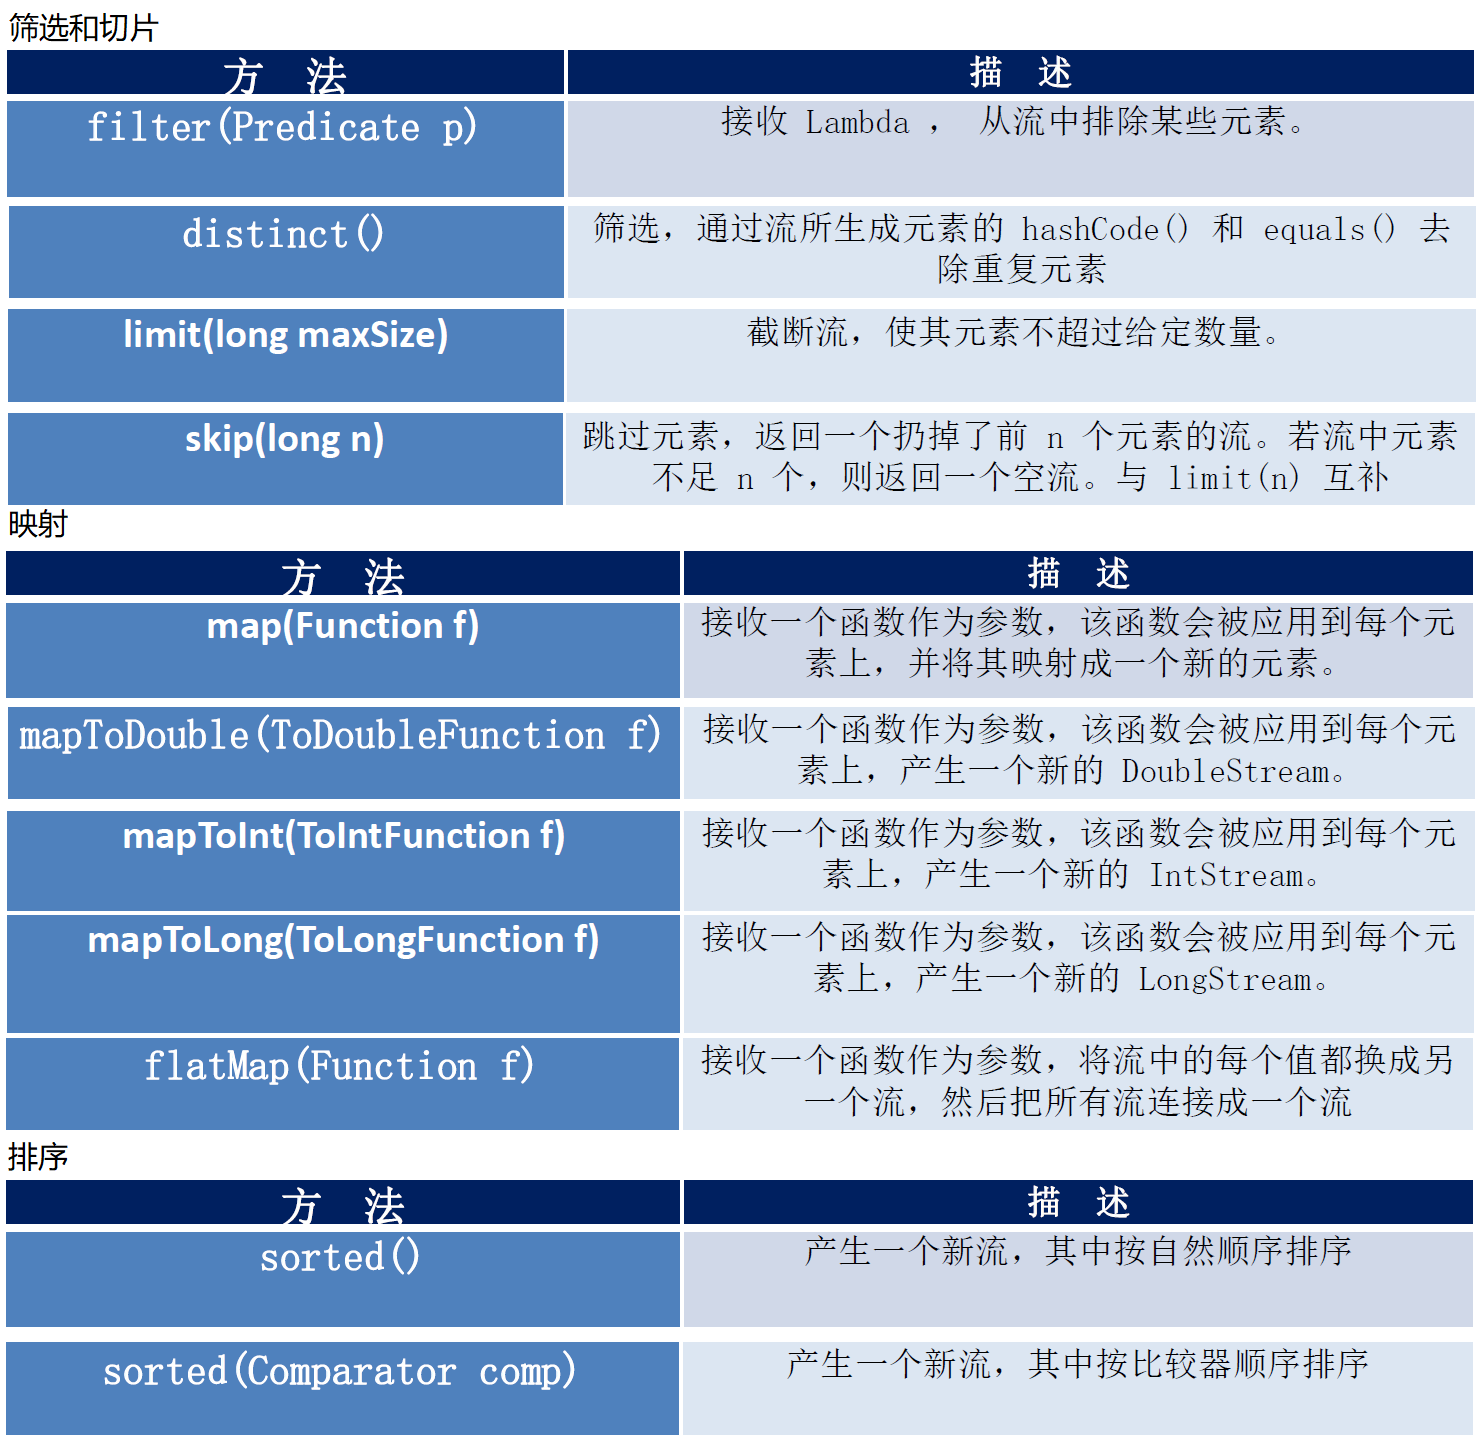
多个中间操作可以连接起来形成一个流水线,除非流水线上触发终止操作,否则中间操作不会执行任何的处理!而在终止操作时一次性全部处理,称为惰性求值 下面是一些中间操作:
下面是筛选重复对象、根据条件过滤对象的示例:
 1public class StreamDemo {
 2    private static List<Employee> employeeList = Arrays.asList(
 3            new Employee(18, 5500, "Tom"),
 4            new Employee(28, 4500, "Jone"),
 5            new Employee(20, 3500, "Jack"),
 6            new Employee(25, 8500, "Tim"),
 7            new Employee(25, 8500, "Tim")
 8    );
 9
10    public static void main(String[] args) {
11        employeeList.stream()
12                .filter((x)-> x.getAge() > 20)
13                .forEach(System.out::println);
14        System.out.println("----------------");
15        employeeList.stream()
16                .distinct()
17                .forEach(System.out::println);
18    }
19}
那么映射又是什么意思呢?map——接收Lambda,将元素转换成其他形式或提取信息。接收一个函数作为参数, 该函数会被应用到每个元素上,并将其映射成一个新的元素。
flatMap接收一个函数作为参数,将流中的每个值都换成另一个流,然后把所有流连接成一个流。
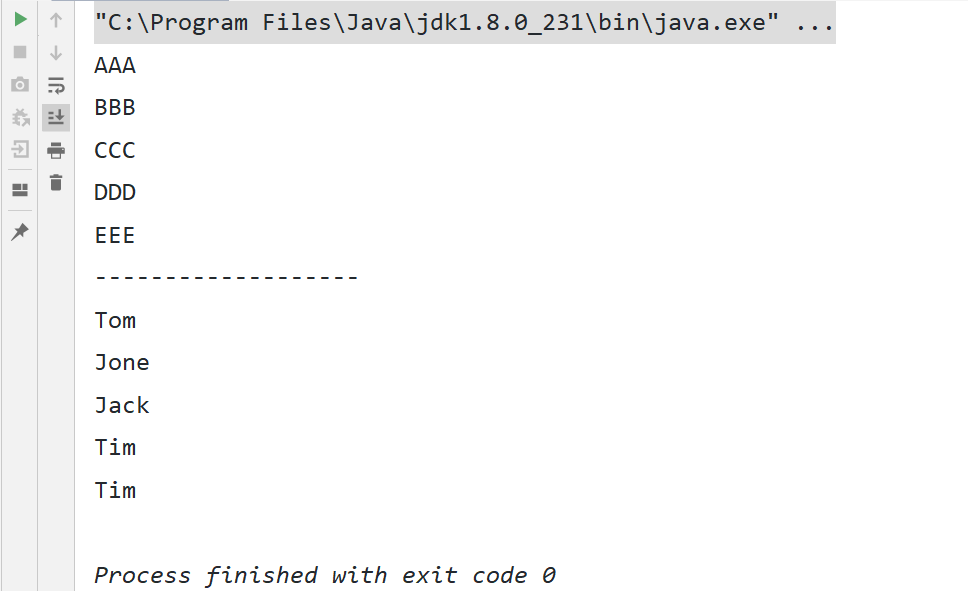
 1public class StreamDemo {
 2    private static List<Employee> employeeList = Arrays.asList(
 3            new Employee(18, 5500, "Tom"),
 4            new Employee(28, 4500, "Jone"),
 5            new Employee(20, 3500, "Jack"),
 6            new Employee(25, 8500, "Tim"),
 7            new Employee(25, 8500, "Tim")
 8    );
 9
10    public static void main(String[] args) {
11        List<String> stringList = Arrays.asList("aaa", "bbb", "ccc", "ddd", "eee");
12        stringList.stream()
13                .map(String::toUpperCase)
14                .forEach(System.out::println);
15        System.out.println("-------------------");
16        employeeList.stream()
17                .map(Employee::getName)
18                .forEach(System.out::println);
19    }
20}
如何用Stream排序呢?其实也很简单,在之前的讲解Lambda表达式的例子中我们已经用过了:
 1public class StreamDemo {
 2    private static List<Employee> employeeList = Arrays.asList(
 3            new Employee(18, 5500, "Tom"),
 4            new Employee(28, 4500, "Jone"),
 5            new Employee(20, 3500, "Jack"),
 6            new Employee(25, 8500, "Tim"),
 7            new Employee(25, 8500, "Tim")
 8    );
 9
10    public static void main(String[] args) {
11        employeeList.stream()
12                .sorted((x, y) -> {
13                    //年龄一样按照姓名排序
14                    if(x.getAge() == y.getAge()){
15                        return x.getName().compareTo(y.getName());
16                    }else{
17                        return x.getAge() - y.getAge();
18                    }
19                })
20                .forEach(System.out::println);
21    }
22}
接下来看看Stream的终止操作,终止操作会从流的流水线生成结果。其结果可以是任何不是流的值,例如: List、Integer, 甚至是void。

接下来看看Stream查找与匹配:
 1public class StreamDemo {
 2    private static List<Employee> employeeList = Arrays.asList(
 3            new Employee(18, 5500, "Tom"),
 4            new Employee(28, 4500, "Jone"),
 5            new Employee(20, 3500, "Jack"),
 6            new Employee(25, 3500, "Tim"),
 7            new Employee(25, 3500, "Tim")
 8    );
 9
10    public static void main(String[] args) {
11        // 判断是不是所有员工工资都是3500
12        boolean match = employeeList.stream()
13                .allMatch((e) -> e.getSalary() == 3500);
14        System.out.println(match);
15
16        // 判断是不是至少有一个员工姓名是Tim
17        boolean timExist = employeeList.stream()
18                .anyMatch((e) -> e.getName().equals("Tim"));
19        System.out.println(timExist);
20
21        // 判断是否存在员工年龄小于20
22        boolean ageMatch = employeeList.stream()
23                .noneMatch((e) -> e.getAge() < 20);
24        System.out.println(ageMatch);
25
26        // 根据员工工资排序,并得到第一个结果
27        Optional<Employee> employee = employeeList.stream()
28                .sorted(Comparator.comparingInt(Employee::getSalary))
29                .findFirst();
30        System.out.println(employee.get());
31
32        // 获取员工工资最高的员工信息
33        Optional<Employee> maxEmployee = employeeList.stream()
34                .max(Comparator.comparingInt(Employee::getSalary));
35        System.out.println(maxEmployee.get());
36
37        // 获取员工最低工资
38        Optional<Integer> minSalary = employeeList.stream()
39                .map(Employee::getSalary)
40                .min(Integer::compareTo);
41        System.out.println(minSalary);
42    }
43}
接下来看看Stream的归约,归约可以将流中元素反复结合起来,得到一个值。
 1public class StreamDemo {
 2    private static List<Employee> employeeList = Arrays.asList(
 3            new Employee(18, 5500, "Tom"),
 4            new Employee(28, 4500, "Jone"),
 5            new Employee(20, 3500, "Jack"),
 6            new Employee(25, 3500, "Tim"),
 7            new Employee(25, 3500, "Tim")
 8    );
 9    public static void main(String[] args) {
10        List<Integer> list = Arrays.asList(1, 2, 3, 4, 5, 6, 7, 8, 9);
11        Integer sum = list.stream()
12                .reduce(0, (x, y) -> x + y);
13        System.out.println(sum);
14
15        System.out.println("------------------------");
16
17        Optional<Integer> salarySum = employeeList.stream()
18                .map(Employee::getSalary)
19                .reduce(Integer::sum);
20        System.out.println(salarySum.get());
21    }
22}
备注: map和reduce的连接通常称为map-reduce 模式,因Google用它来进行网络搜索而出名。
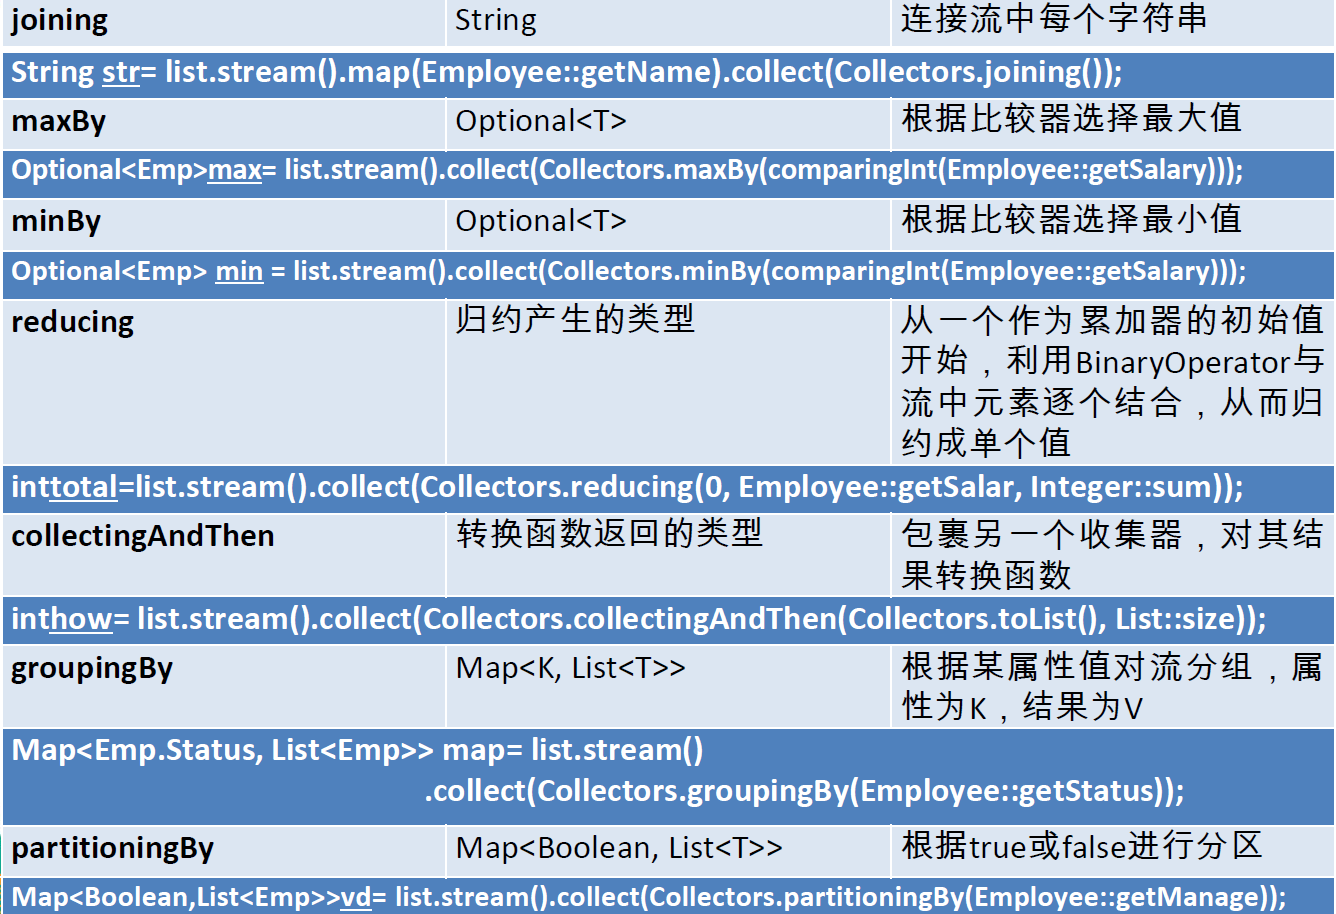
接下来看看收集,Collector接口中方法的实现决定了如何对流执行收集操作(如收集到List、Set、Map)。但是Collectors 实用类提供了很多静态方法,可以方便地创建常见收集器实例,具体方法与实例如下表:
 1public class StreamDemo {
 2    private static List<Employee> employeeList = Arrays.asList(
 3            new Employee(18, 5500, "Tom"),
 4            new Employee(28, 4500, "Jone"),
 5            new Employee(20, 3500, "Jack"),
 6            new Employee(25, 3500, "Tim"),
 7            new Employee(25, 3500, "Tim")
 8    );
 9
10    public static void main(String[] args) {
11        // 收集员工的姓名到List中
12        List<String> nameList = employeeList.stream()
13                .map(Employee::getName)
14                .collect(Collectors.toList());
15        nameList.forEach(System.out::println);
16
17        System.out.println("---------------------");
18
19        // 收集员工的姓名到Set中
20        Set<String> nameSet = employeeList.stream()
21                .map(Employee::getName)
22                .collect(Collectors.toSet());
23        nameSet.forEach(System.out::println);
24
25        // 收集员工的姓名到其他结构中
26        LinkedHashSet<String> linkedHashSet = employeeList.stream()
27                .map(Employee::getName)
28                .collect(Collectors.toCollection(LinkedHashSet::new));
29        linkedHashSet.forEach(System.out::println);
30
31        // 收集员工的工资平均值
32        Double averageSalary = employeeList.stream()
33                .collect(Collectors.averagingInt(Employee::getSalary));
34        System.out.println(averageSalary);
35
36        // 收集员工工资总和
37        Long summarySalary = employeeList.stream()
38                .collect(Collectors.summingLong(Employee::getSalary));
39        System.out.println(summarySalary);
40    }
41}
并行流与顺序流
并行流就是把一个内容分成多个数据块,并用不同的线程分别处理每个数据块的流。Java8中将并行进行了优化,我们可以很容易的对数据进行并行操作。Stream API可以声明性地通过parallel() 与sequential()在并行流与顺序流之间进行切换。
Fork/Join框架:就是在必要的情况下,将一个大任务,进行拆分(fork)成若千个小任务(拆到不可再拆时),再将一个个的小任务运算的结果进行join汇总。关于Fork/Join框架可以看我之前的一篇博客 《 ForkJoin框架与读写锁 》
早在JDK1.7的时候Fork/Join框架就有了,但是使用起来稍微复杂。Fork/Join框架采用“工作窃取” 模式(work-stealing)当执行新的任务时它可以将其拆分分成更小的任务执行,并将小任务加到线程队列中,然后再从一个随机线程的队列中偷一个并把它放在自己的队列中。相对于一般的线程池实现,fork/join框架的优势体现在对其中包含的任务的处理方式上,在一般的线程池中,如果一个线程正在执行的任务由于某些原因无法继续运行,那么该线程会处于等待状态。而在fork/join框架实现中,如果某个子问题由于等待另外一个子问题的完成而无法继续运行。那么处理该子问题的线程会主动寻找其他尚未运行的子问题来执行。这种方式减少了线程的等待时间,提高了性能。
 1import java.util.concurrent.RecursiveTask;
 2
 3// 一个并行计算的示例
 4public class ForkJoinCalculate extends RecursiveTask<Long> {
 5
 6    private static final long serialVersionUID = -2761358406351641206L;
 7
 8    public ForkJoinCalculate(long start, long end) {
 9        this.start = start;
10        this.end = end;
11    }
12
13    // 范围
14    private long start;
15    private long end;
16    // 临界值
17    private static final long THRESHOLD = 10000;
18
19    @Override
20    protected Long compute() {
21        long length = end - start;
22        if(length <= THRESHOLD){
23            long sum = 0;
24            for (long i = start; i <= end; i++) {
25                sum += i;
26            }
27            return sum;
28        }else{
29            // 拆分为子任务
30            long mid = (end - start) / 2 + start;
31            ForkJoinCalculate calculateLeft = new ForkJoinCalculate(start, mid);
32            calculateLeft.fork();
33
34            ForkJoinCalculate calculateRight = new ForkJoinCalculate(mid + 1, end);
35            calculateRight.fork();
36            return calculateLeft.join() + calculateRight.join();
37        }
38    }
39}
测试性能:
 1package newjdk8.forkjoin;
 2
 3import java.time.Duration;
 4import java.time.Instant;
 5import java.util.concurrent.ForkJoinPool;
 6import java.util.concurrent.ForkJoinTask;
 7import java.util.stream.LongStream;
 8
 9public class TestForkJoinCalculate {
10    public static void main(String[] args) {
11        // 计算500亿的累加
12        long n = 50000000000L;
13        forkJoinTest(n); //8723毫秒
14        oneThreadCalc(n); //14337毫秒
15        streamCalc(n); //4375毫秒
16    }
17
18    private static void streamCalc(long n) {
19        Instant start = Instant.now();
20        long reduce = LongStream.range(0, n)
21                .parallel()
22                .reduce(0, Long::sum);
23        System.out.println(reduce);
24        Instant end = Instant.now();
25        System.out.println("Stream " + Duration.between(start, end).toMillis());
26    }
27
28    private static void oneThreadCalc(long n) {
29        Instant start = Instant.now();
30        long sum = 0L;
31        for (long i = 0; i <= n; i++) {
32            sum += i;
33        }
34        System.out.println(sum);
35        Instant end = Instant.now();
36        System.out.println("单线程 " + Duration.between(start, end).toMillis());
37    }
38
39    private static void forkJoinTest(long n) {
40        Instant start = Instant.now();
41        ForkJoinPool pool = new ForkJoinPool();
42        ForkJoinTask<Long> forkJoinTask = new ForkJoinCalculate(0, n);
43        Long sum = pool.invoke(forkJoinTask);
44        System.out.println(sum);
45        Instant end = Instant.now();
46        System.out.println("Fork/Join " + Duration.between(start, end).toMillis());
47    }
48}
注意:parallel并行流底层就是使用了Fork/Join框架
Option尽量避免空指针
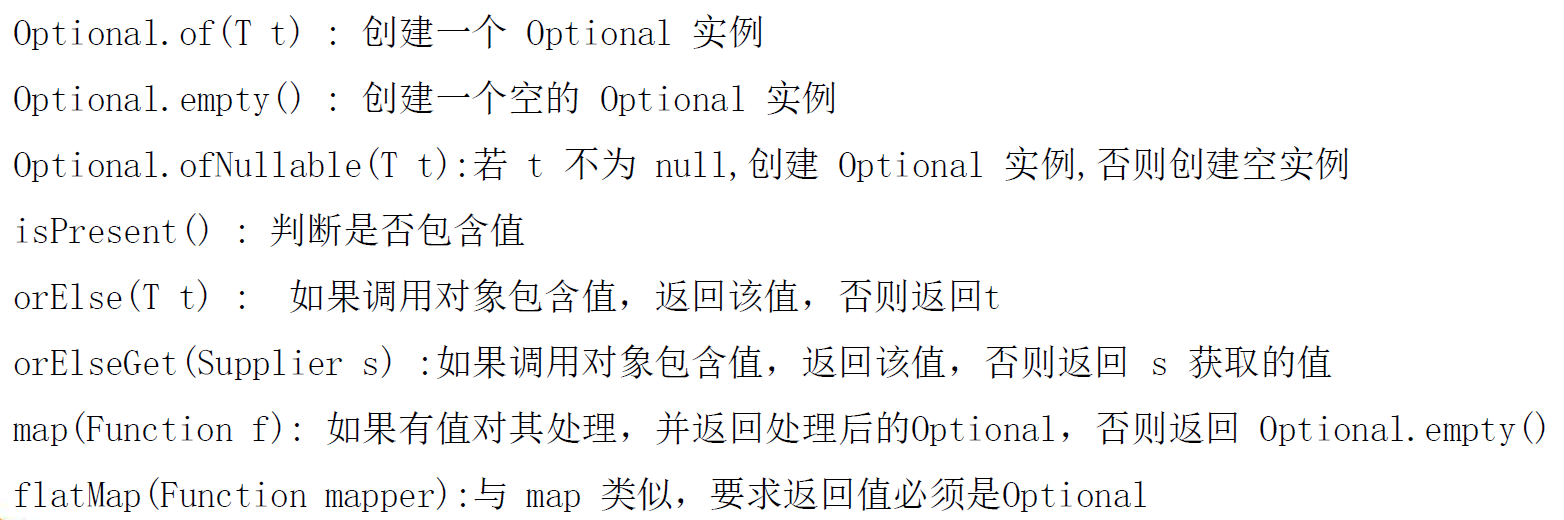
Optional<T>类(java. util. Optional)是一个容器类,代表一个值存在或不存在,原来用null表示一个值不存在,现在Optional可以更好的表达这个概念。并且可以避免空指针异常。
Option这种容器在SpringDataJpa中经常用到,所以在此不再记述。
接口中的默认方法与静态方法
接口中的默认方法
Java 8中允许接口中包含具有具体实现的方法,该方法称为默认方法,默认方法使用default 关键字修饰。我觉得JDK8出现了函数式接口,为了兼容JDK7所以出现了default修饰的接口级别的默认方法。
 1public interface MyFunc{
 2    default String getName(){
 3        return "HelloWorld";
 4    }
 5}
 6
 7public class MyCLass implements MyFunc {
 8
 9}
10
11public class Test {
12    public static void main(String[] args) {
13        MyFunc myFunc = new MyCLass();
14        System.out.println(myFunc.getName()); // HelloWorld
15    }
16}
接口默认方法的类优先原则:若一个接口中定义了一个默认方法,而另外一个父类或接口中又定义了一个同名的方法时:
- 选择父类中的方法。如果一个父类提供了具体的实现,那么接口中具有相同名称和参数的默认方法会被忽略。
- 接口冲突。如果一个父接口提供一个默认方法,而另一个接口也提供了一个具有相同名称和参数列表的方法(不管方法是否是默认方法),那么必须覆盖该方法来解决冲突。
 1public interface MyFunc{
 2    default String getName(){
 3        return "HelloWorld";
 4    }
 5}
 6
 7public class MyCLass implements MyFunc {
 8    public String getName(){
 9        return "MyClass";
10    }
11}
12
13public class Test {
14    public static void main(String[] args) {
15        MyFunc myFunc = new MyCLass();
16        System.out.println(myFunc.getName()); // MyClass
17    }
18}
那么如果有两个接口应该怎么办呢?
MyFunc.java
MyFunc2.java
MyClass.java,因为不知道该用谁的默认方法,所以报错
MyCLass.Java ,以下两种解决方案:
 1public class MyCLass implements MyFunc, MyFunc2 {
 2    @Override
 3    public String getName() {
 4        // 1、要么就指定用谁的
 5        return MyFunc.super.getName();
 6    }
 7
 8    @Override
 9    public String getName() {
10        // 2、要么就实现自己的
11        return "MyClass";
12    }
13}
接口中的静态方法
这个其实没啥好说的,就是接口中允许存在静态方法:
MyFunc.java
Test.java
新时间日期API
LocalDate、LocalTime、 LocalDateTime 类的实例是不可变的对象,分别表示使用ISO-8601日历系统的日期、时间、日期和时间。它们提供了简单的日期或时间,并不包含当前的时间信息,且也不包含与时区相关的信息。
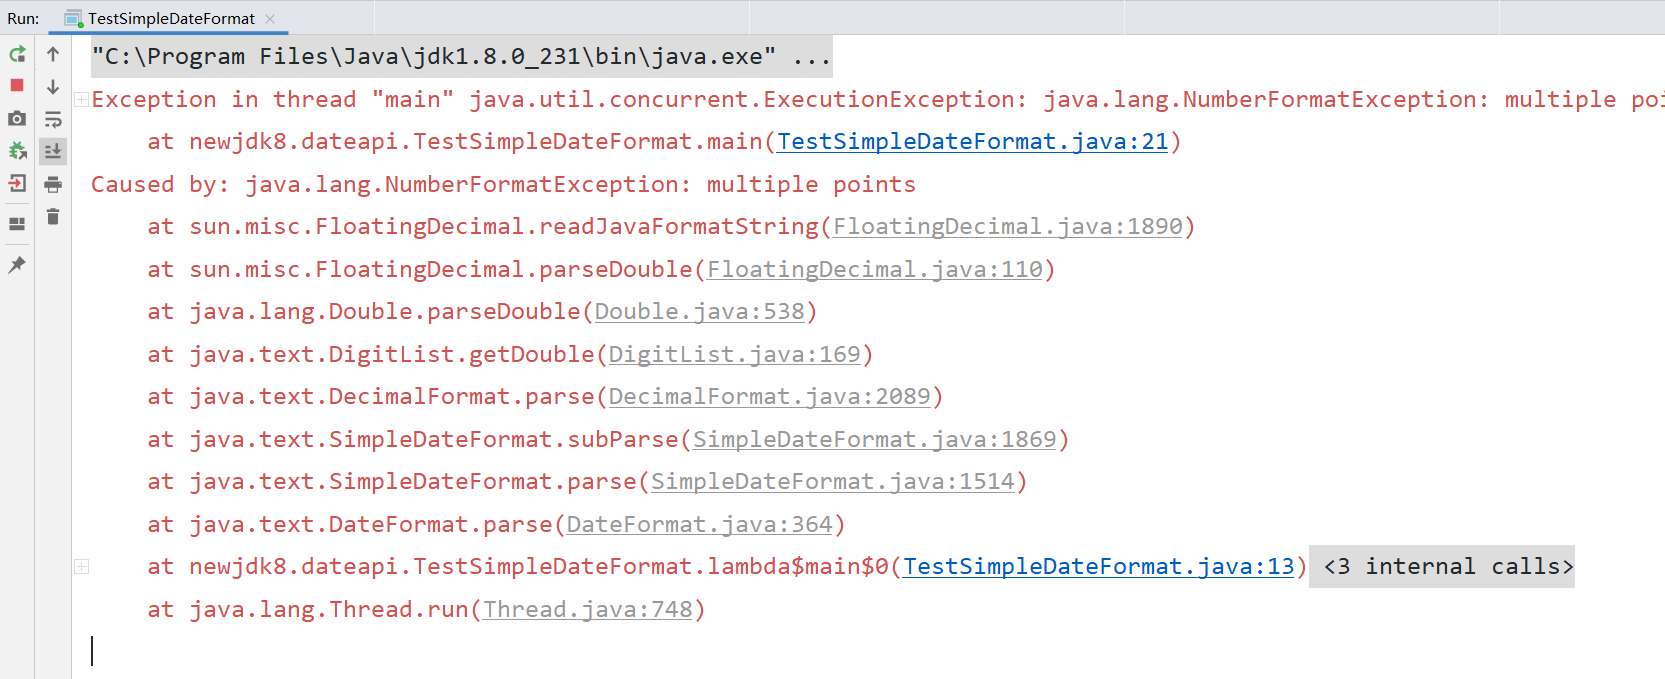
比如我们比较常用的SimpleDateFormat,这个我们经常使用的类存在线程安全问题:
 1import java.text.SimpleDateFormat;
 2import java.util.ArrayList;
 3import java.util.Date;
 4import java.util.List;
 5import java.util.concurrent.*;
 6
 7public class TestSimpleDateFormat {
 8    public static void main(String[] args) throws Exception {
 9        SimpleDateFormat format = new SimpleDateFormat("yyyy-MM-dd");
10        ExecutorService executorService = Executors.newFixedThreadPool(10);
11        Callable<Date> callable = () -> format.parse("2020-04-17");
12        List<Future<Date>> futureList = new ArrayList<>();
13
14        for (int i = 0; i < 20; i++) {
15            futureList.add(executorService.submit(callable));
16        }
17
18        for(Future<Date> dateFuture: futureList){
19            System.out.println(dateFuture.get());
20        }
21        executorService.shutdown();
22    }
23}
我们可以用ThreadLocal,DateFormatThreadLocal.java
 1import java.text.DateFormat;
 2import java.text.ParseException;
 3import java.text.SimpleDateFormat;
 4import java.util.Date;
 5
 6public class DateFormatThreadLocal {
 7    private static final ThreadLocal<DateFormat> df = new ThreadLocal<DateFormat>(){
 8        @Override
 9        protected DateFormat initialValue() {
10            return new SimpleDateFormat("yyy-MM-dd");
11        }
12    };
13
14    public static Date convert(String source) throws ParseException {
15        return df.get().parse(source);
16    }
17}
这样的话我们只需要按照如下方式使用即可:
 1import java.text.DateFormat;
 2import java.text.SimpleDateFormat;
 3import java.util.ArrayList;
 4import java.util.Date;
 5import java.util.List;
 6import java.util.concurrent.*;
 7
 8public class TestSimpleDateFormat {
 9    public static void main(String[] args) throws Exception {
10        ExecutorService executorService = Executors.newFixedThreadPool(10);
11        Callable<Date> callable = () -> DateFormatThreadLocal.convert("2020-04-17");
12        List<Future<Date>> futureList = new ArrayList<>();
13
14        for (int i = 0; i < 20; i++) {
15            futureList.add(executorService.submit(callable));
16        }
17
18        for(Future<Date> dateFuture: futureList){
19            System.out.println(dateFuture.get());
20        }
21        executorService.shutdown();
22    }
23}

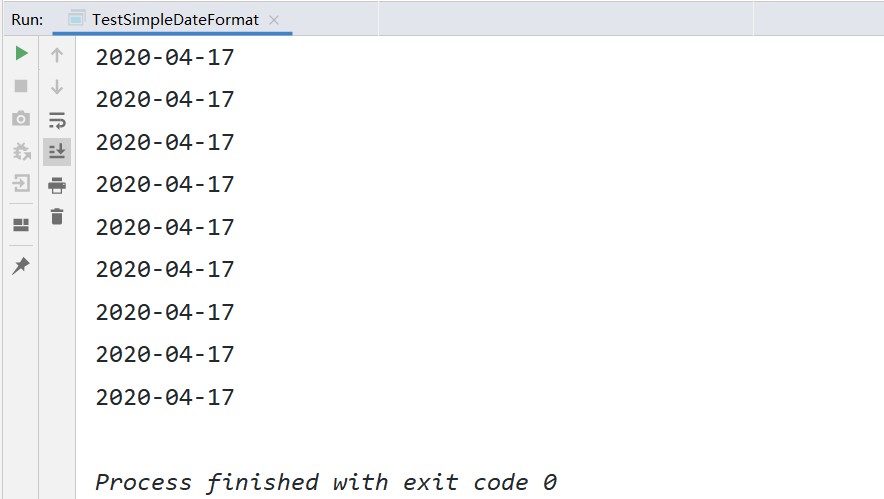
现在,我们不需要使用ThreadLocal来辅助了,直接用LocalDate这个线程安全的工具来搞定,就和String一样,线程安全,无论做出怎么样的改变都会产生一个新的实例对象:
 1import java.text.DateFormat;
 2import java.text.SimpleDateFormat;
 3import java.time.LocalDate;
 4import java.time.format.DateTimeFormatter;
 5import java.util.ArrayList;
 6import java.util.Date;
 7import java.util.List;
 8import java.util.concurrent.*;
 9
10public class TestSimpleDateFormat {
11    public static void main(String[] args) throws Exception {
12        ExecutorService executorService = Executors.newFixedThreadPool(10);
13        //DateTimeFormatter dateTimeFormatter = DateTimeFormatter.ISO_LOCAL_DATE;
14        DateTimeFormatter dateTimeFormatter = DateTimeFormatter.ofPattern("yyyy-MM-dd");
15
16        Callable<LocalDate> callable = () -> LocalDate.parse("2020-04-17", dateTimeFormatter);
17
18        List<Future<LocalDate>> futureList = new ArrayList<>();
19        for (int i = 0; i < 20; i++) {
20            futureList.add(executorService.submit(callable));
21        }
22
23        for(Future<LocalDate> dateFuture: futureList){
24            System.out.println(dateFuture.get());
25        }
26        executorService.shutdown();
27    }
28}
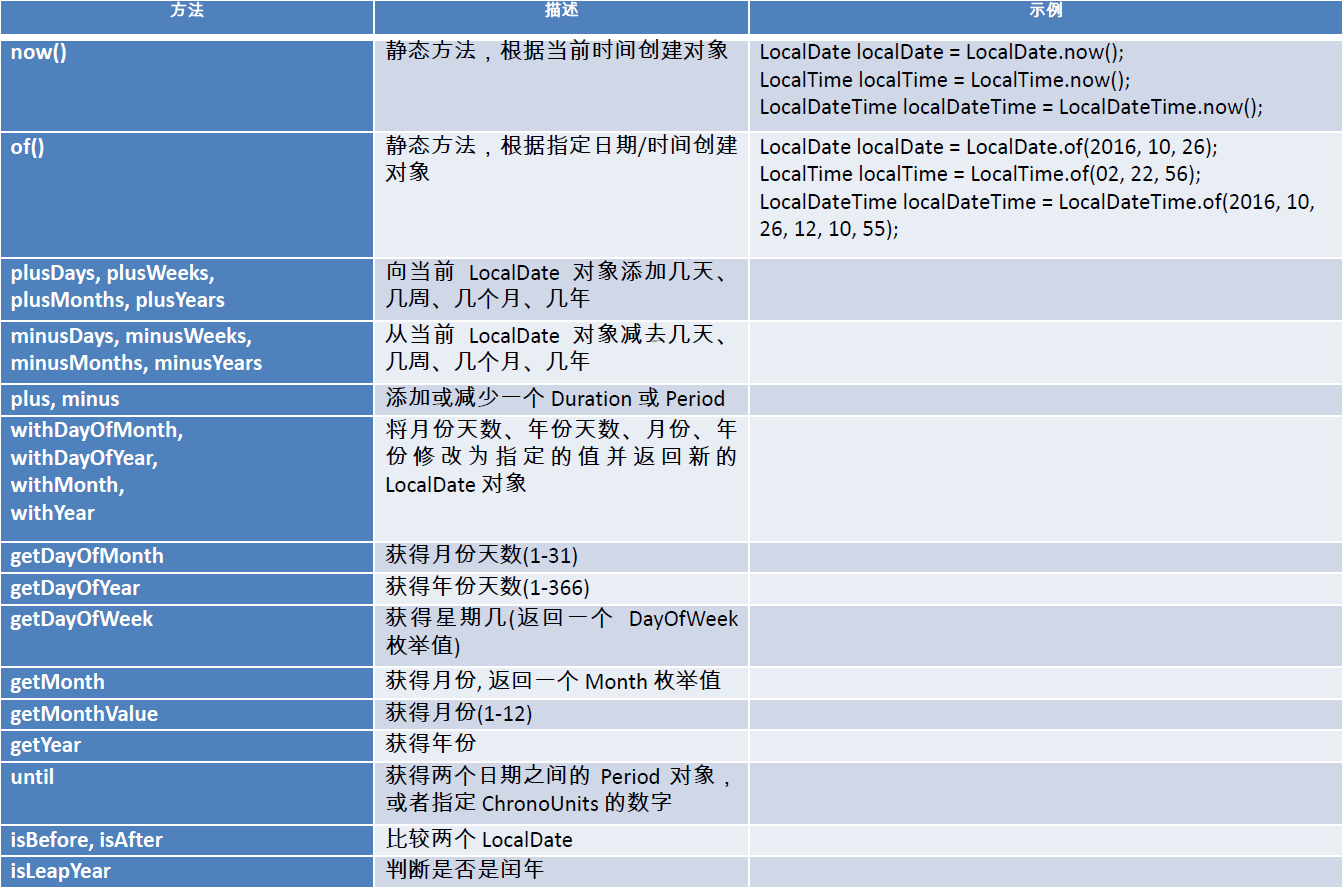
下面是这些API的使用示例:
Duration:用于计算两个时间间隔。 Period:用于计算两个日期间隔。
Instant时间戳用于时间戳的运算。它是以Unix元年(传统的设定为UTC时区1970年1月1日午夜时分)开始所经历的描述进行运算。
TemporalAdjuster:时间校正器。有时我们可能需要获取例如:将日期调整到下个周日等操作。
TemporalAdjusters:该类通过静态方法提供了大量的常用TemporalAdjuster的实现。
java.time.format.DateTimeFormatter类:该类提供了三种格式化方法:
- 预定义的标准格式
- 语言环境相关的格式
- 自定义的格式
Java8中加入了对时区的支持,带时区的时间为分别为:ZonedDate、ZonedTime、 ZonedDateTime 其中每个时区都对应着ID,地区ID都为{区 域}/{城市}的格式,例如: Asia/Shanghai等
- Zoneld:该类中包含了所有的时区信息
- getAvailableZonelds():可以获取所有时区时区信息
- of(id):用指定的时区信息获取Zoneld对象
  1import java.time.DayOfWeek;
  2import java.time.Duration;
  3import java.time.Instant;
  4import java.time.LocalDate;
  5import java.time.LocalDateTime;
  6import java.time.OffsetDateTime;
  7import java.time.Period;
  8import java.time.ZoneId;
  9import java.time.ZoneOffset;
 10import java.time.ZonedDateTime;
 11import java.time.format.DateTimeFormatter;
 12import java.time.temporal.TemporalAdjusters;
 13import java.util.Set;
 14
 15import org.junit.Test;
 16
 17public class TestLocalDateTime {
 18
 19	// ZonedDate、ZonedTime、ZonedDateTime:带时区的时间或日期
 20	@Test
 21	public void test7(){
 22		LocalDateTime ldt = LocalDateTime.now(ZoneId.of("Asia/Shanghai"));
 23		System.out.println(ldt);
 24
 25		ZonedDateTime zdt = ZonedDateTime.now(ZoneId.of("US/Pacific"));
 26		System.out.println(zdt);
 27	}
 28
 29	@Test
 30	public void test6(){
 31		Set<String> set = ZoneId.getAvailableZoneIds();
 32		set.forEach(System.out::println);
 33	}
 34
 35
 36	// DateTimeFormatter : 解析和格式化日期或时间
 37	@Test
 38	public void test5(){
 39		//DateTimeFormatter dtf = DateTimeFormatter.ISO_LOCAL_DATE;
 40		DateTimeFormatter dtf = DateTimeFormatter.ofPattern("yyyy年MM月dd日 HH:mm:ss E");
 41
 42		LocalDateTime ldt = LocalDateTime.now();
 43		String strDate = ldt.format(dtf);
 44
 45		System.out.println(strDate);
 46
 47		LocalDateTime newLdt = ldt.parse(strDate, dtf);
 48		System.out.println(newLdt);
 49	}
 50
 51	// TemporalAdjuster : 时间校正器
 52	@Test
 53	public void test4(){
 54	LocalDateTime ldt = LocalDateTime.now();
 55		System.out.println(ldt);
 56
 57		LocalDateTime ldt2 = ldt.withDayOfMonth(10);
 58		System.out.println(ldt2);
 59
 60		LocalDateTime ldt3 = ldt.with(TemporalAdjusters.next(DayOfWeek.SUNDAY));
 61		System.out.println(ldt3);
 62
 63		//自定义:下一个工作日
 64		LocalDateTime ldt5 = ldt.with((l) -> {
 65			LocalDateTime ldt4 = (LocalDateTime) l;
 66
 67			DayOfWeek dow = ldt4.getDayOfWeek();
 68
 69			if(dow.equals(DayOfWeek.FRIDAY)){
 70				return ldt4.plusDays(3);
 71			}else if(dow.equals(DayOfWeek.SATURDAY)){
 72				return ldt4.plusDays(2);
 73			}else{
 74				return ldt4.plusDays(1);
 75			}
 76		});
 77
 78		System.out.println(ldt5);
 79
 80	}
 81
 82	// Duration : 用于计算两个“时间”间隔
 83	// Period : 用于计算两个“日期”间隔
 84	@Test
 85	public void test3(){
 86		Instant ins1 = Instant.now();
 87
 88		System.out.println("--------------------");
 89		try {
 90			Thread.sleep(1000);
 91		} catch (InterruptedException e) {
 92		}
 93
 94		Instant ins2 = Instant.now();
 95
 96		System.out.println("所耗费时间为:" + Duration.between(ins1, ins2));
 97
 98		System.out.println("----------------------------------");
 99
100		LocalDate ld1 = LocalDate.now();
101		LocalDate ld2 = LocalDate.of(2011, 1, 1);
102
103		Period pe = Period.between(ld2, ld1);
104		System.out.println(pe.getYears());
105		System.out.println(pe.getMonths());
106		System.out.println(pe.getDays());
107	}
108
109	// Instant : 时间戳(使用 Unix元年1970年1月1日 00:00:00 所经历的毫秒值)
110	@Test
111	public void test2(){
112		Instant ins = Instant.now();  //默认使用 UTC 时区
113		System.out.println(ins);
114
115		OffsetDateTime odt = ins.atOffset(ZoneOffset.ofHours(8));
116		System.out.println(odt);
117
118		System.out.println(ins.getNano());
119
120		Instant ins2 = Instant.ofEpochSecond(5);
121		System.out.println(ins2);
122	}
123
124	// LocalDate、LocalTime、LocalDateTime
125	@Test
126	public void test1(){
127		LocalDateTime ldt = LocalDateTime.now();
128		System.out.println(ldt);
129
130		LocalDateTime ld2 = LocalDateTime.of(2016, 11, 21, 10, 10, 10);
131		System.out.println(ld2);
132
133		LocalDateTime ldt3 = ld2.plusYears(20);
134		System.out.println(ldt3);
135
136		LocalDateTime ldt4 = ld2.minusMonths(2);
137		System.out.println(ldt4);
138
139		System.out.println(ldt.getYear());
140		System.out.println(ldt.getMonthValue());
141		System.out.println(ldt.getDayOfMonth());
142		System.out.println(ldt.getHour());
143		System.out.println(ldt.getMinute());
144		System.out.println(ldt.getSecond());
145	}
146}
重复注解与类型注解
Java 8对注解处理提供了两点改进:可重复的注解及可用于类型的注解。
假设现在我有如下注解:
 1import static java.lang.annotation.ElementType.*;
 2
 3import java.lang.annotation.Retention;
 4import java.lang.annotation.RetentionPolicy;
 5import java.lang.annotation.Target;
 6
 7@Target({TYPE, FIELD, METHOD, PARAMETER, CONSTRUCTOR, LOCAL_VARIABLE})
 8@Retention(RetentionPolicy.RUNTIME)
 9public @interface MyAnnotation {
10    String value() default "Tim";
11}
测试如下,像下面这种重复注解是不被允许的:
1package newjdk8.dateapi.annotation;
2
3public class TestAnnotation {
4    @MyAnnotation("AAA")
5    @MyAnnotation("BBB")  // Error!
6    public void show(){
7
8    }
9}
那么如何解决这个问题呢?我们还需要定义一个注解容器:
MyAnnotations.java
 1import java.lang.annotation.Retention;
 2import java.lang.annotation.RetentionPolicy;
 3import java.lang.annotation.Target;
 4
 5import static java.lang.annotation.ElementType.*;
 6import static java.lang.annotation.ElementType.LOCAL_VARIABLE;
 7
 8@Target({TYPE, FIELD, METHOD, PARAMETER, CONSTRUCTOR, LOCAL_VARIABLE})
 9@Retention(RetentionPolicy.RUNTIME)
10public @interface MyAnnotations {
11    MyAnnotation[] value();
12}
MyAnnotation.java
 1import static java.lang.annotation.ElementType.*;
 2
 3import java.lang.annotation.Repeatable;
 4import java.lang.annotation.Retention;
 5import java.lang.annotation.RetentionPolicy;
 6import java.lang.annotation.Target;
 7
 8
 9@Repeatable(MyAnnotations.class) // 指定容器
10@Target({TYPE, FIELD, METHOD, PARAMETER, CONSTRUCTOR, LOCAL_VARIABLE})
11@Retention(RetentionPolicy.RUNTIME)
12public @interface MyAnnotation {
13    String value() default "Tim";
14}
TestAnnotation.java
 1import java.lang.reflect.Method;
 2
 3public class TestAnnotation {
 4    public static void main(String[] args) throws NoSuchMethodException {
 5        Class<TestAnnotation> annotationClass = TestAnnotation.class;
 6        Method method = annotationClass.getMethod("show");
 7        MyAnnotation[] myAnnotations = method.getAnnotationsByType(MyAnnotation.class);
 8        for (MyAnnotation myAnnotation: myAnnotations){
 9            System.out.println(myAnnotation.value());
10        }
11    }
12
13    @MyAnnotation("Hello")
14    @MyAnnotation("World")
15    public void show(){
16
17    }
18}

什么是类型注解呢?Target支持TYPE_PARAMETER,我们通过源码也是可以看到起始于JDK1.8
 1@Repeatable(MyAnnotations.class) // 指定容器
 2@Target({TYPE, FIELD, METHOD, PARAMETER, CONSTRUCTOR, LOCAL_VARIABLE, TYPE_PARAMETER})
 3@Retention(RetentionPolicy.RUNTIME)
 4public @interface MyAnnotation {
 5    String value() default "Tim";
 6}
 7
 8/**
 9 * Type parameter declaration
10 *
11 * @since 1.8
12 */
13TYPE_PARAMETER
那么就可以对类型进行注解: